Castella Cake + Whipped Cream = Korean Bakery Cake

IMG_0623

My youngest just had a birthday and the baby in our family has turned a whopping 3 years old!  It’s hard to believe that this spunky little “baby” is already a little human-in-training: walking, running, eating like there’s no tomorrow, talking, and asking the most annoying question in the cutest little voice, “why?” on repeat, constantly, like a broken record. I love this little person so much and enjoyed a little moment of nostalgia this morning as I held her asleep in my arms; her warm, snuggle-y little body resting against my chest in a deep, sweet slumber.  I didn’t want to move until I finally accepted the reality that it was time to pick up my #2 from preschool and hoped that I might be successful in transferring my sleeping “baby” to her carseat without waking her so it could count for her nap for the day.  She has always been pretty good at transferring and continued to sleep until we got to big sis’s school, so thankfully, we didn’t have a cranky 3 yr old throwing tantrums left and right due to an inadequate nap tonight.

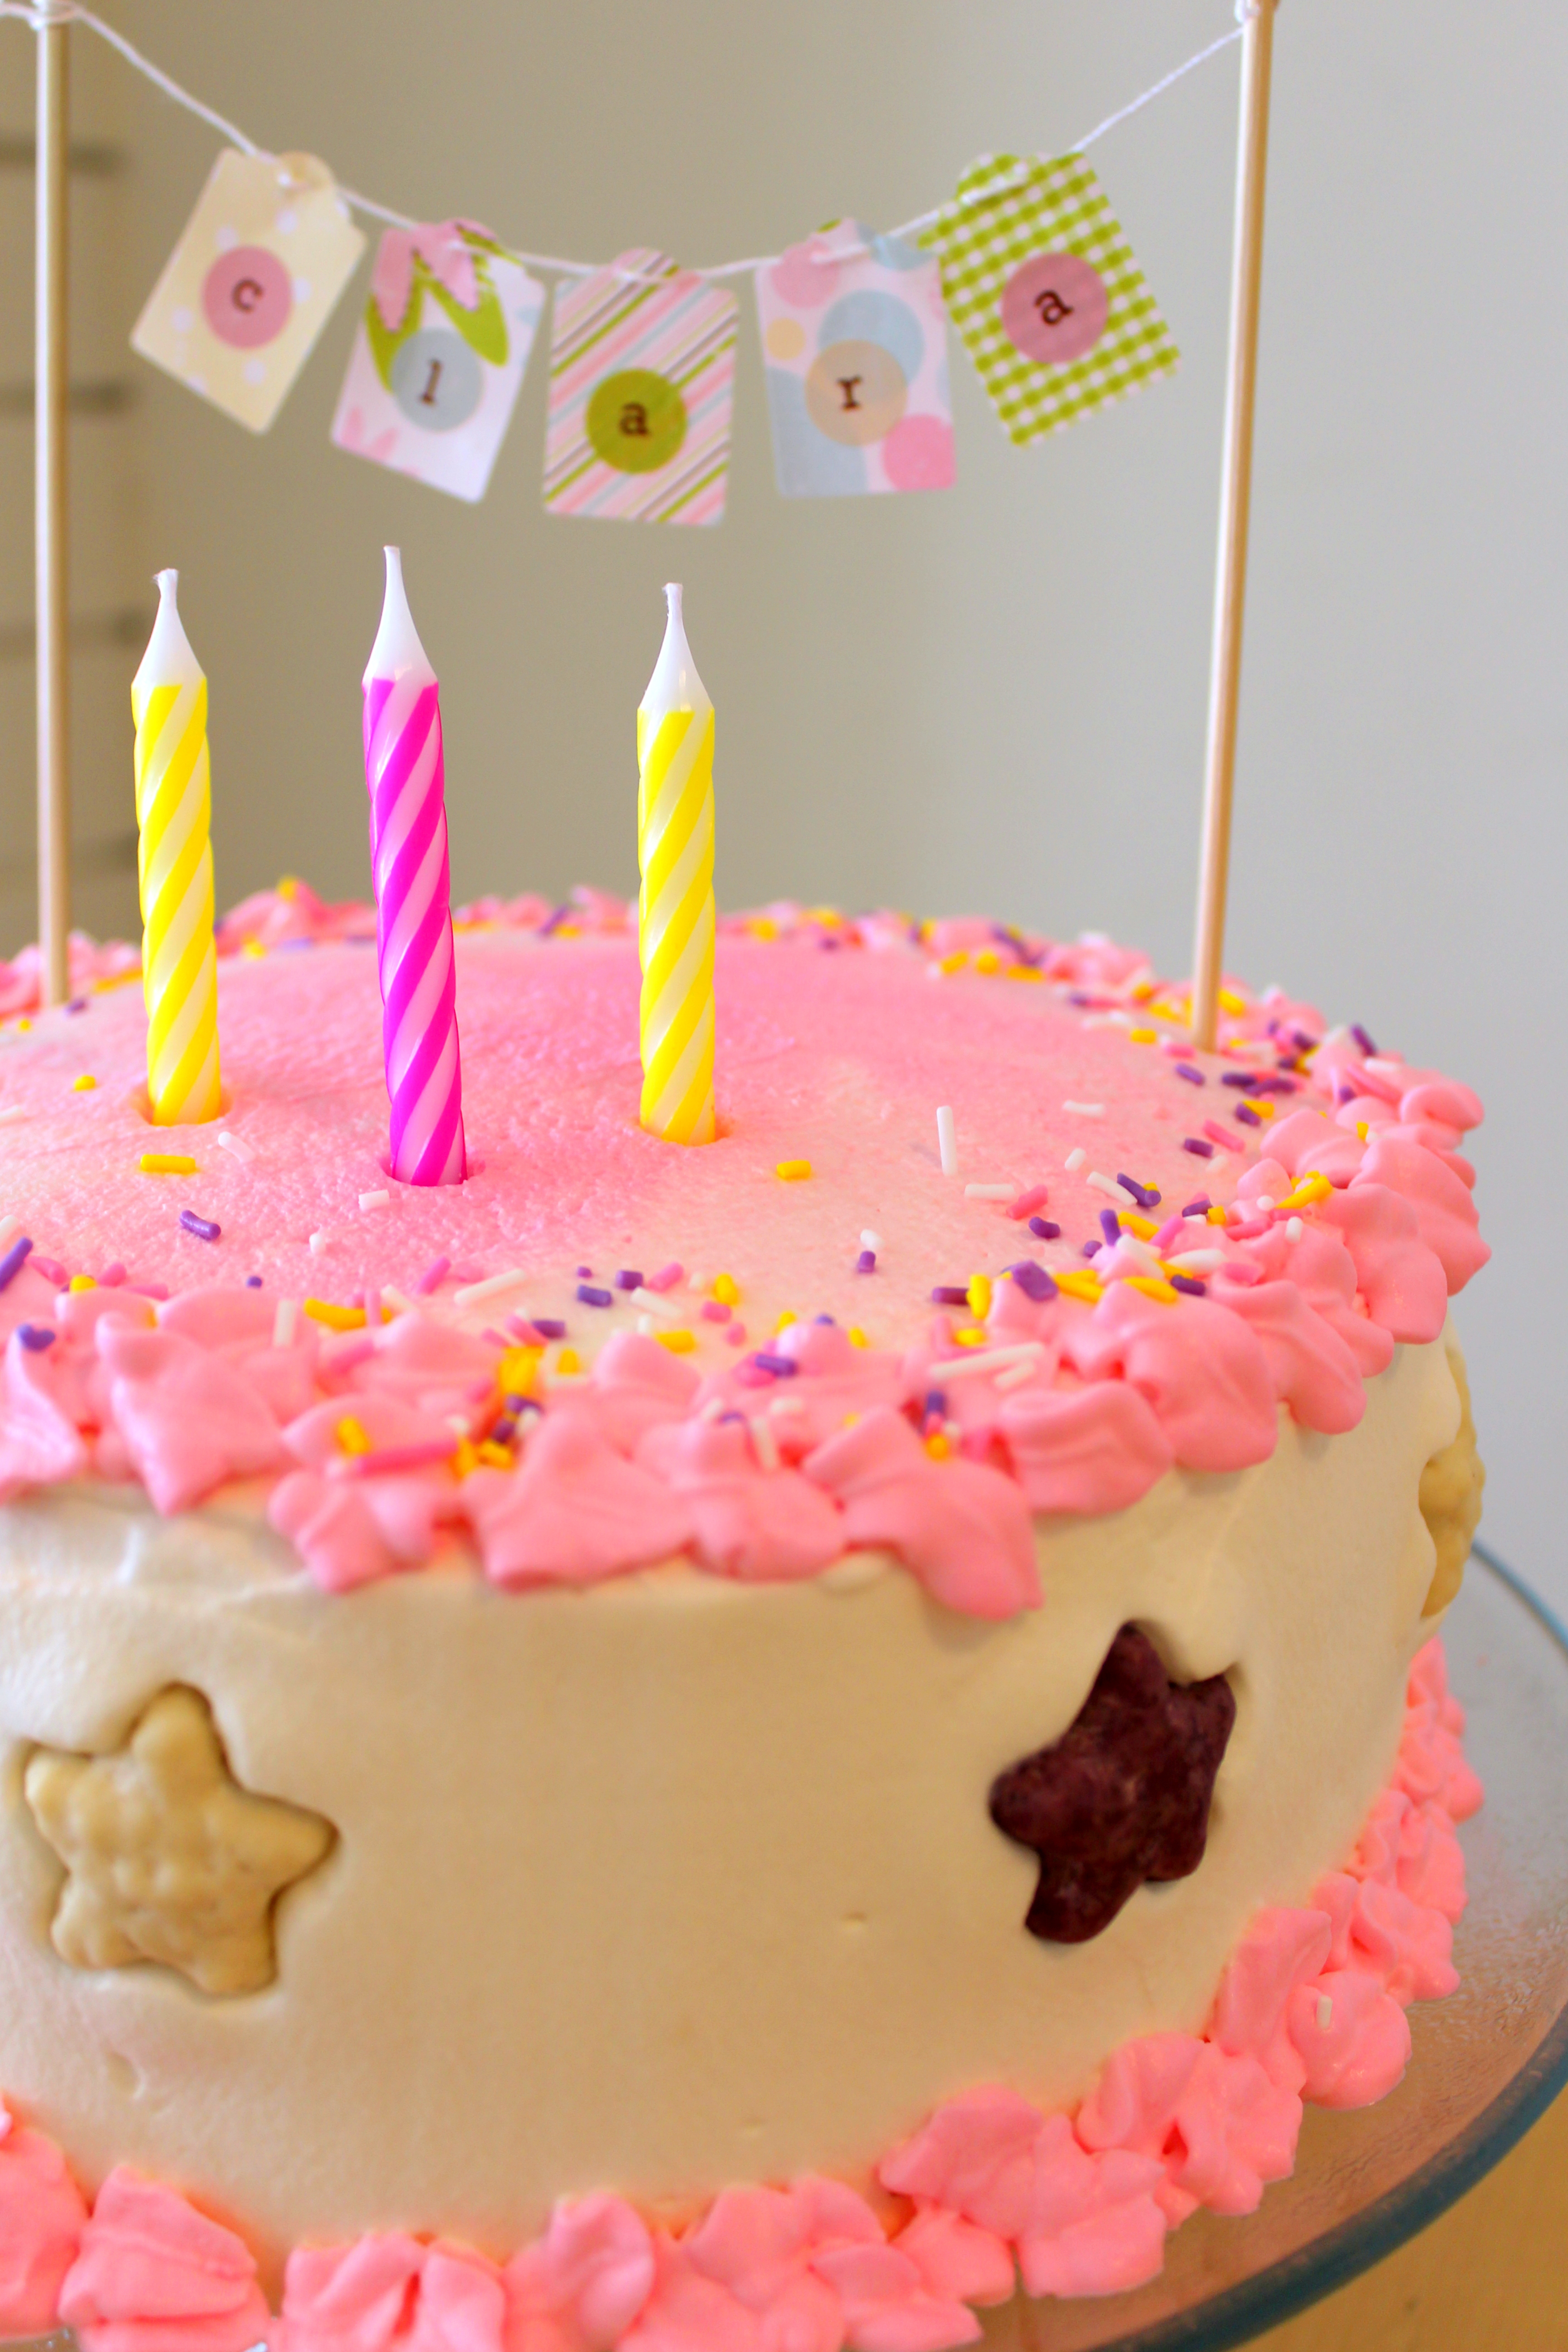
Months before my little C’s birthday, her two older siblings had already started planning her birthday party, including the theme, colors, cake, and friends to invite, when I hadn’t the tiniest inkling of throwing a big party for my 3 year old.  Perhaps it’s her fateful lineup as the youngest of the three children in the family, because I do recall throwing a big party for my first on his 3rd birthday, and a smaller party for my second on her 3rd as well… This time with my third child, I thought, I’ll invite a few of her friends over for a little playdate and make a special day for her, which I hope to accomplish this week…I hope. But rest assured, we did have a family birthday party for my little pup with a special dinner, cake, presents, and even invited grandma, her favorite person!

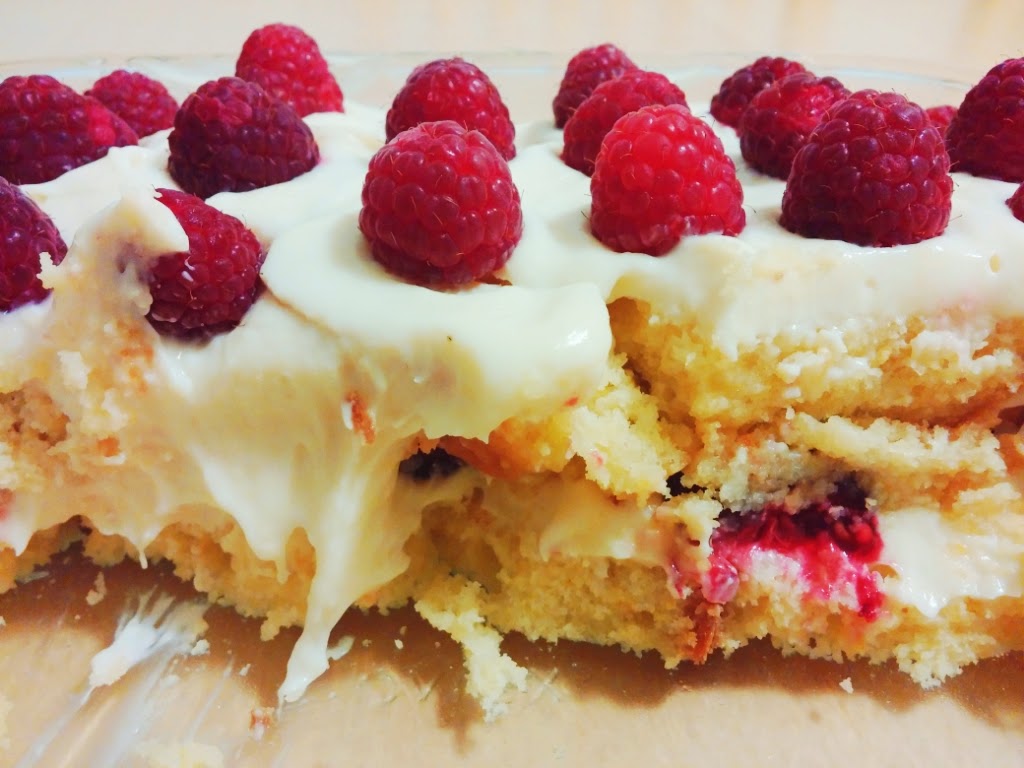
Now on to the cake!  Korean bakery cakes with their light, sponge cake layers frosted with fresh whipped cream and decorated with a variety of colorful fruit nestled into more mounds of cream all covered with a little shaving of chocolate, are one of my favorite cakes.  It might top a deep dark chocolate cake with dark chocolate frosting on certain days.  When I got into baking, one of my first recipe quests was to find that right sponge cake to make one of those Asian bakery copycat cakes.  I’ve tried a variety of sponge cakes, with and without soaking cake layers in sugar syrup, and none of them made the cut… until I figured out I could use this Castella recipe to make my fresh cream cake.  And it is perfect!  You don’t need any sugar syrup to soak the cake layers and you don’t get dry cake when you don’t use the sugar syrup.  What you do get is a beautiful, soft, moist, yet well structured sponge cake that tastes just right with the fresh whipped cream I like to slather on to turn it into a cake.  Castella is normally a popular Japanese cake (with Portuguese roots); it’s not frosted but is baked in a square or rectangle, chilled, sliced, and eaten with a cup of tea or milk.  You can use this recipe to do just that by baking it in a square pan OR you can bake it in two 8″ round cake pans to make a layered cake even better than the ones at the Korean bakeries!

Recently Updated3

Prep: Grease and line your cake pans, sift your cake flour, microwave the milk, mirin, and butter.

IMG_20150509_074916

Separate your eggs, place 8 yolks in mixer bowl and set the whites aside.

IMG_20150509_075744

Whisk the yolks with sugar, honey, and salt until pale yellow and ribbons fall when you lift the whisk. Set aside.

IMG_20150509_080405

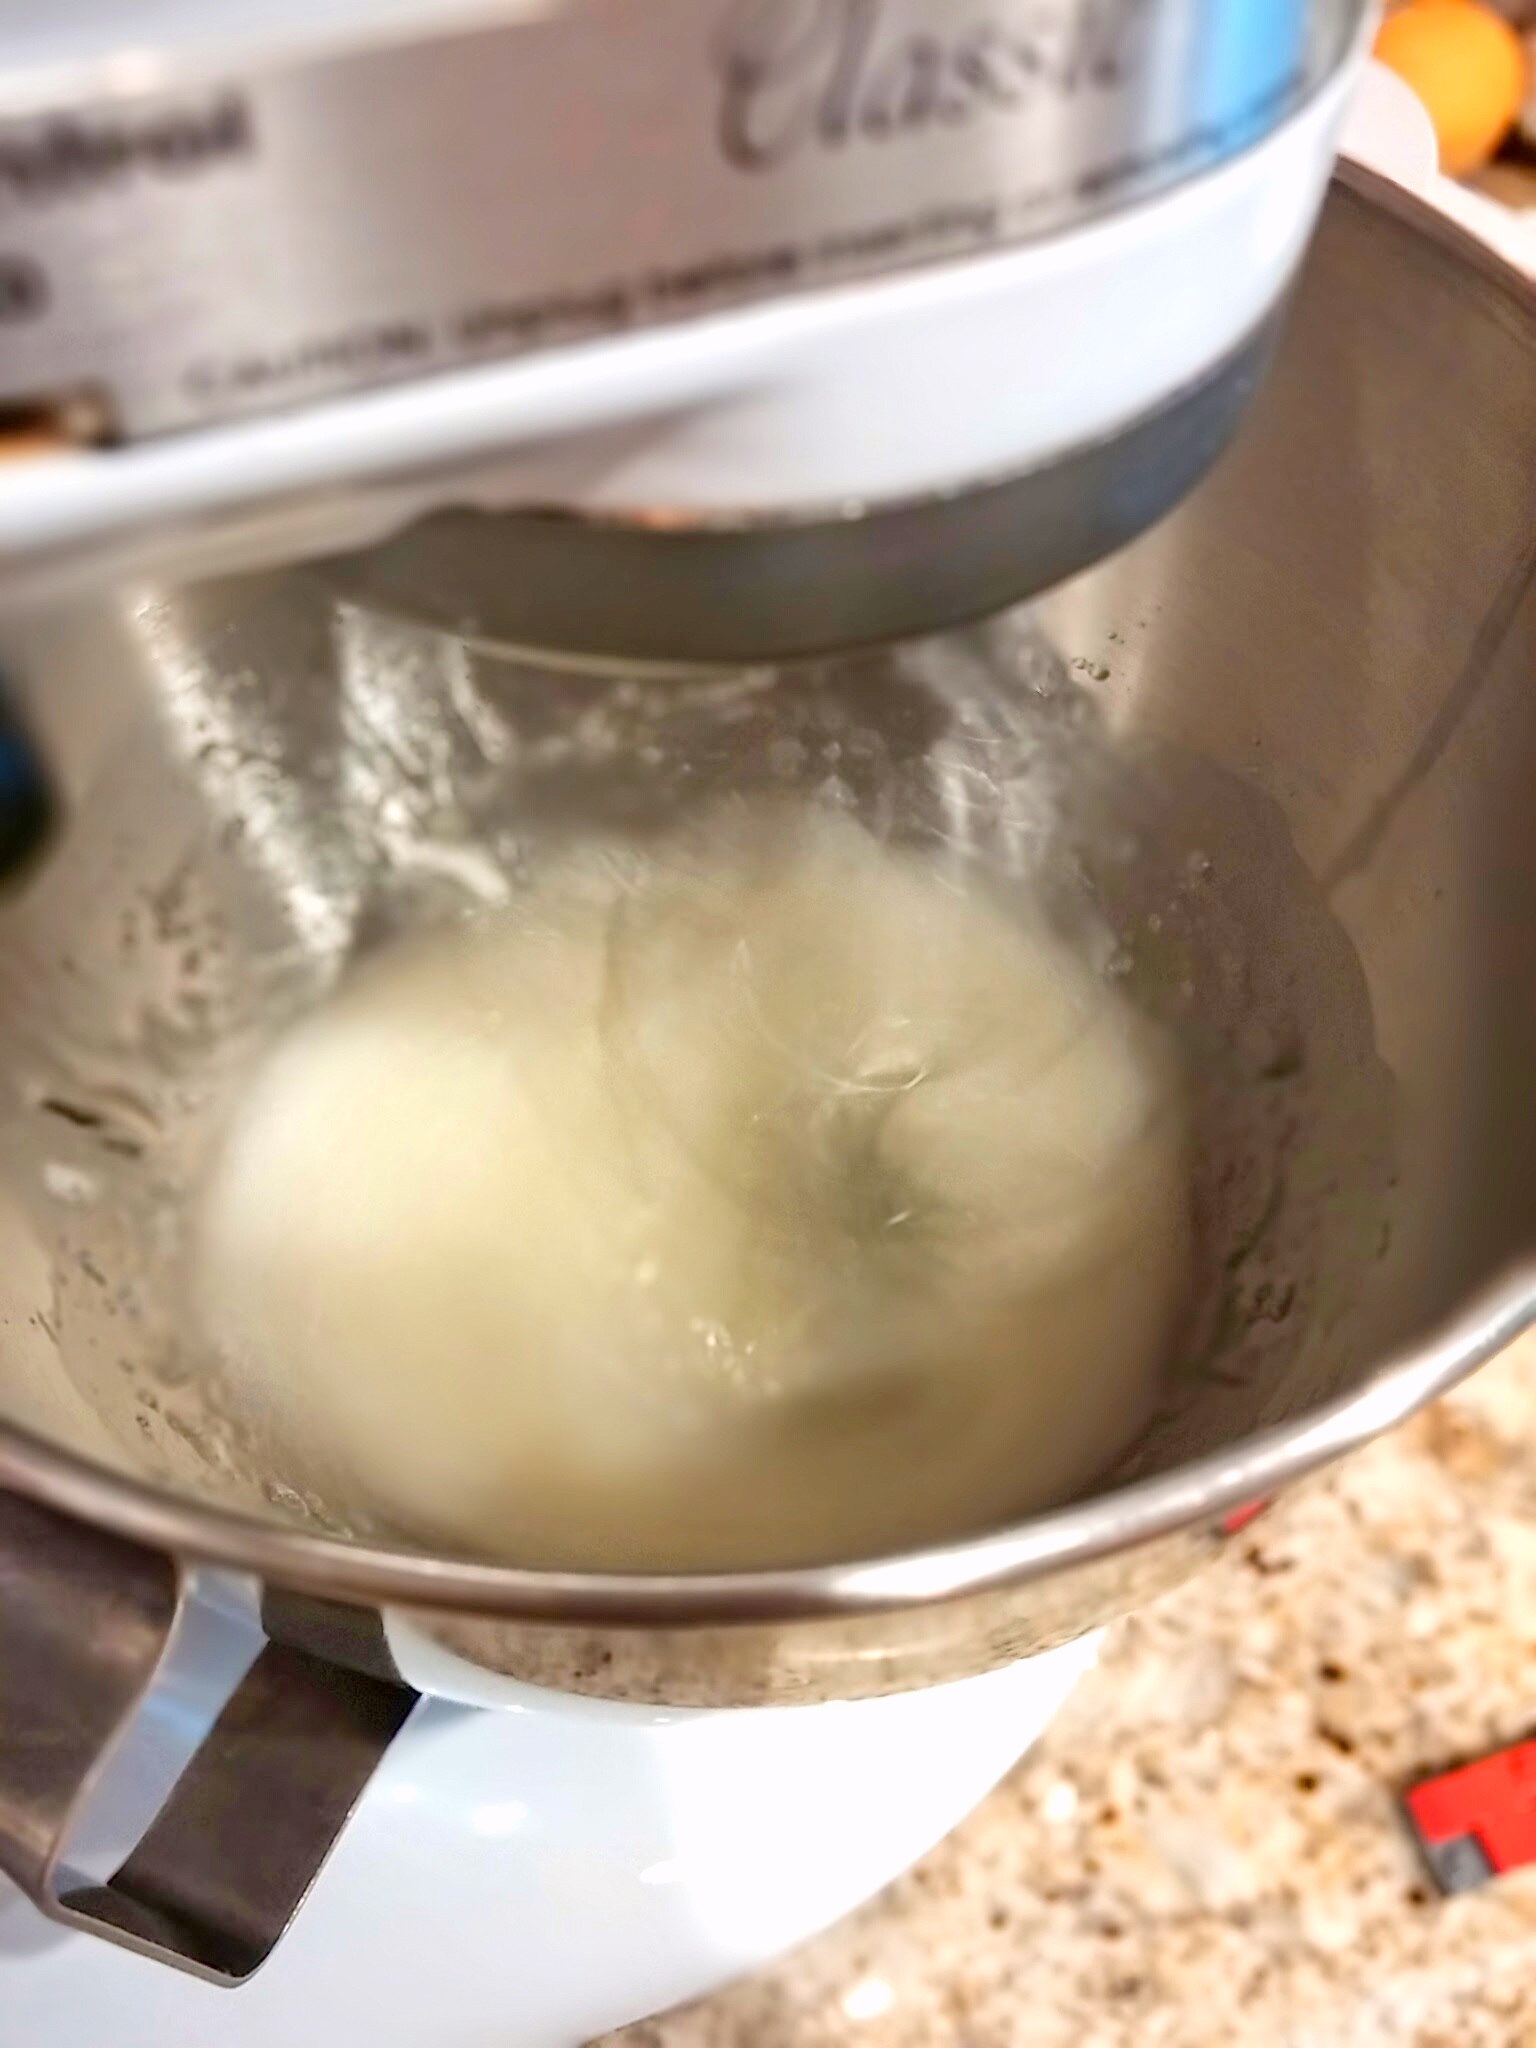
Whisk the only 1/2 cup of the egg whites in a clean and dry mixer bowl with clean and dry whisk attachment

IMG_20150509_080445

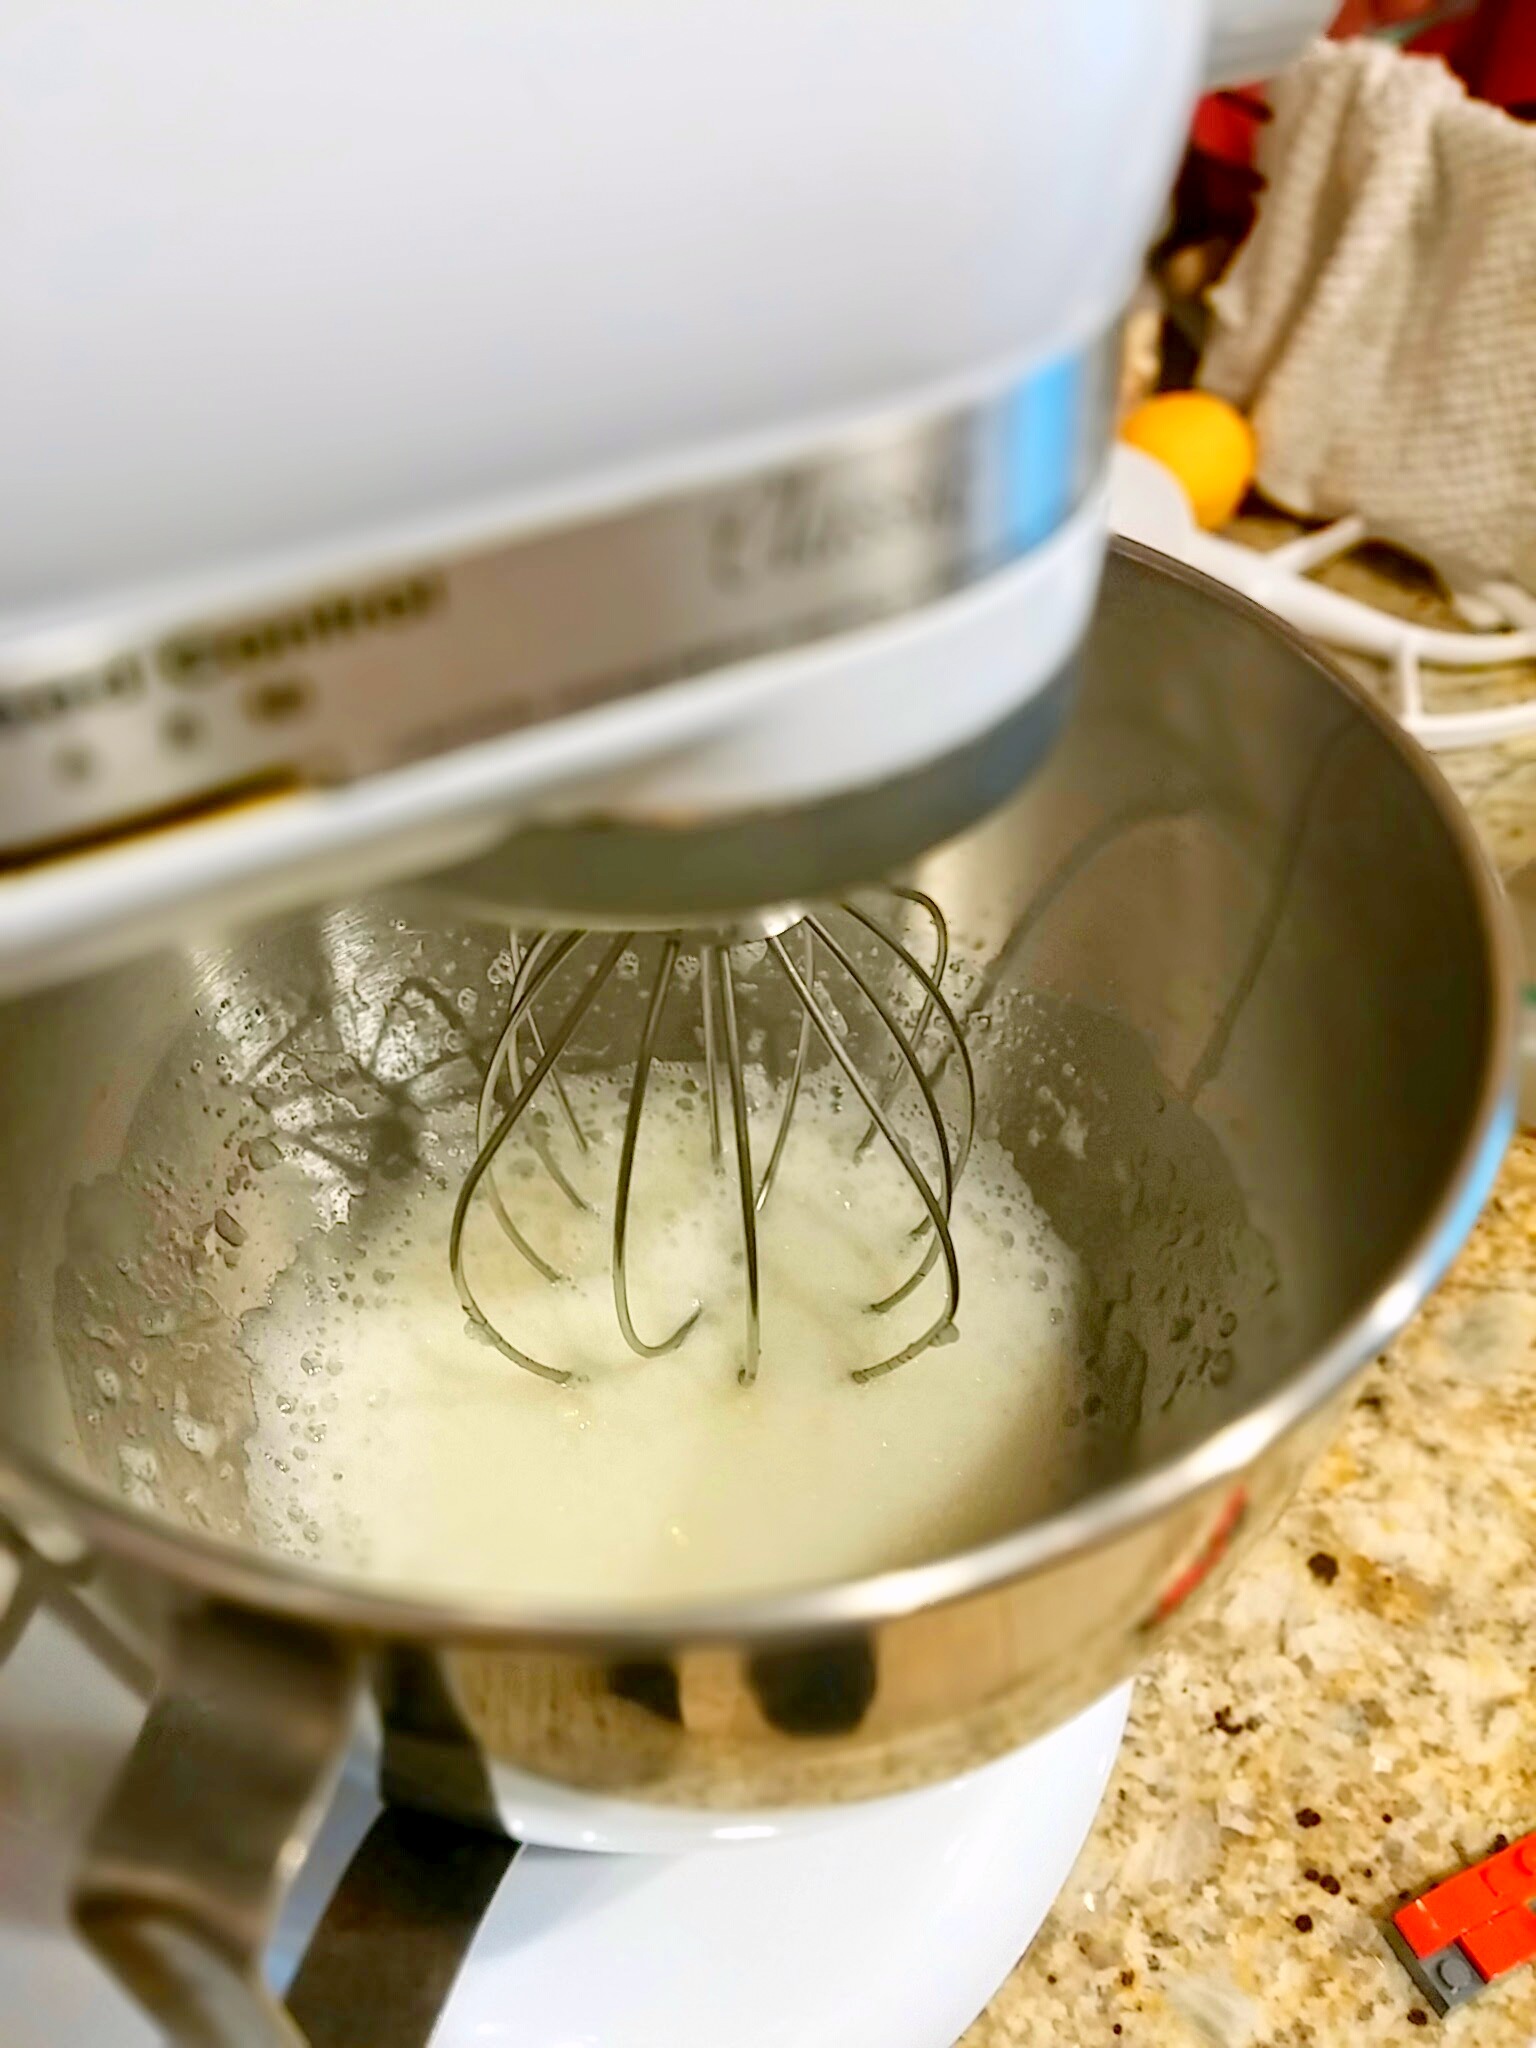
Add sugar when it starts to foam.

IMG_20150509_080727

Whisk the egg whites until soft peaks form. Lift your whisk and the peak should gently fall over.

IMG_20150509_080842

Add a third of the whites into the yolk mixture, gently fold in, fold in half of the cake flour, gently fold in, then repeat ending with the remaining egg whites.

IMG_20150509_081222

Add a big dollop of the cake batter into the melted milk, mirin, and butter mixture and mix. Pour it into the cake batter and gently fold in.

IMG_20150509_081357

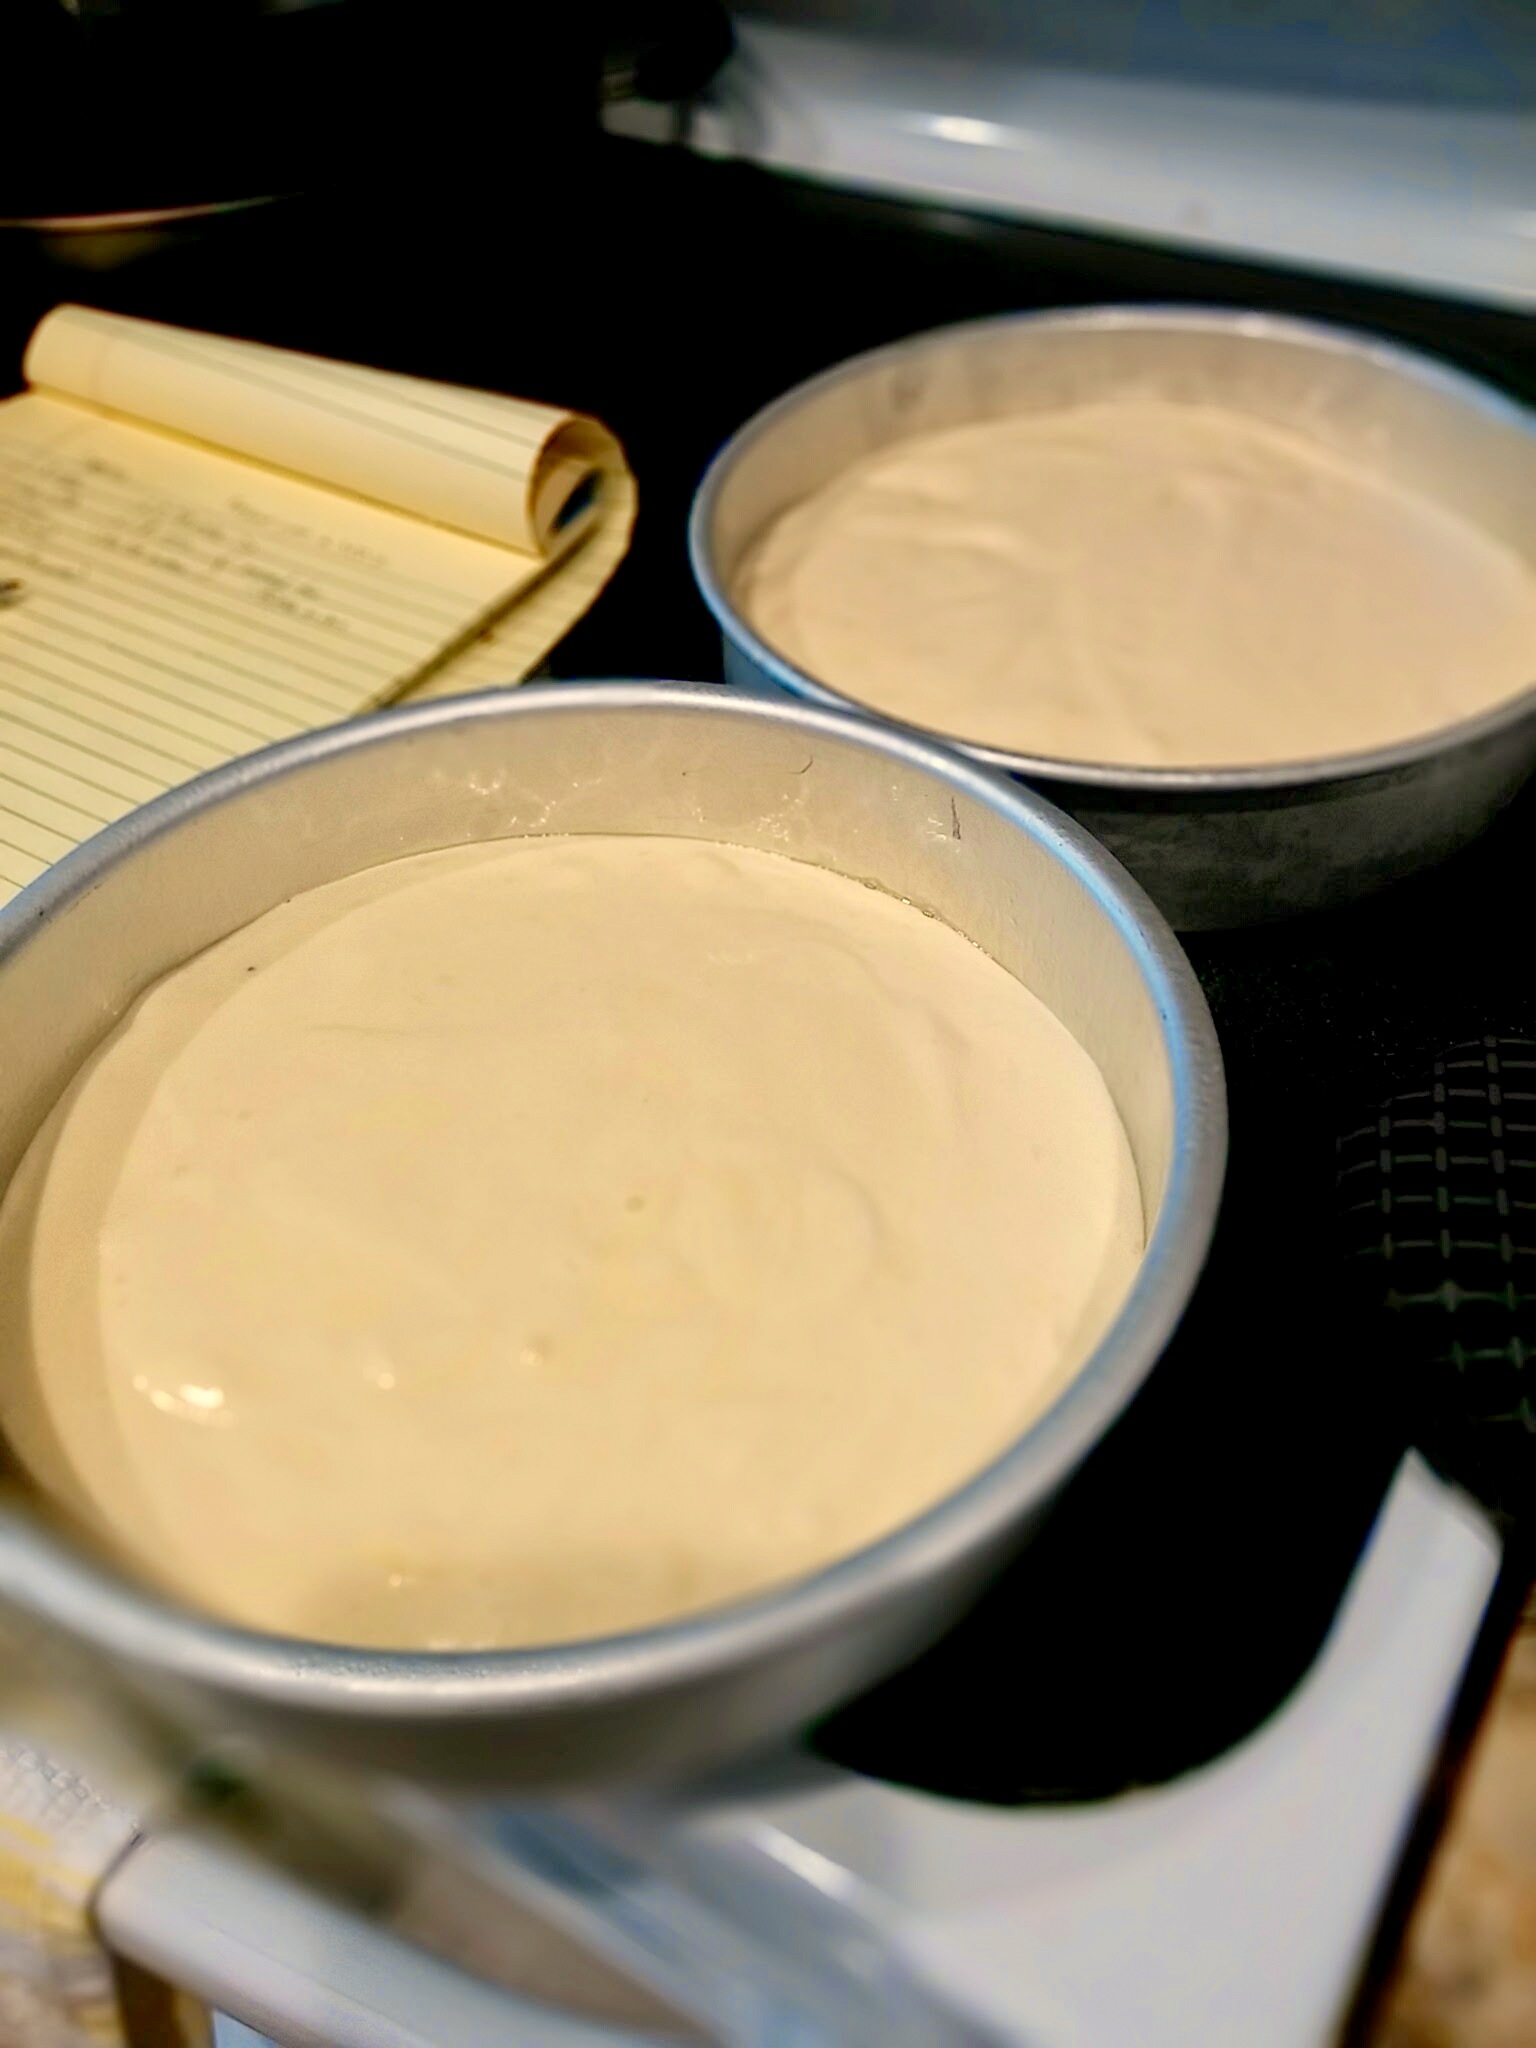
Pour batter into prepared cake pans and drop onto the counter several times.

IMG_20150509_083853

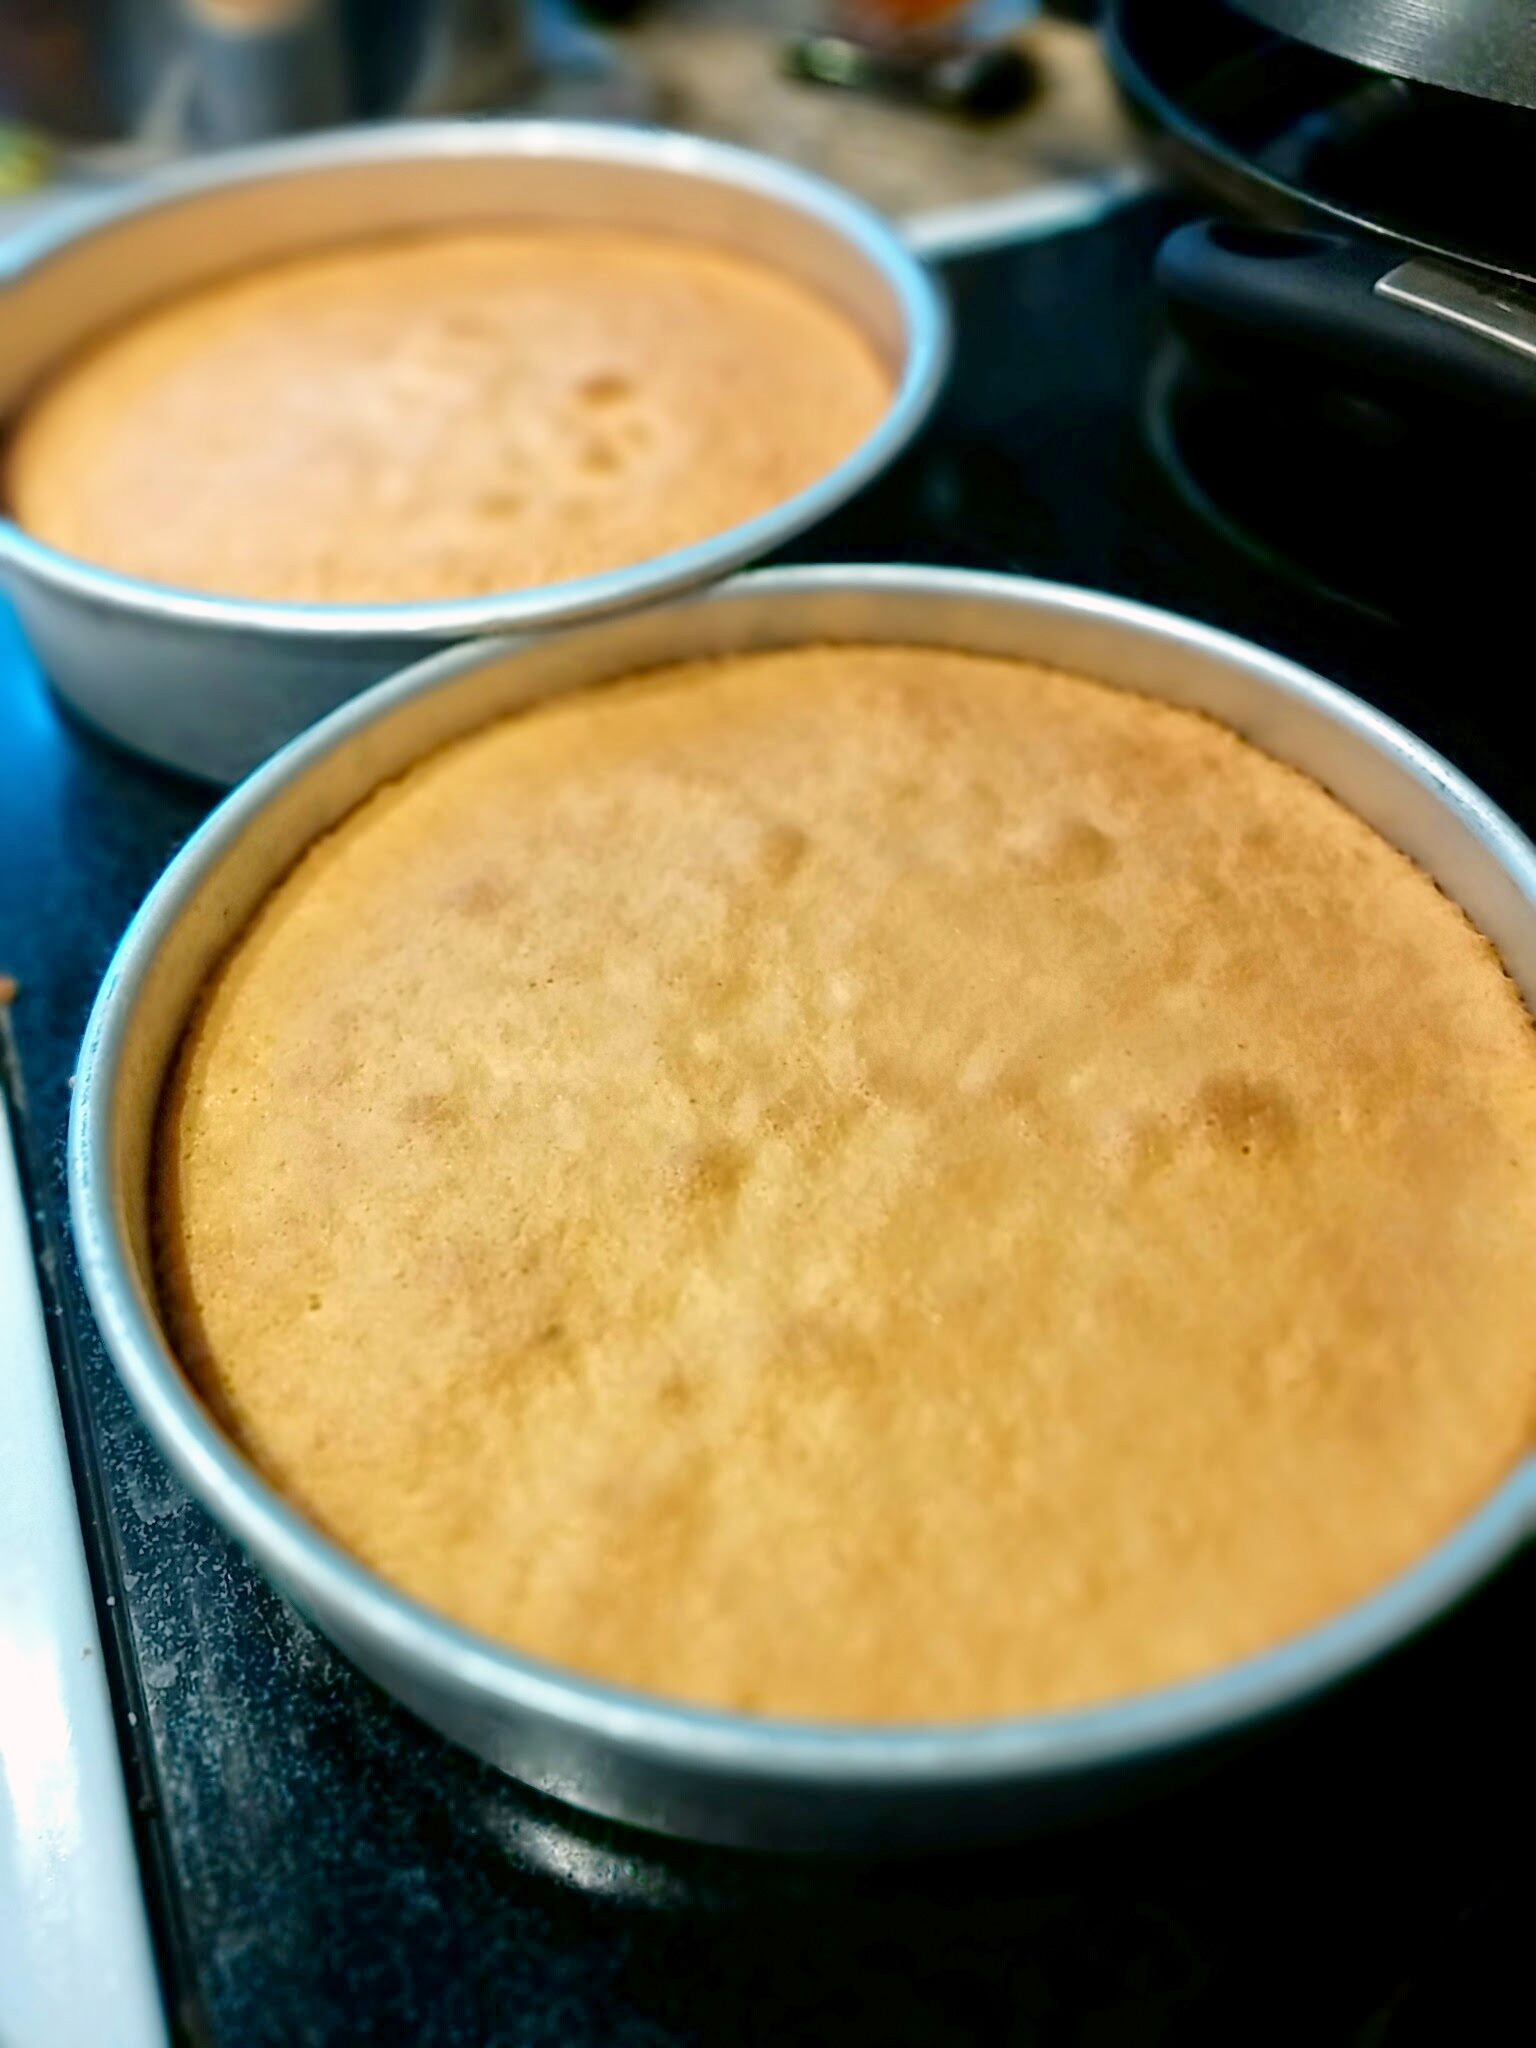
Bake 350°F for 10 mins then lower heat to 335°F and bake for another 15 mins

IMG_20150509_134704

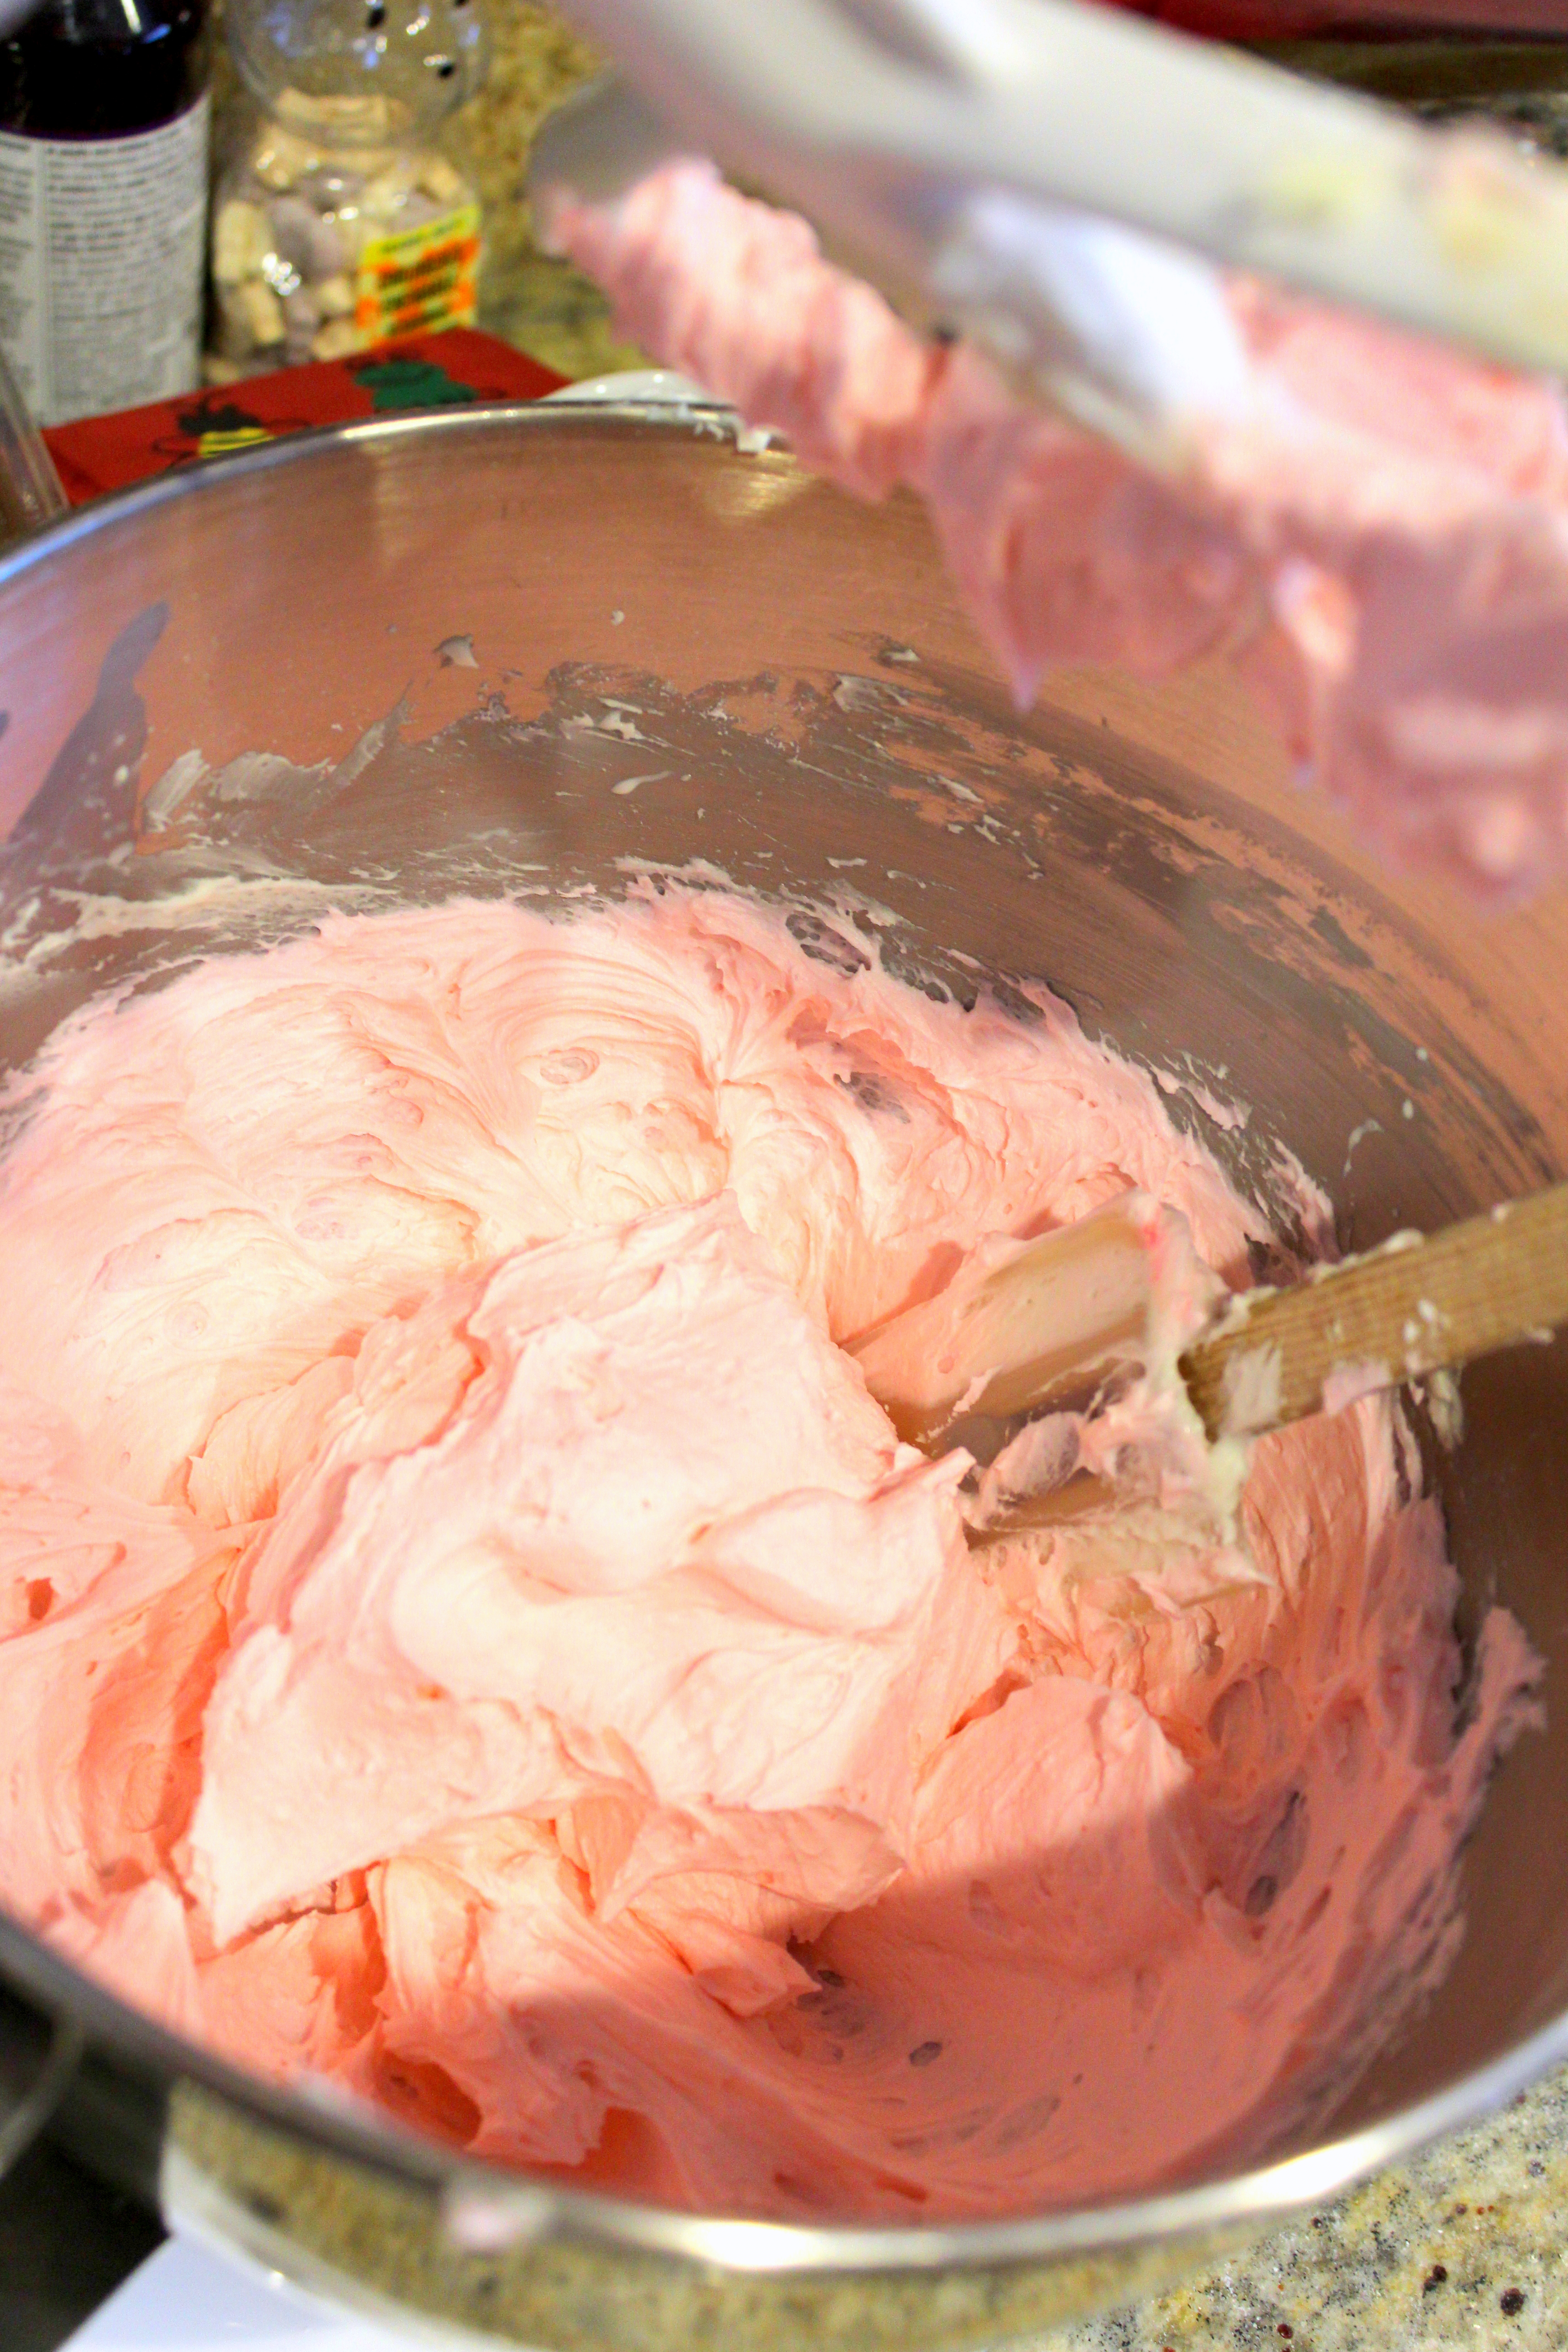
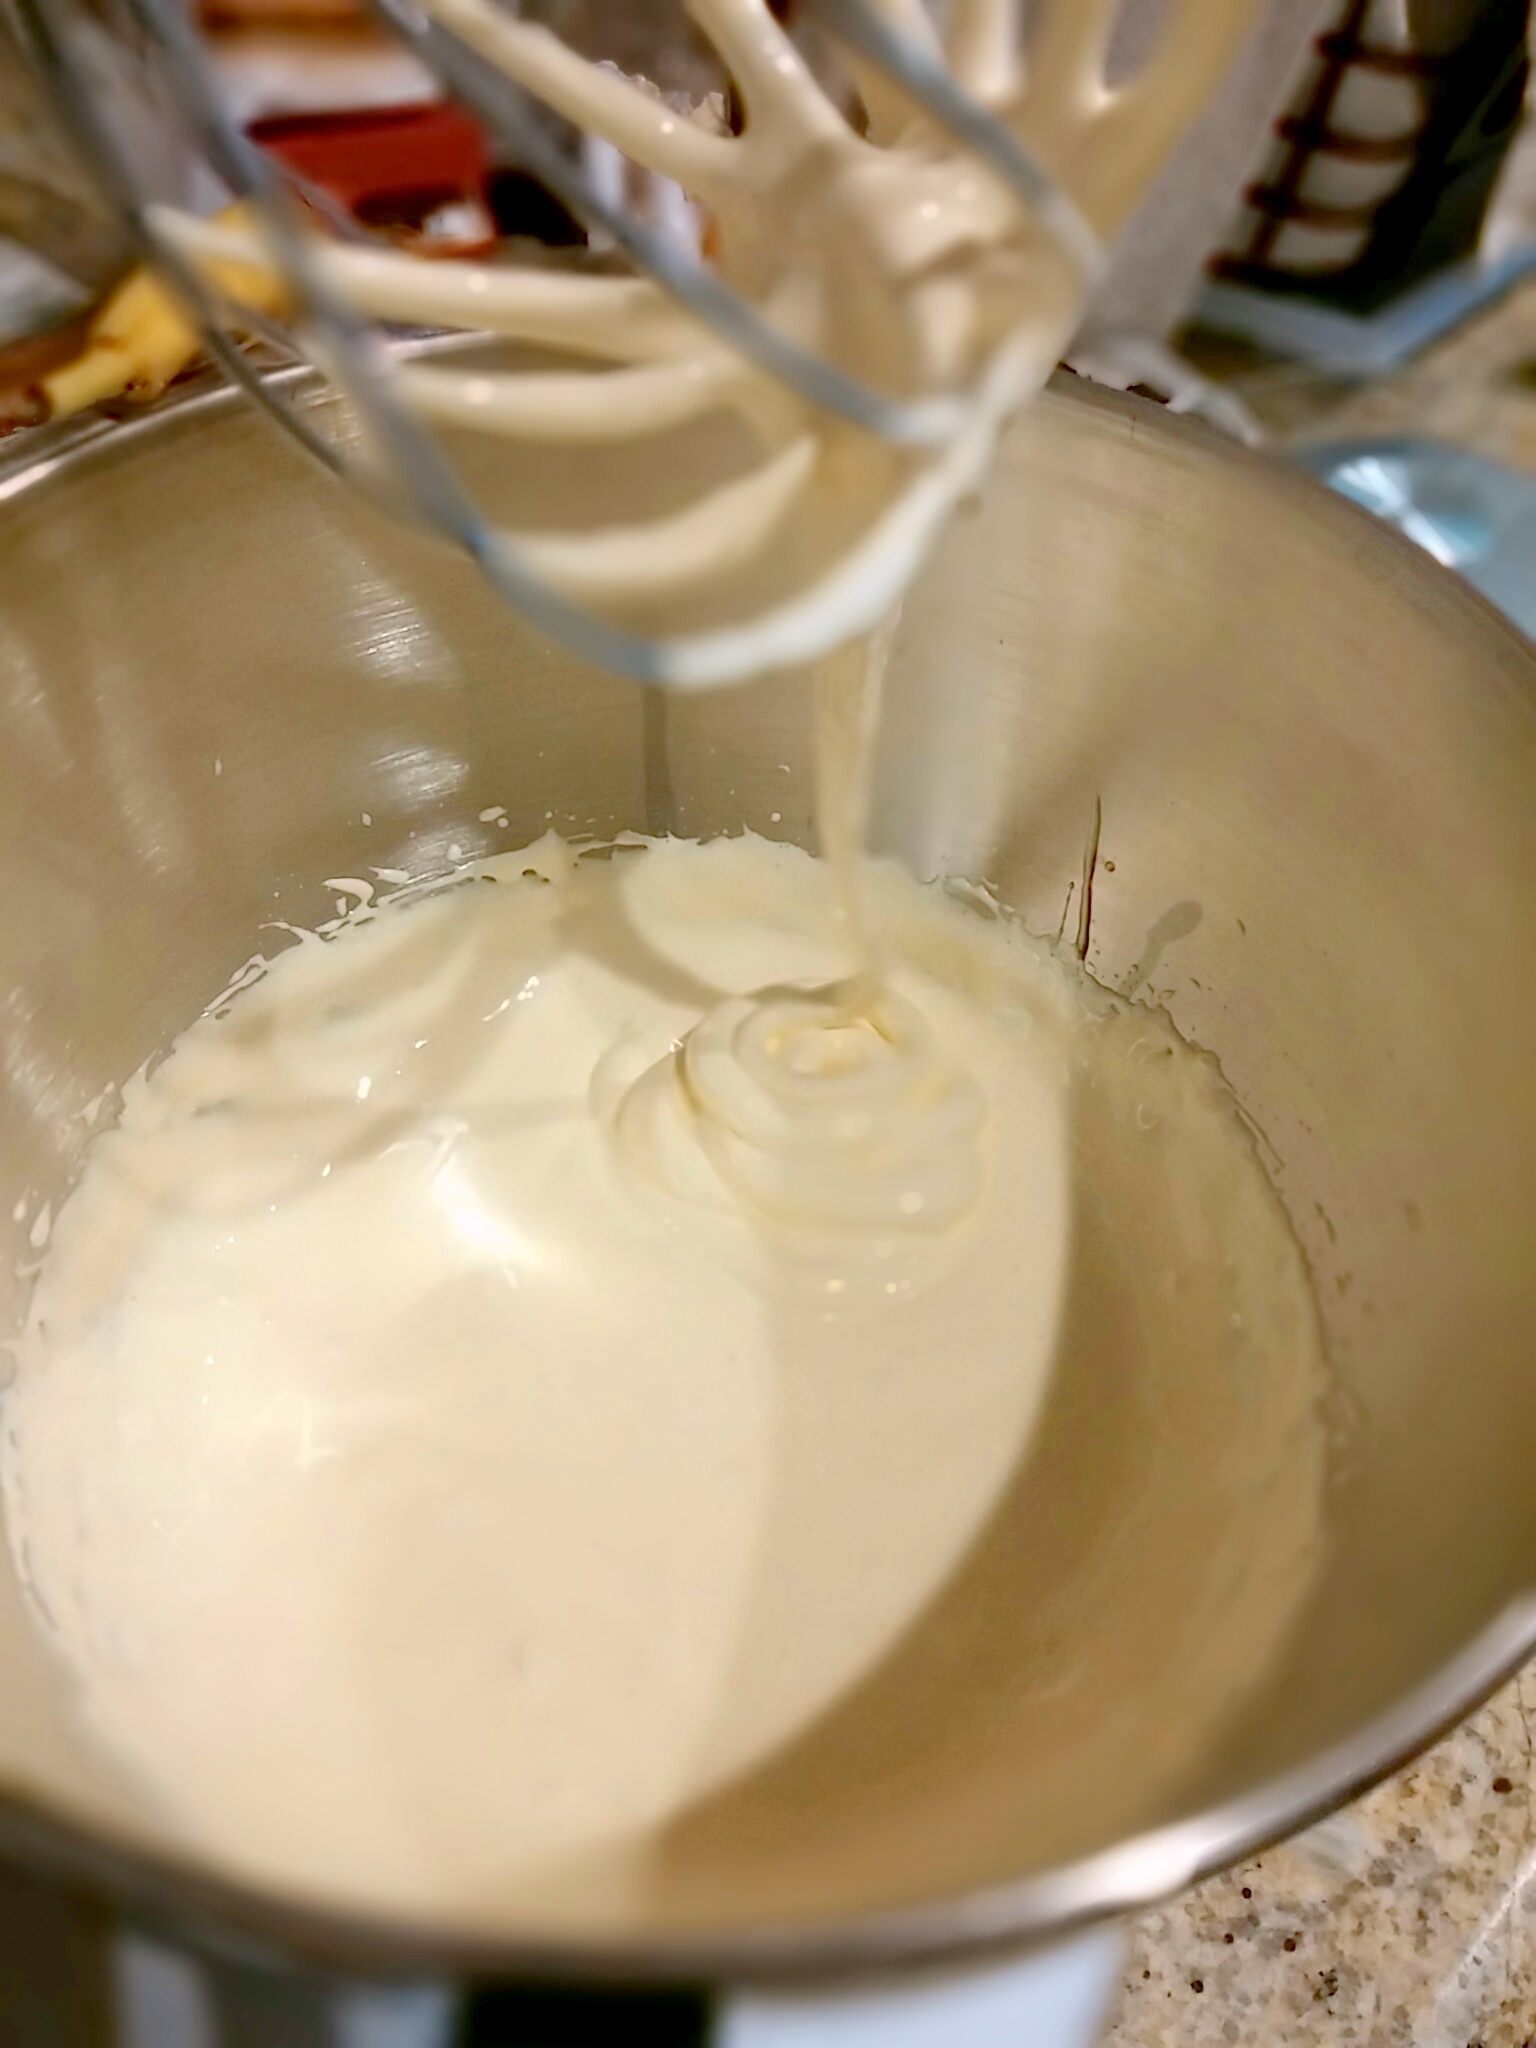
Whip your cream and add sugar and vanilla. Whip until soft peaks form

IMG_20150509_135451

To make lemon whipped cream filling, fold 1/2 cup of lemon curd to 1½ cups of the whipped cream in a separate bowl

IMG_20150509_135636

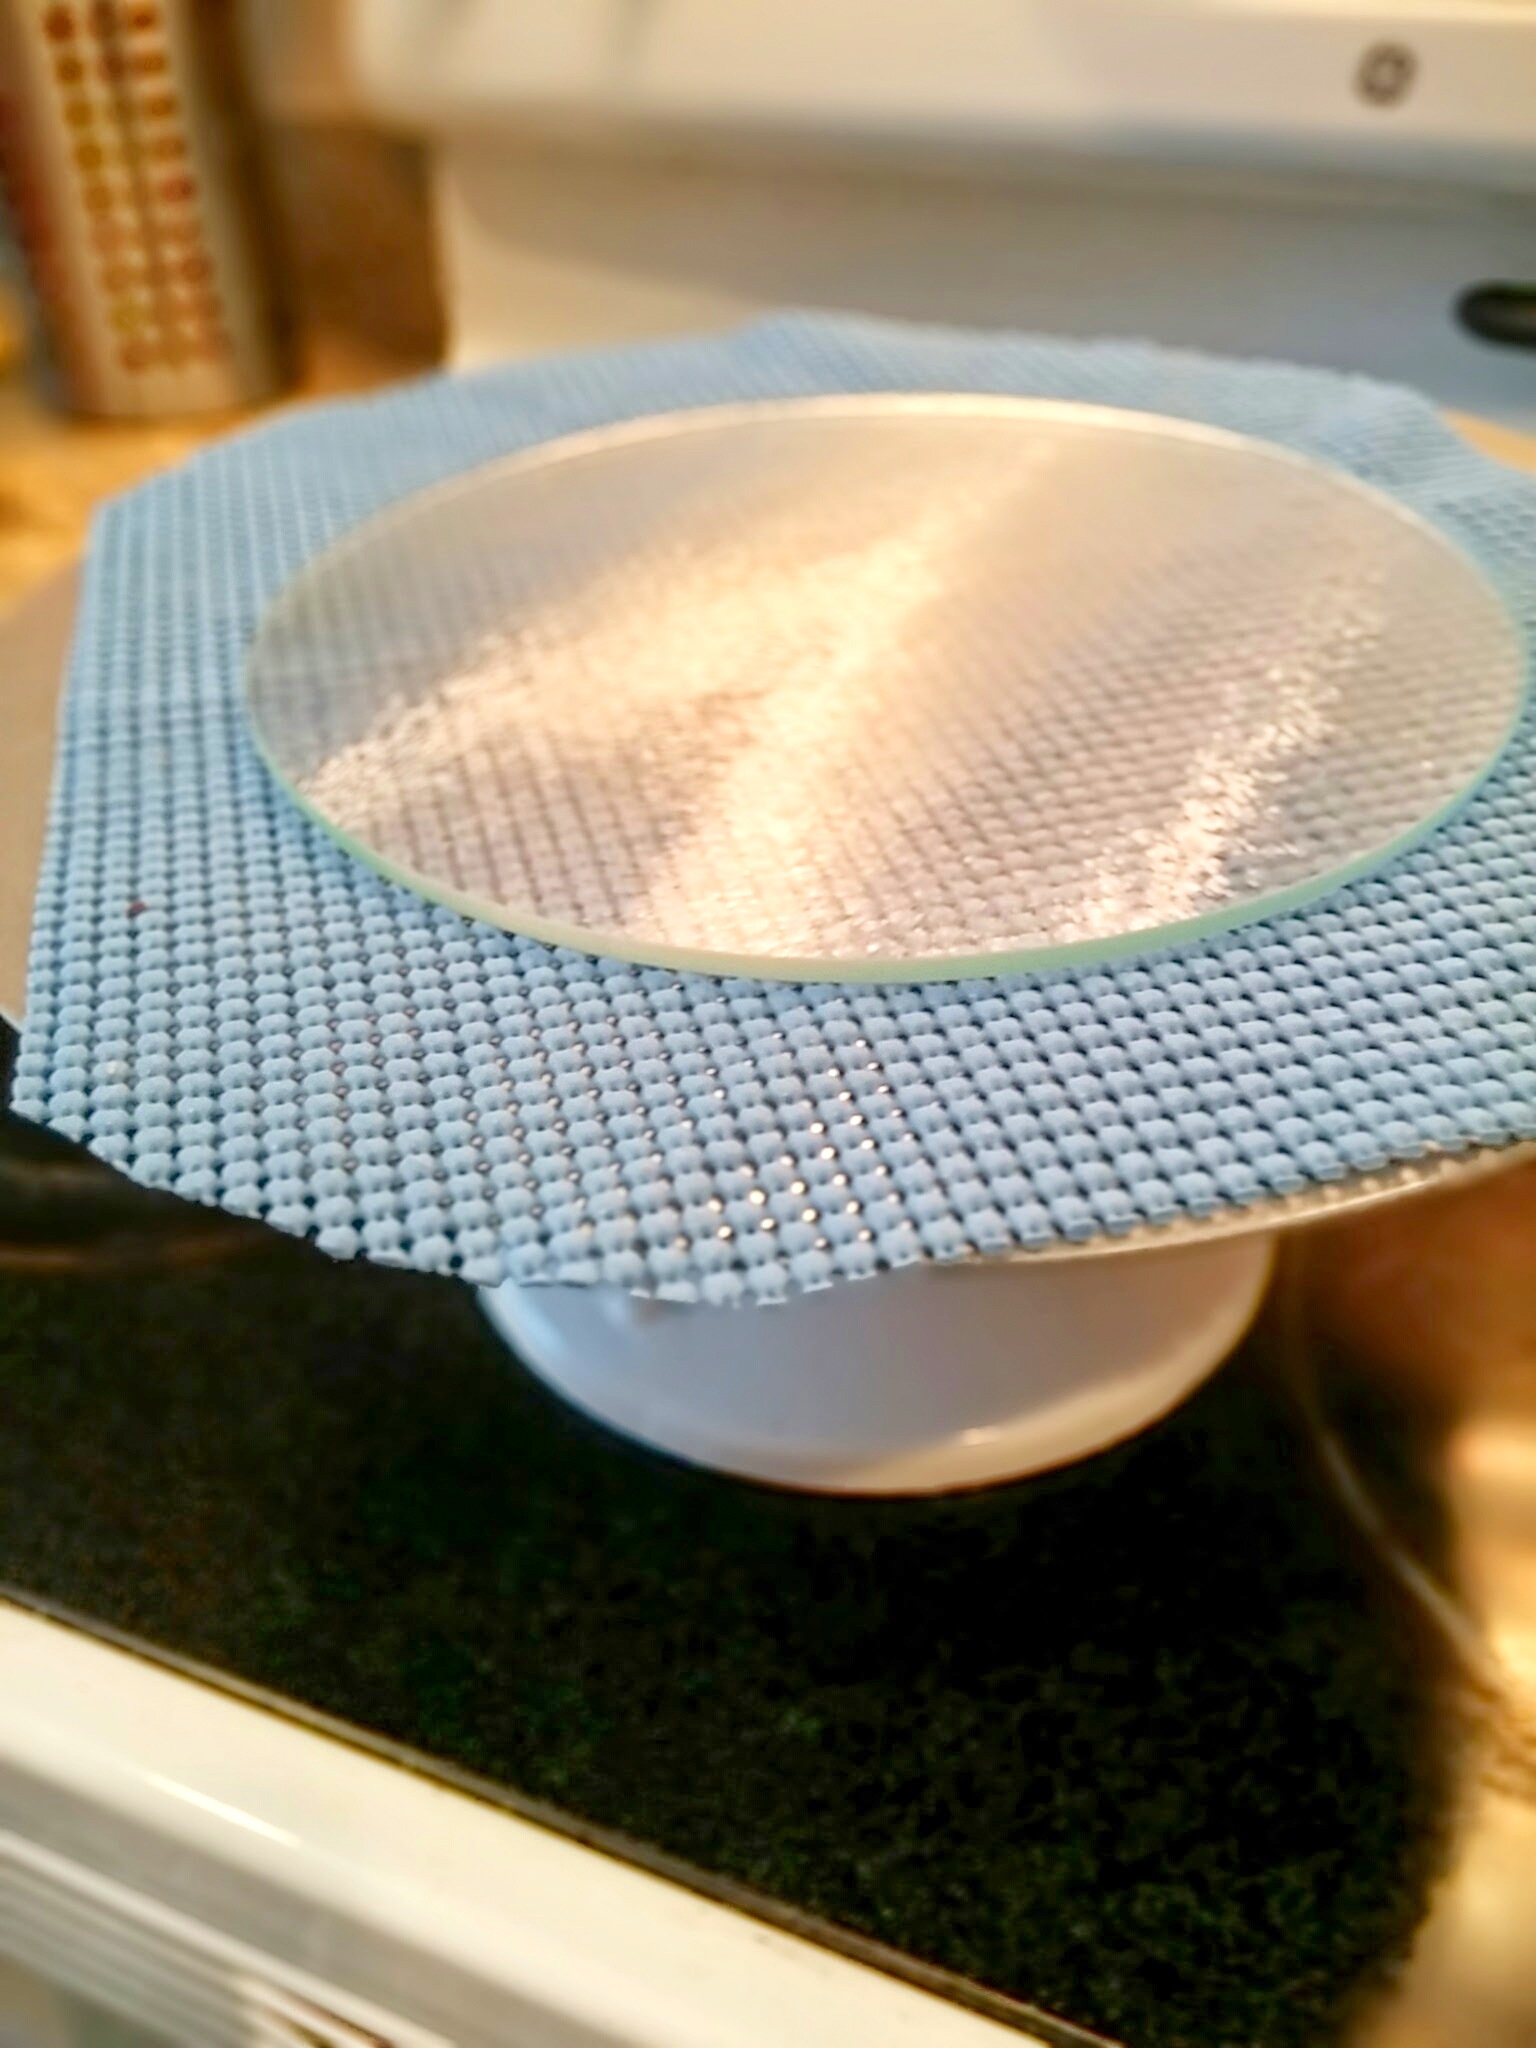
I got that glass round from the dollar store and it’s a perfect 8″! I think it’s actually a cutting board. And using a nonskid mat works wonders when decorating a cake.

IMG_20150509_135821

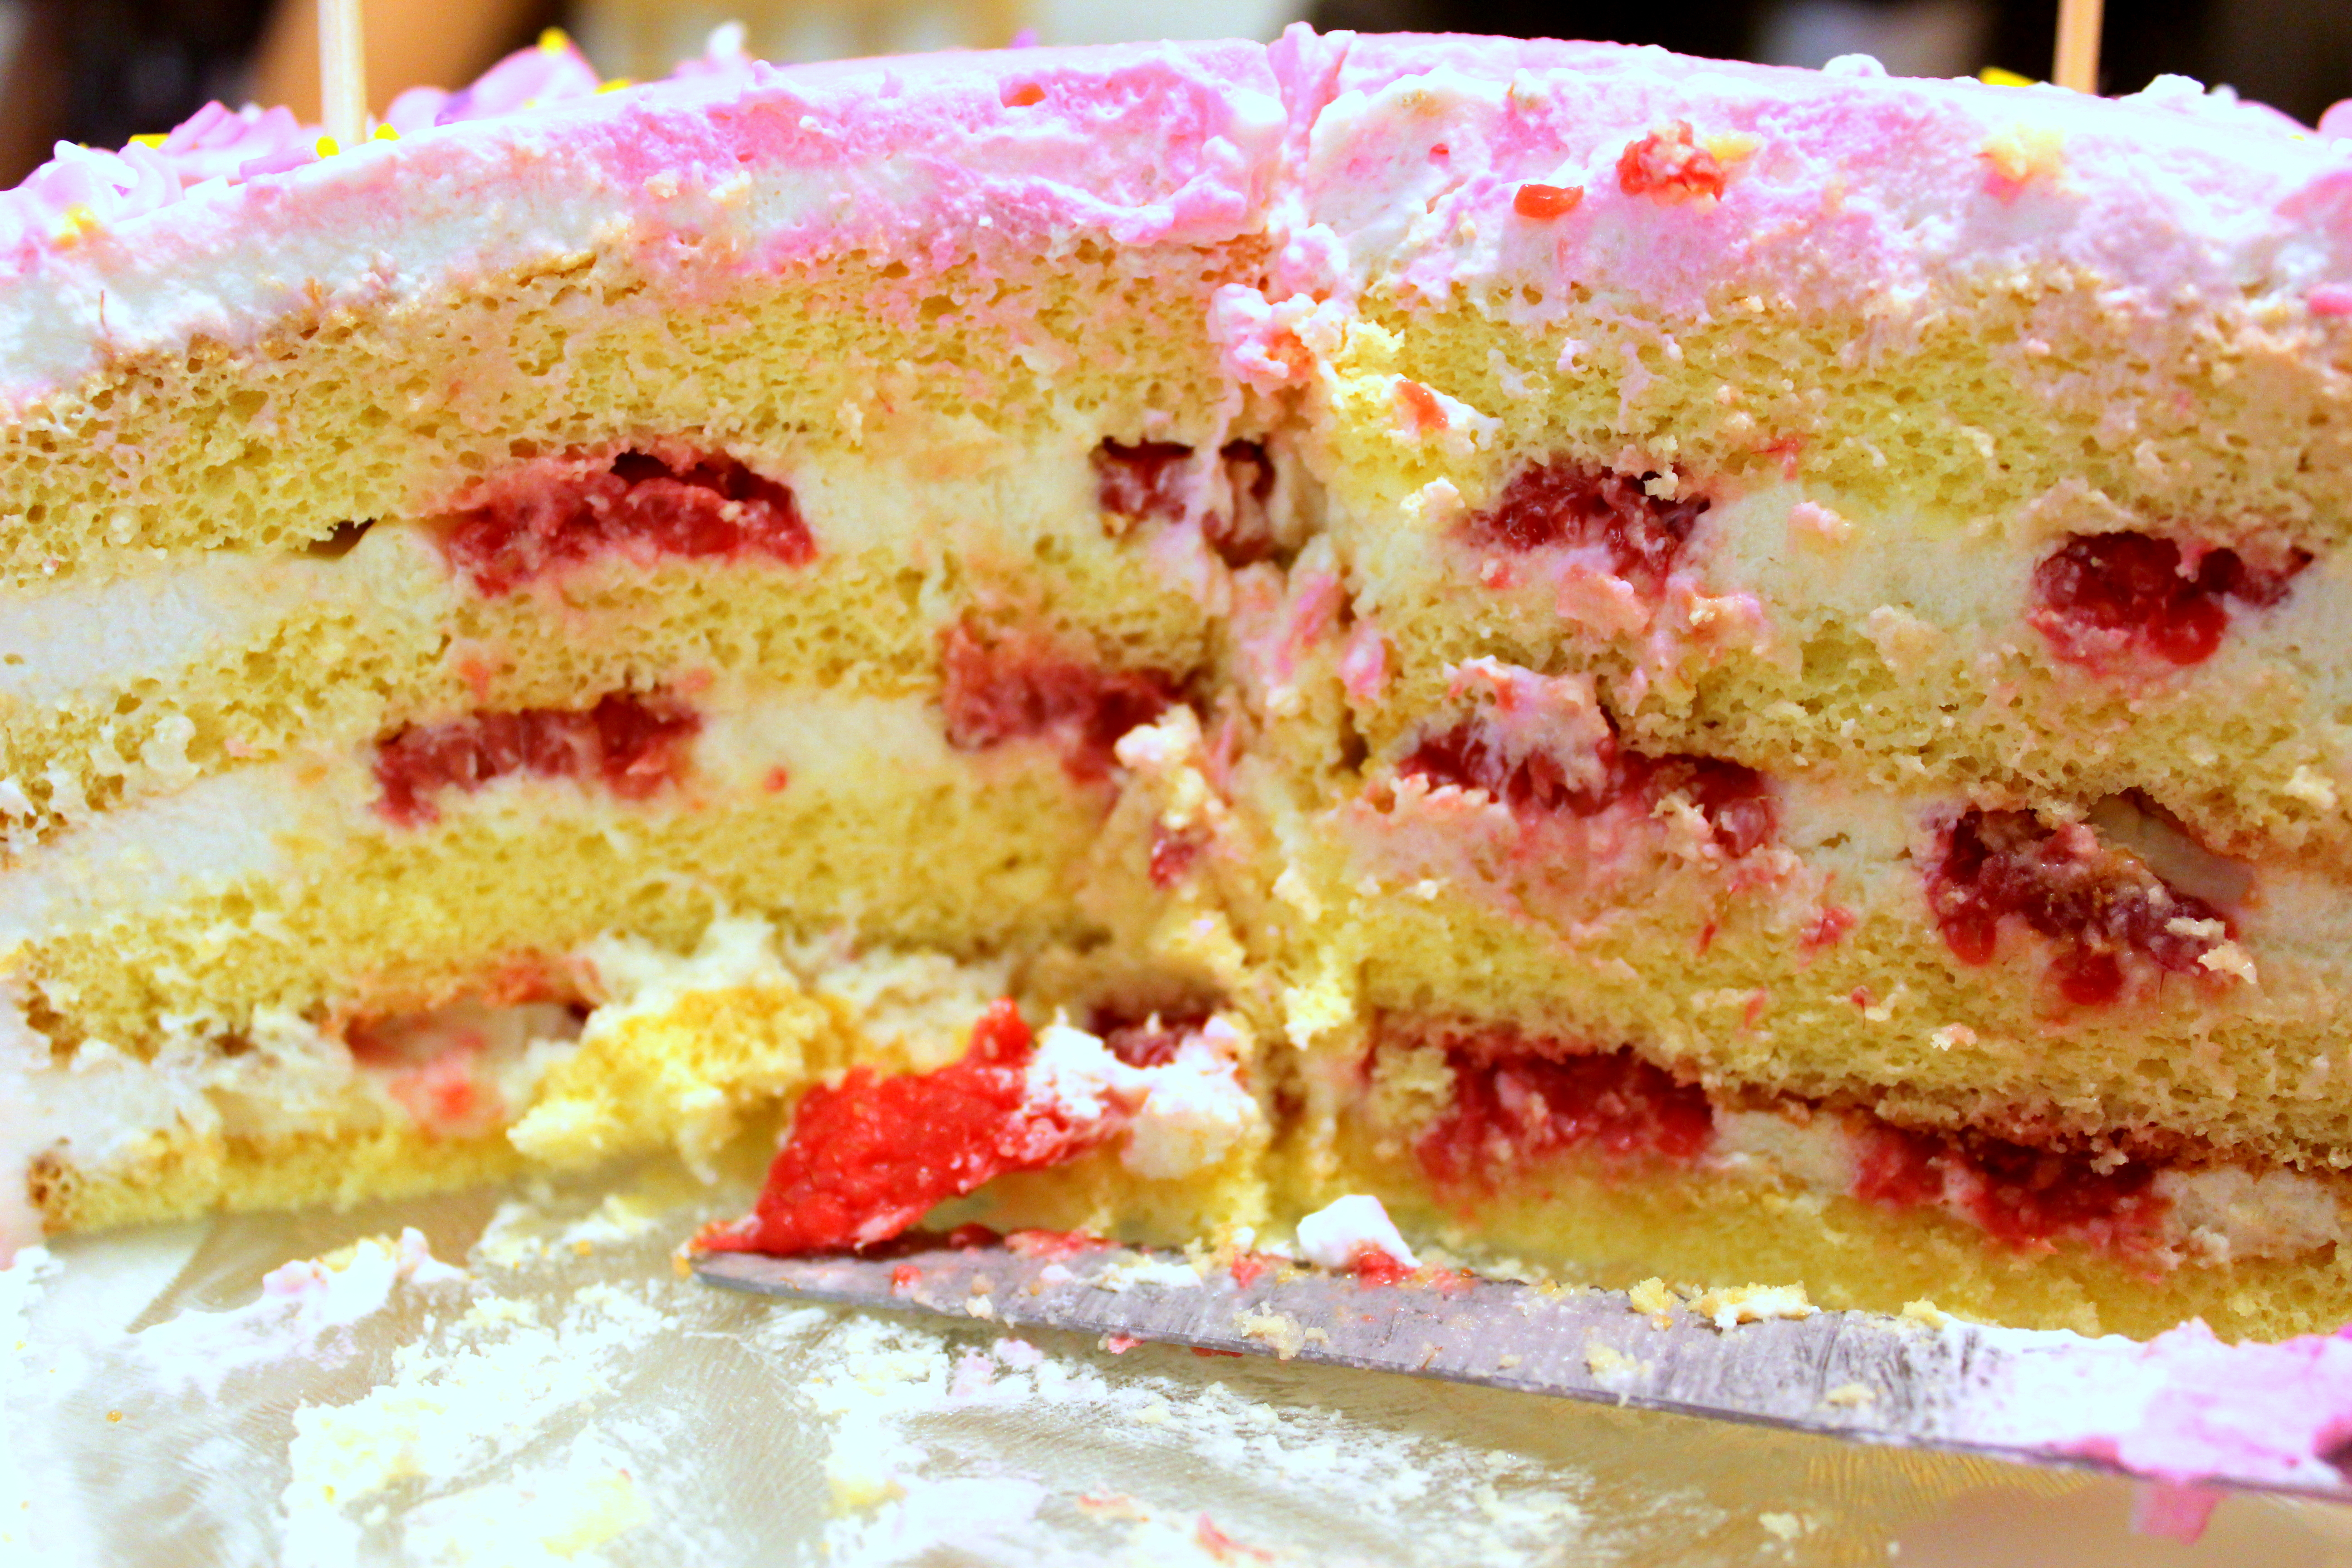
Once you cake is completely cool, slice each cake in half to make a 4 layered cake.

IMG_20150509_140000

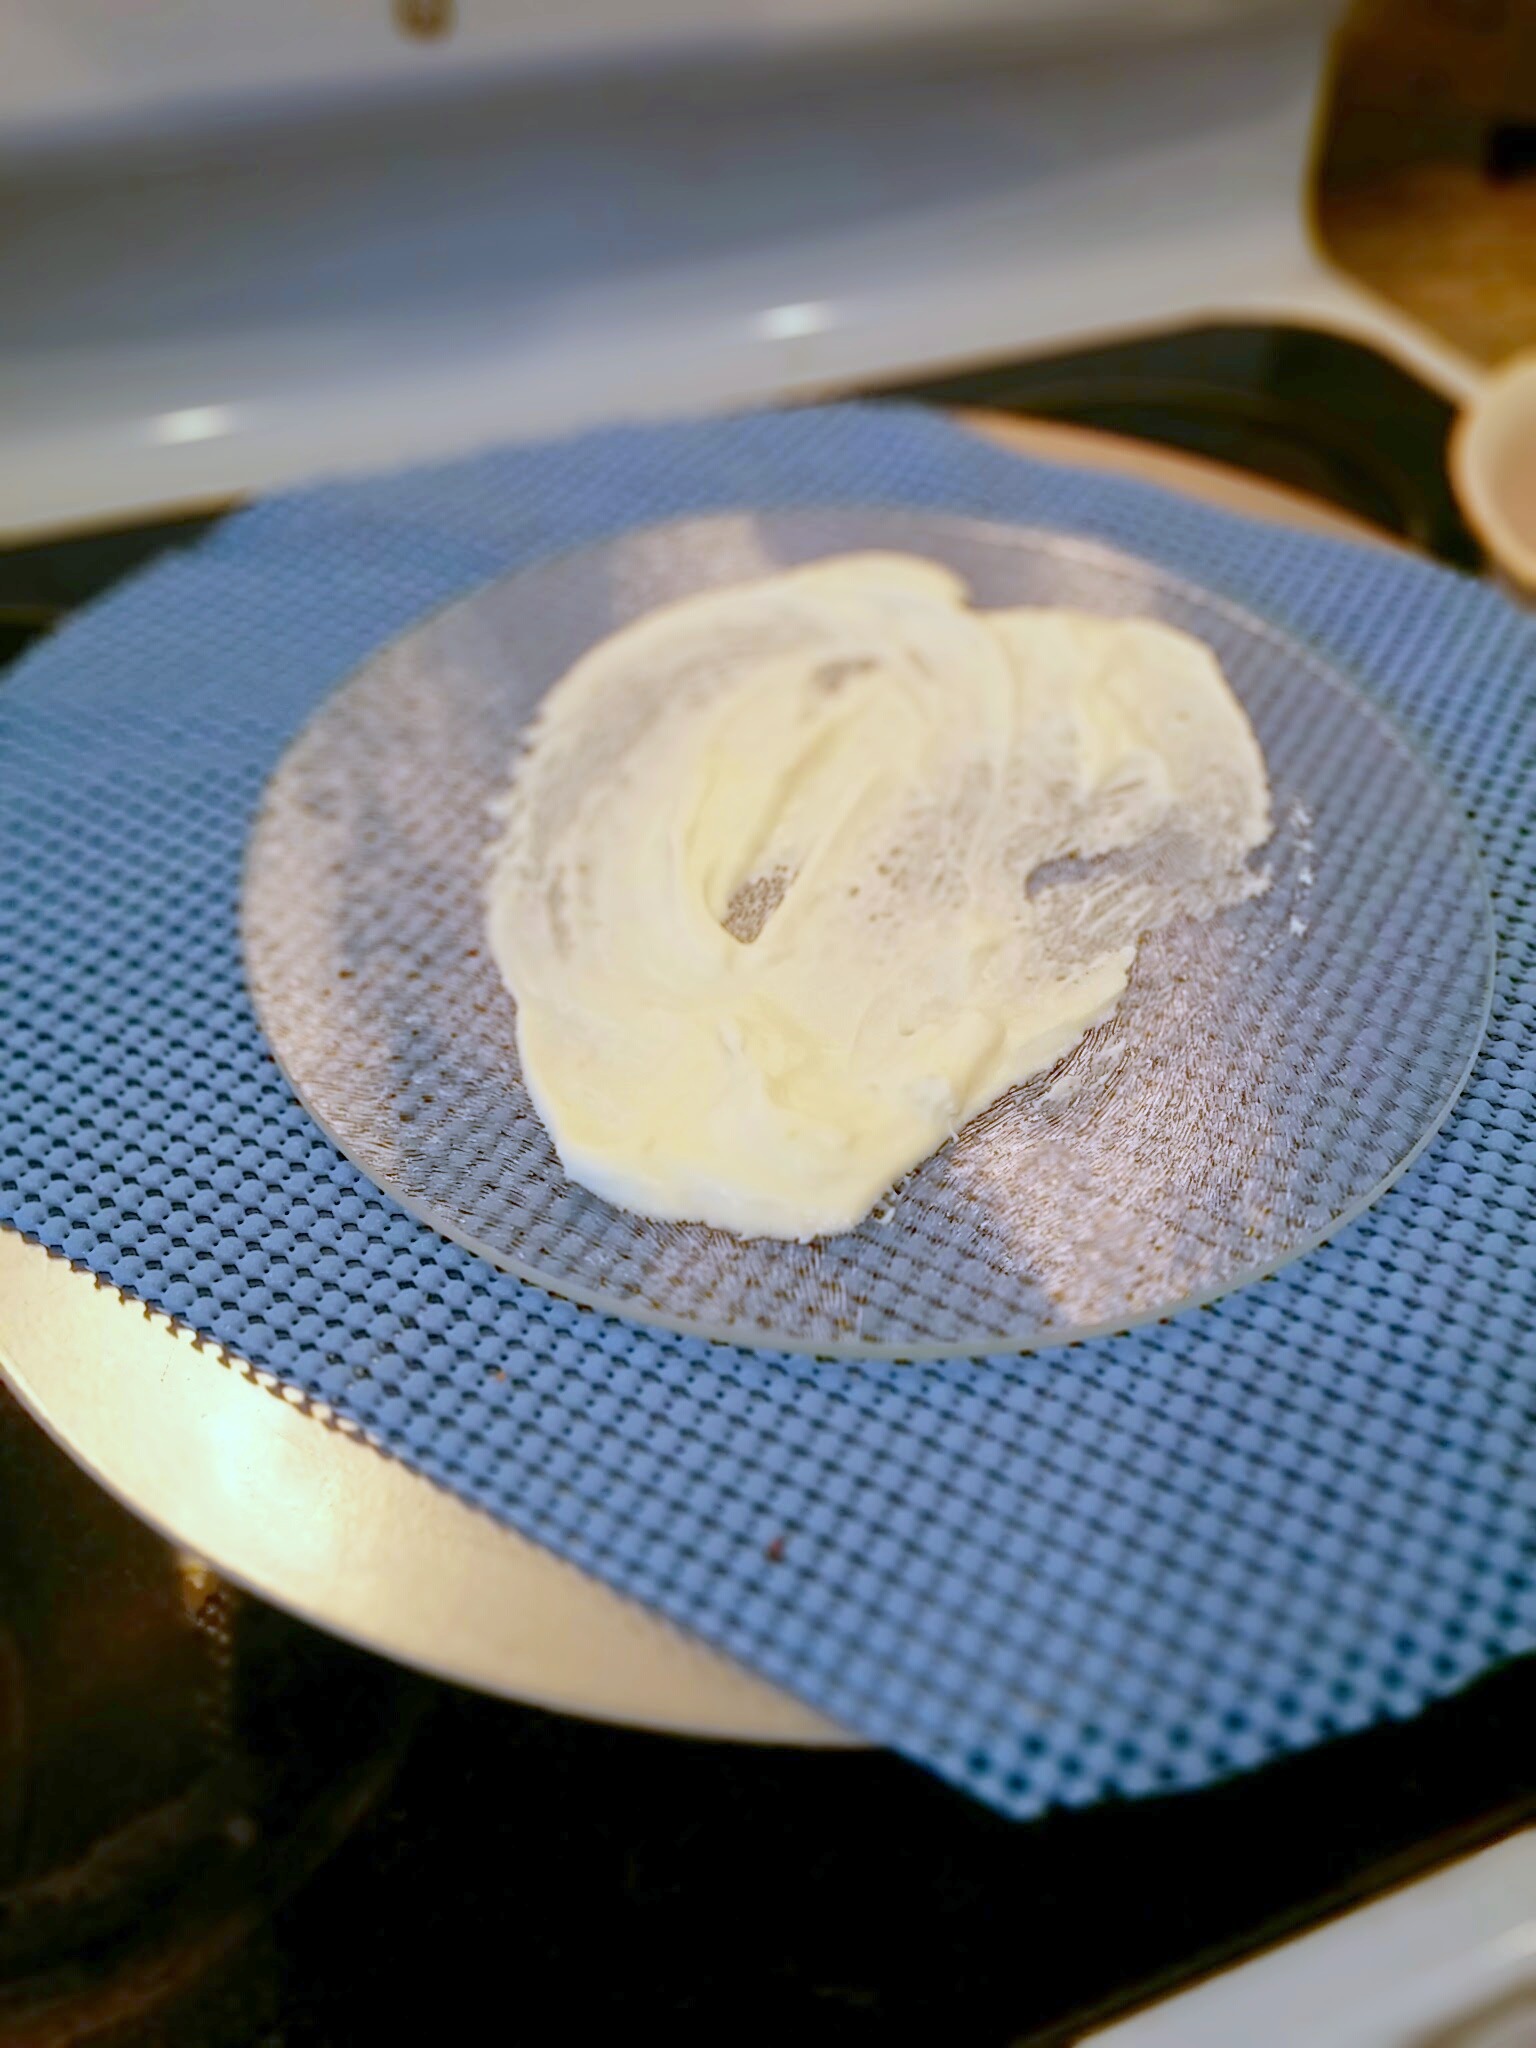
Smear a dollop of cream to the cake round so the cake will stick

IMG_20150509_140056

Add a layer of cake. I should have had the cut side facing up…

IMG_20150509_140223

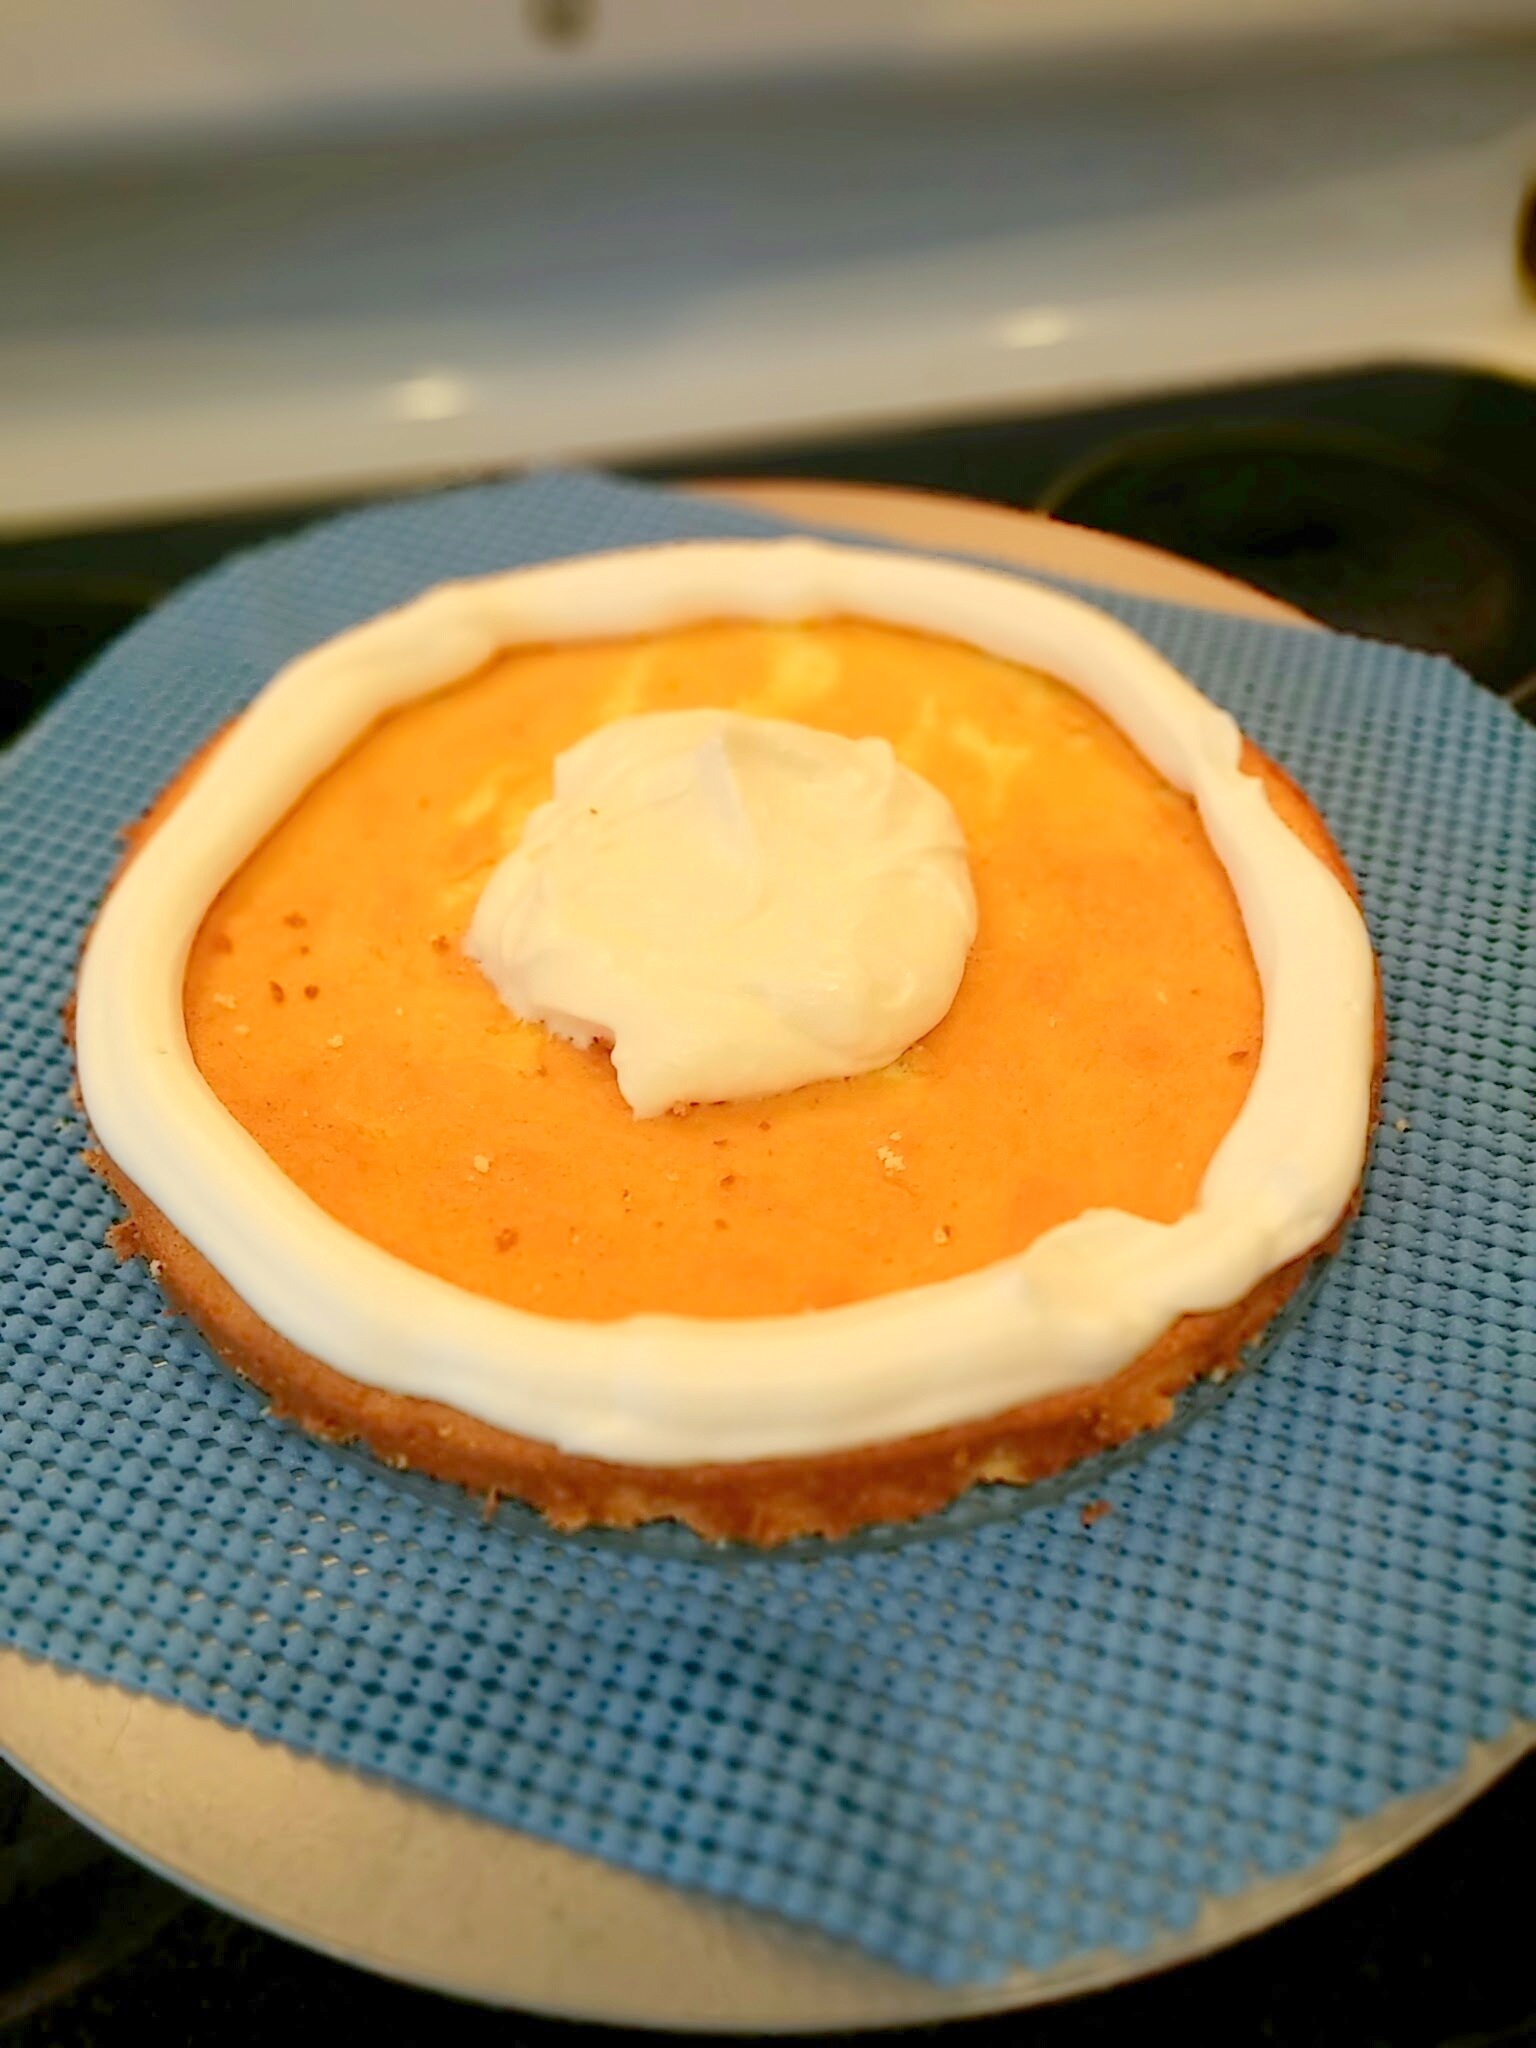
Make a little dam by piping an edge around the perimeter of the cake then spread the lemon filling into the middle. You can use just regular whipped cream for the filling as well.

IMG_20150509_140540

I added raspberries that I split in half.

IMG_20150509_141044

Repeat the process for two more layers

IMG_20150509_141446

Add the last layer then you will frost the entire cake.

IMG_20150509_141926

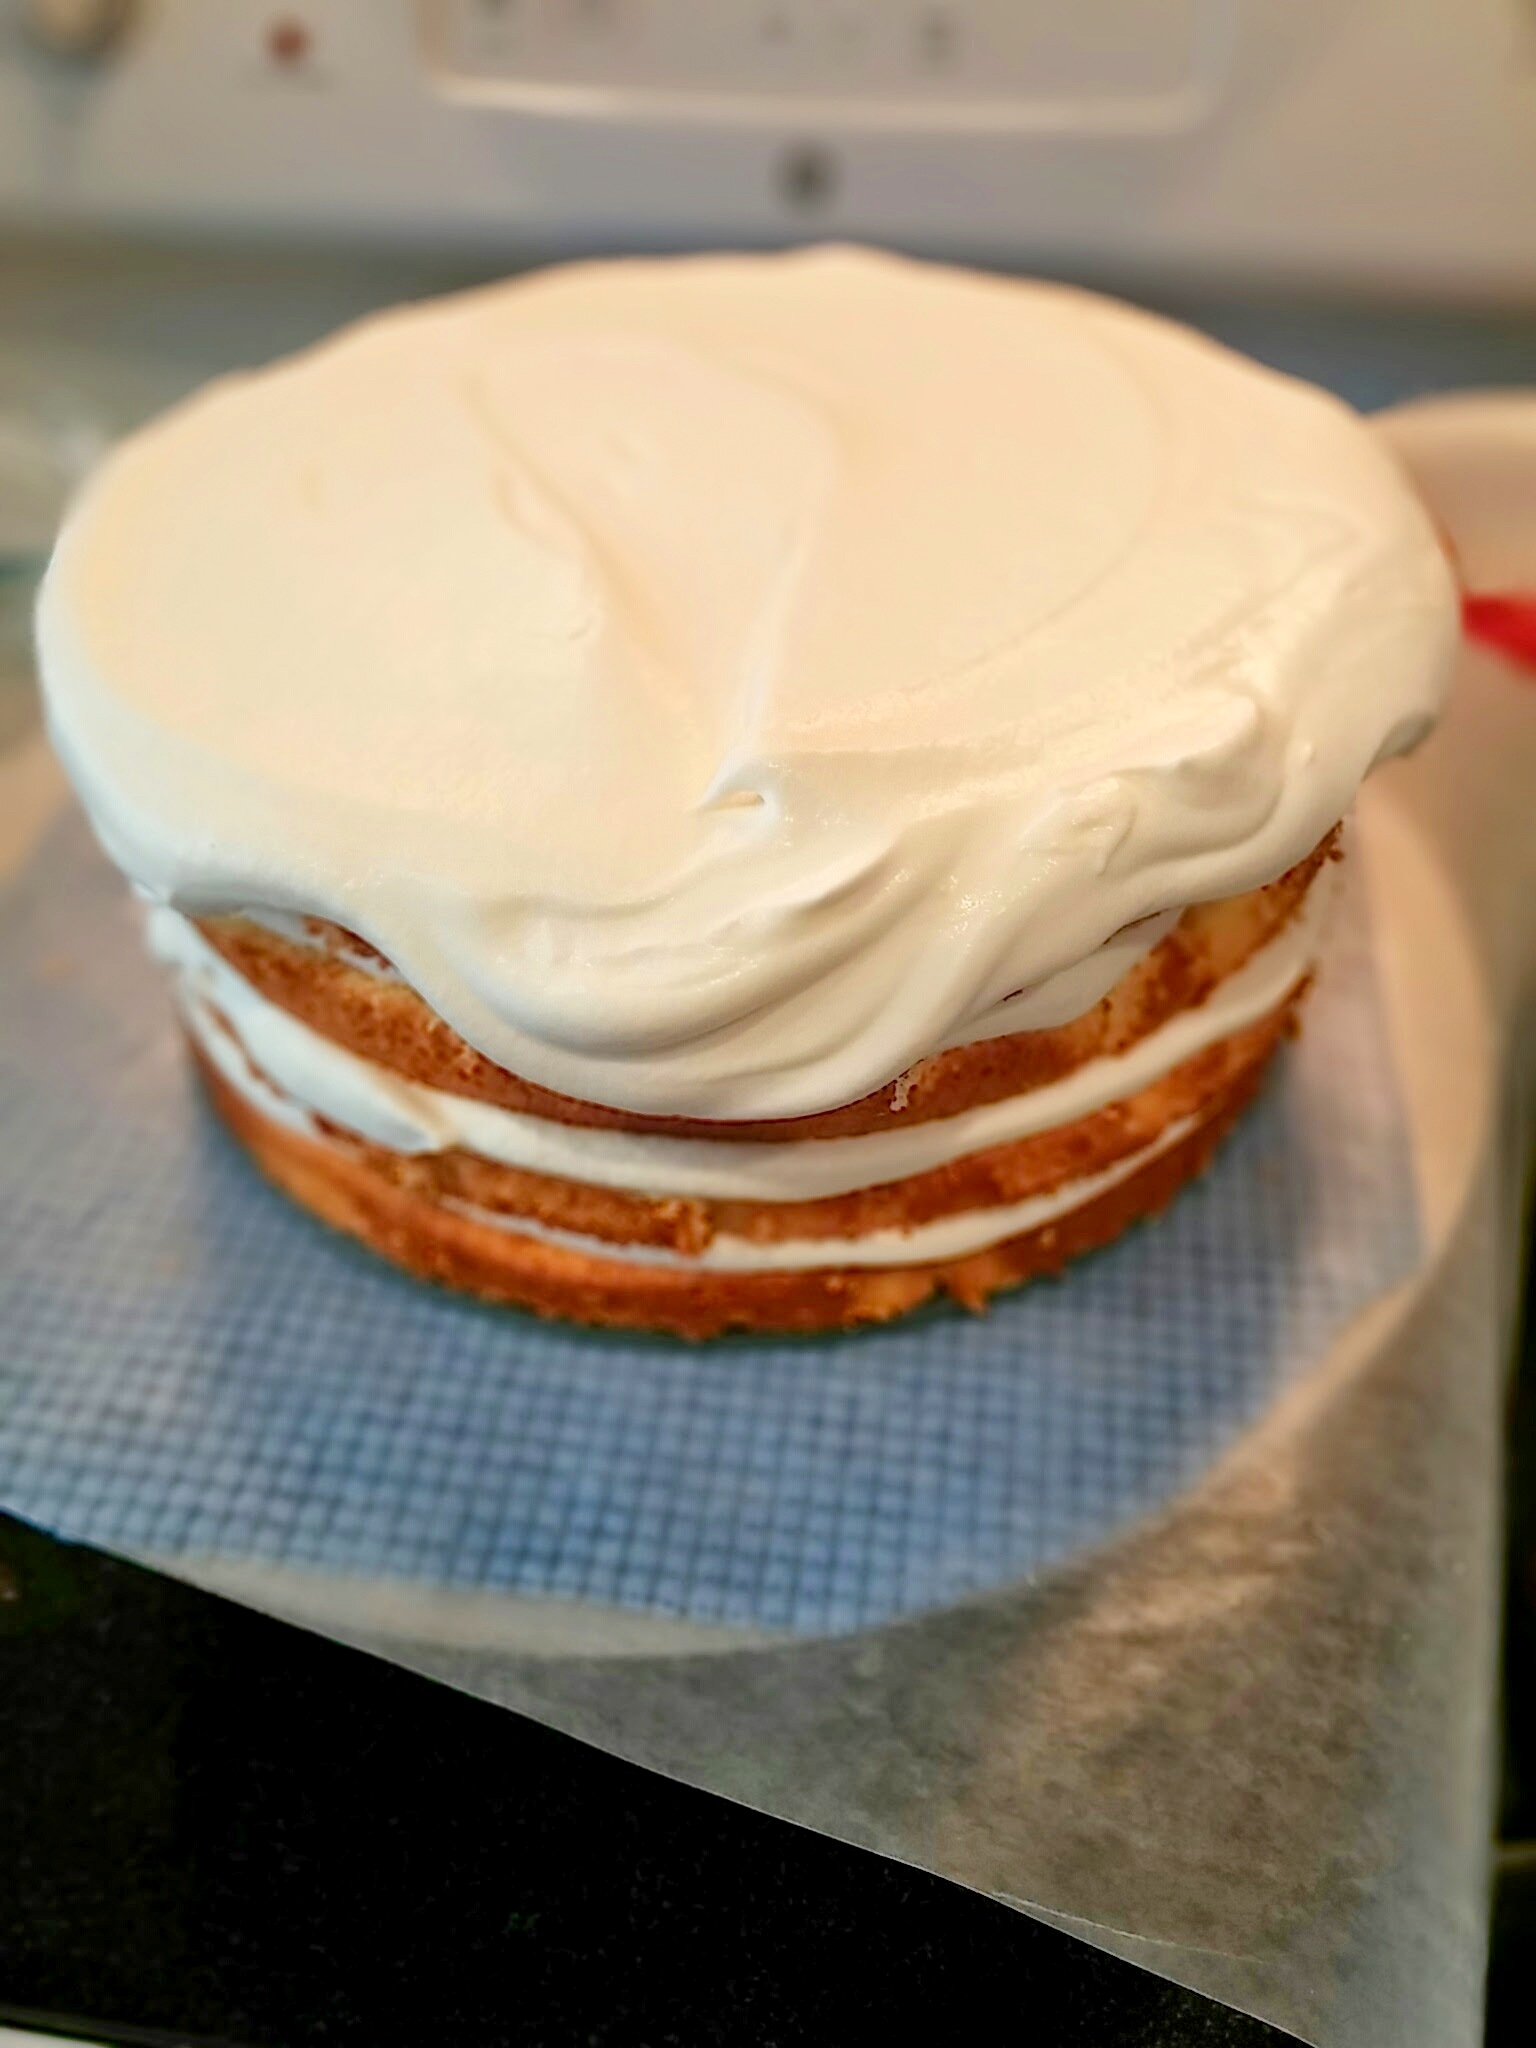
Place a generous scoop of whipped cream to the top and let it fall over the edge

IMG_20150509_142308

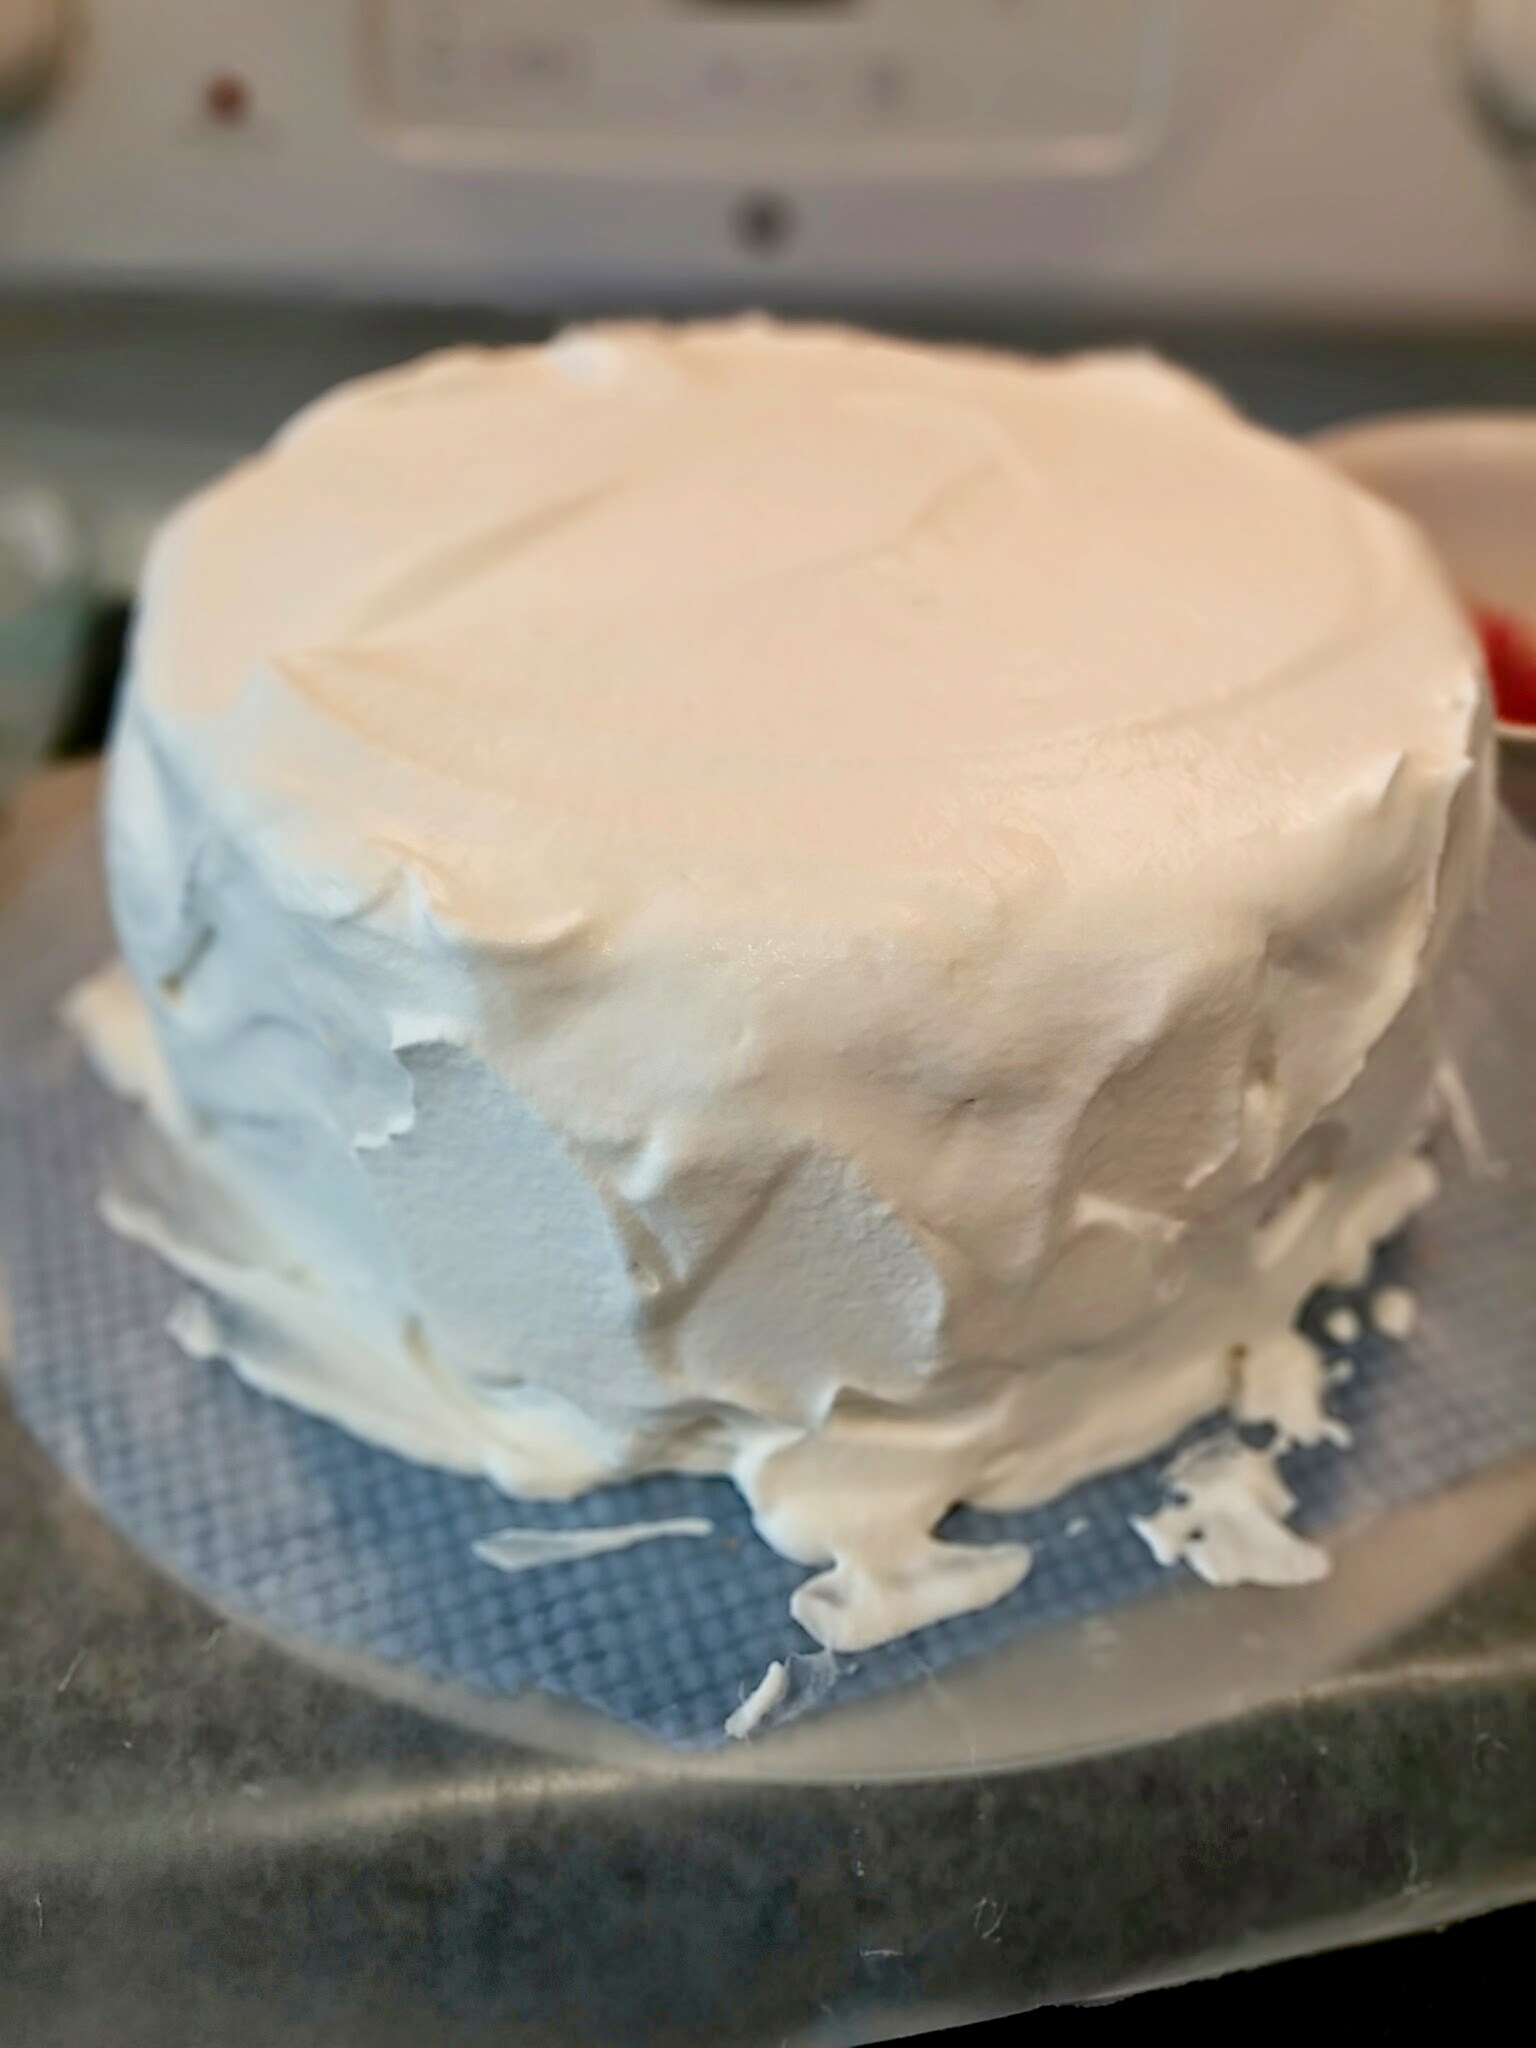
carefully cover the sides of the cake. Use lots of frosting and don’t let the spatula touch the cake or you will introduce cake crumbs into the pretty frosting.

IMG_20150509_143002

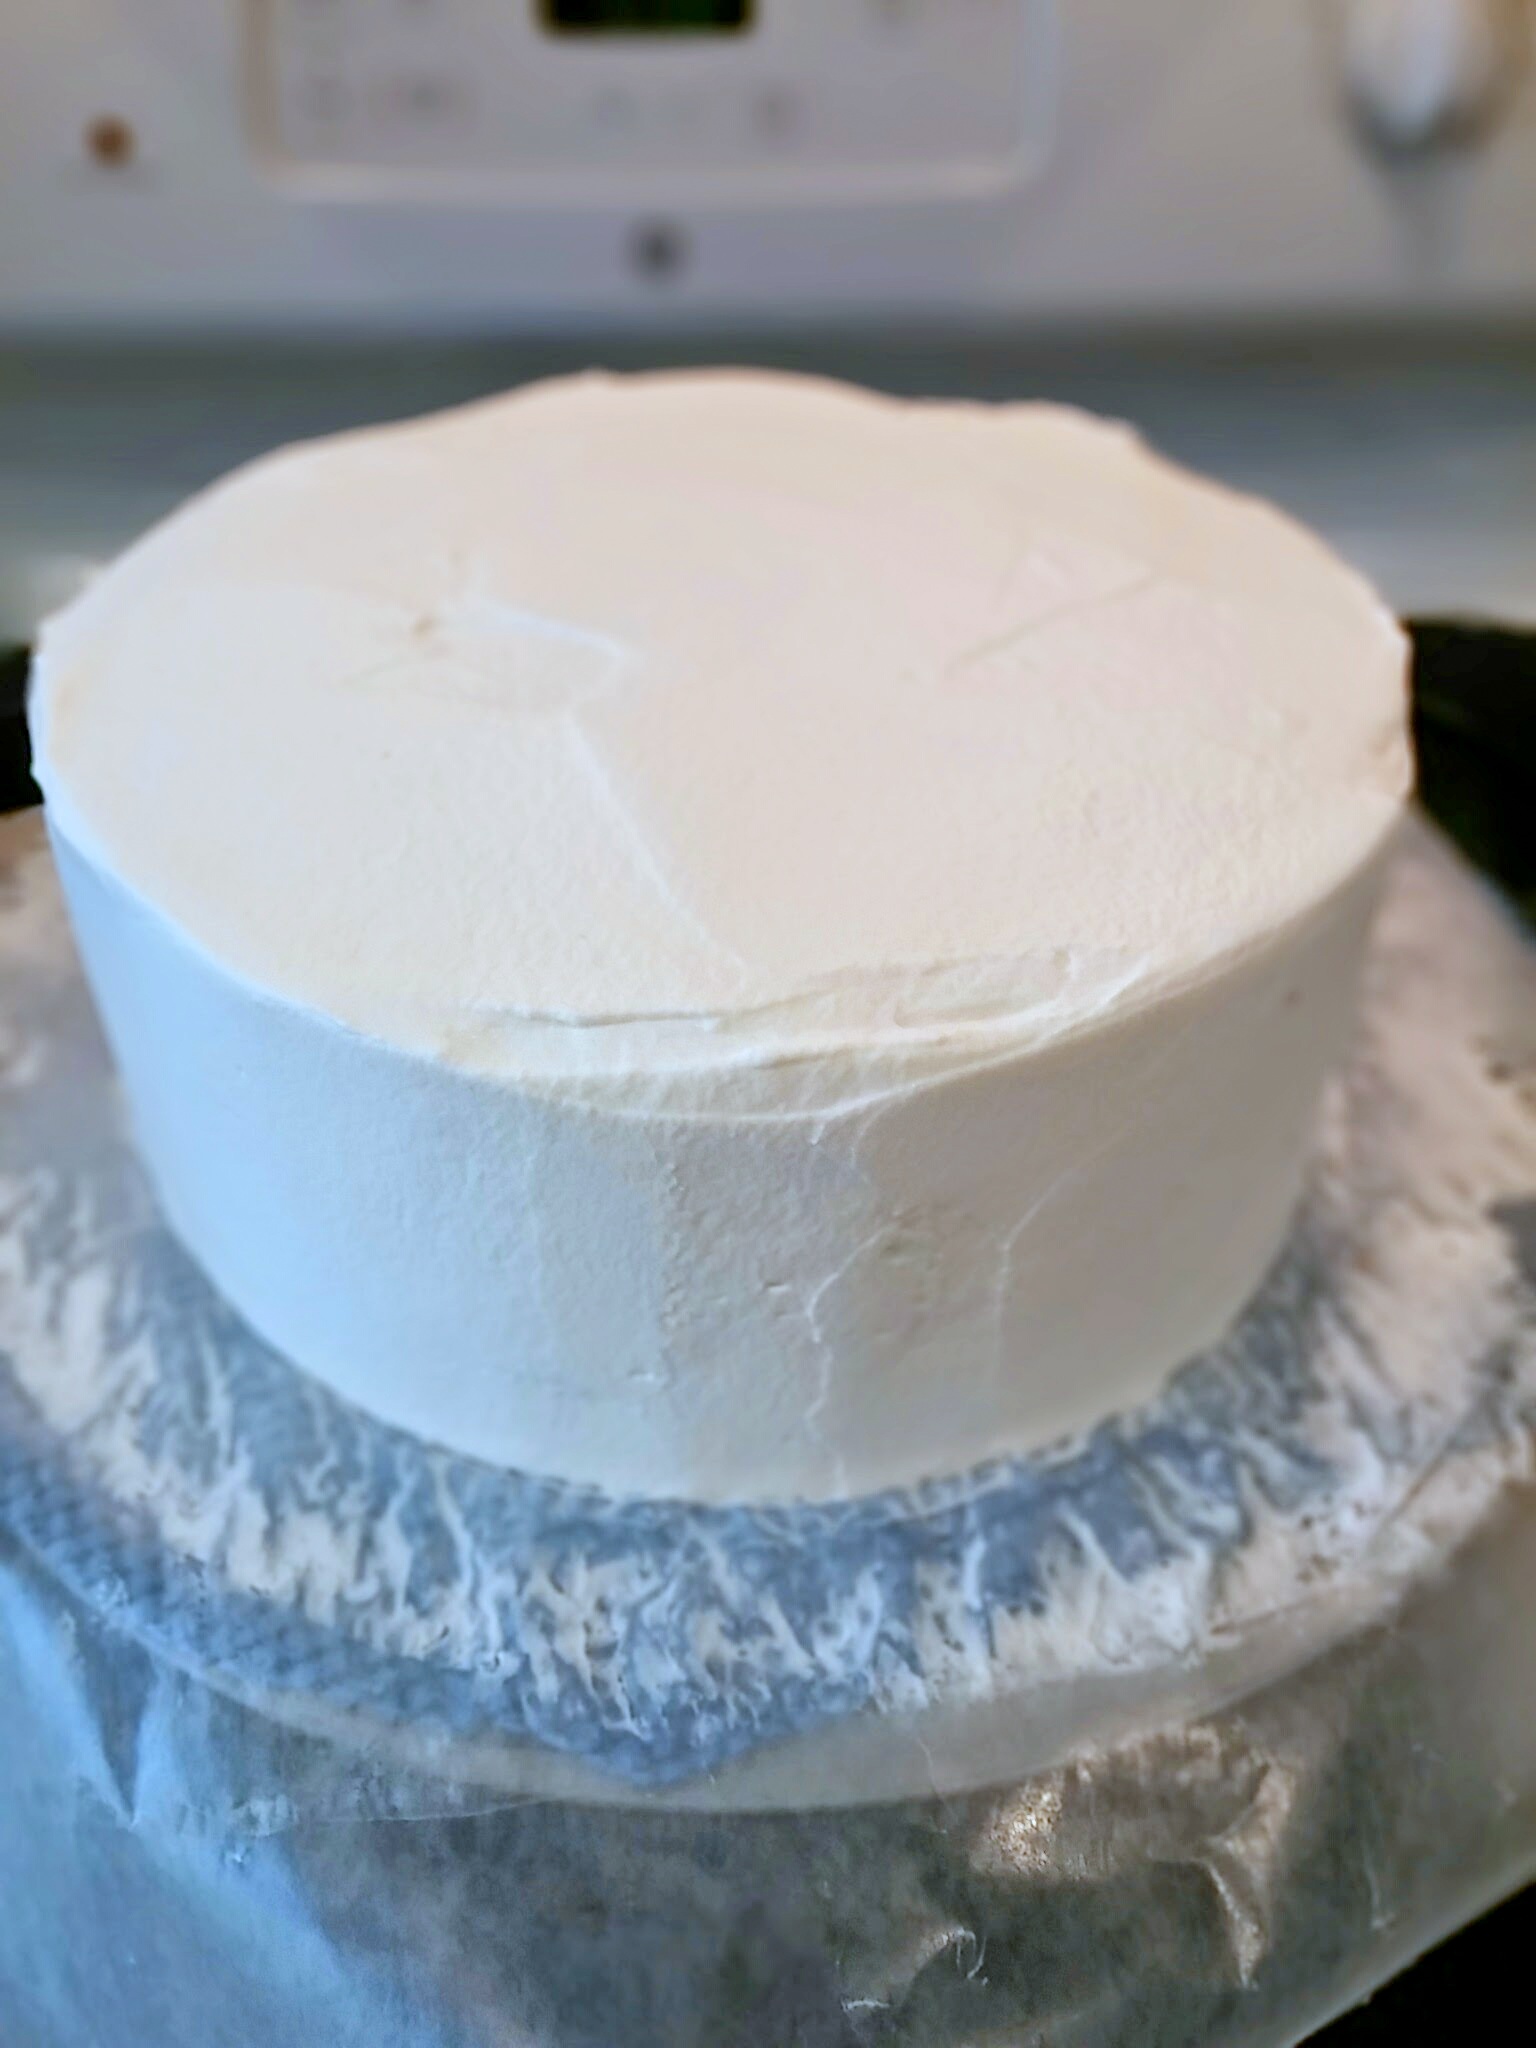
Use a spatula to smooth out the top and the sides. I like to use a handheld pastry scraper to hold it along the side of the cake while I turn the cake turntable. Using a hot spatula also creates a smooth finish.

IMG_0585

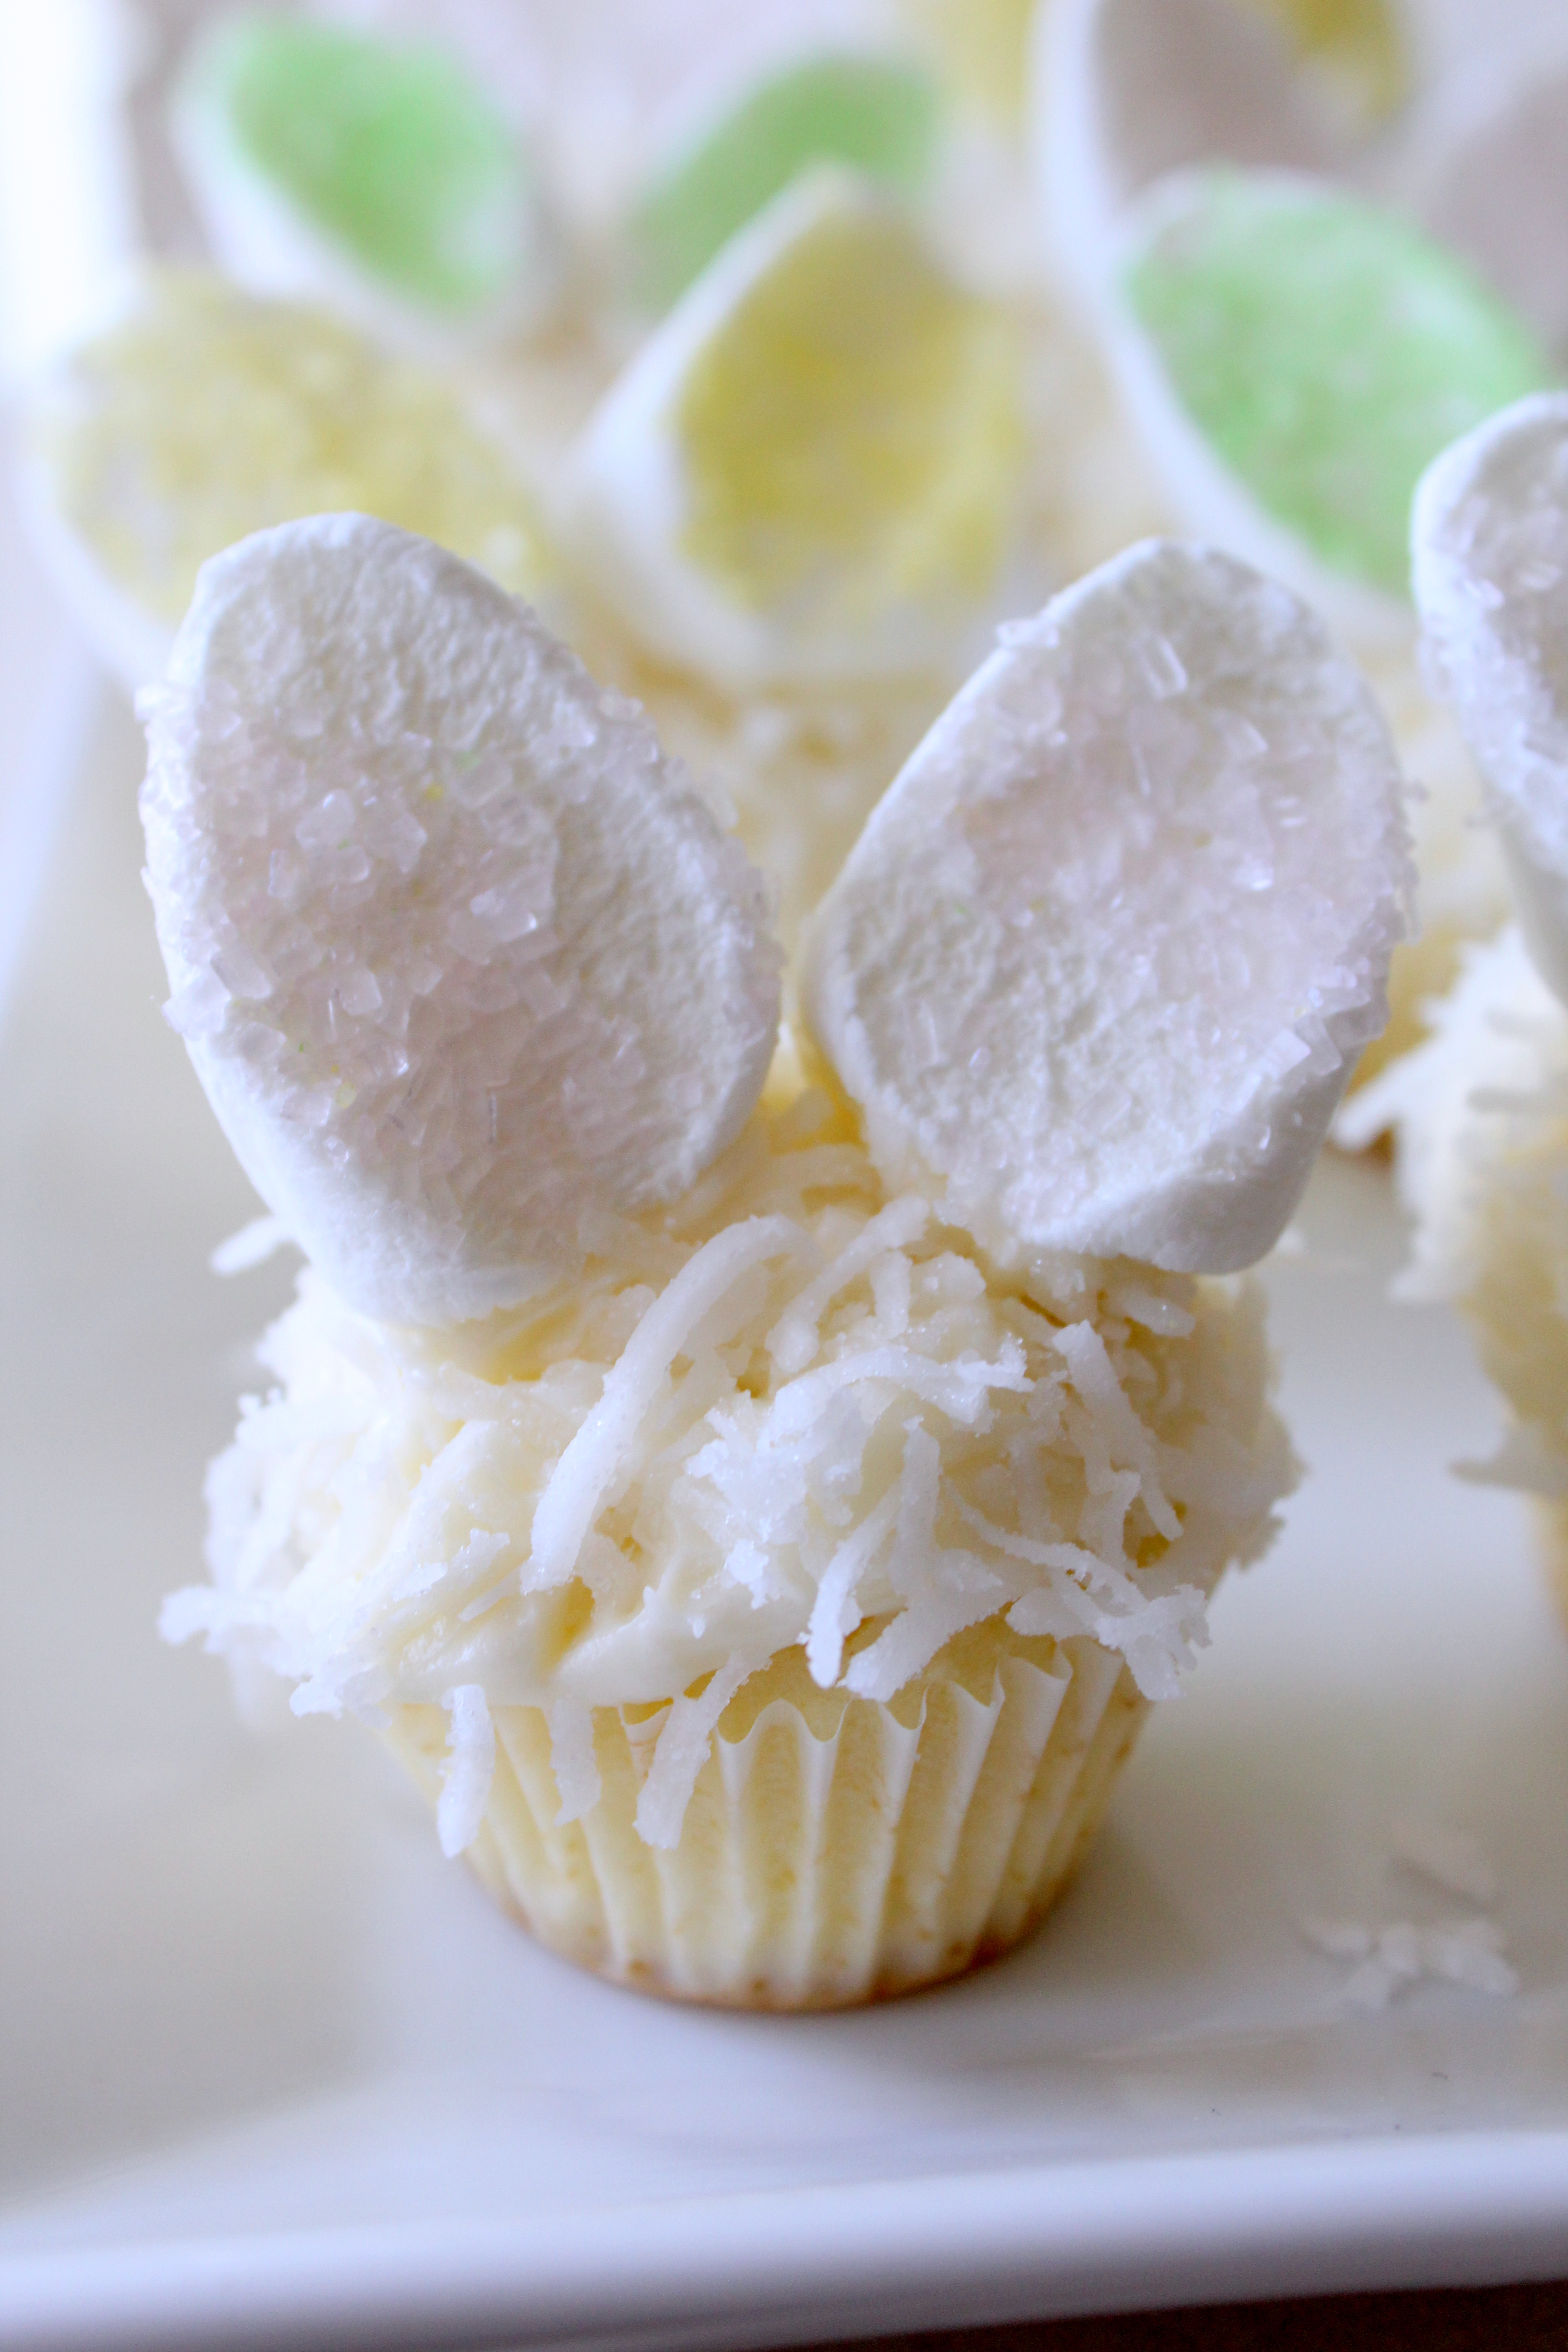
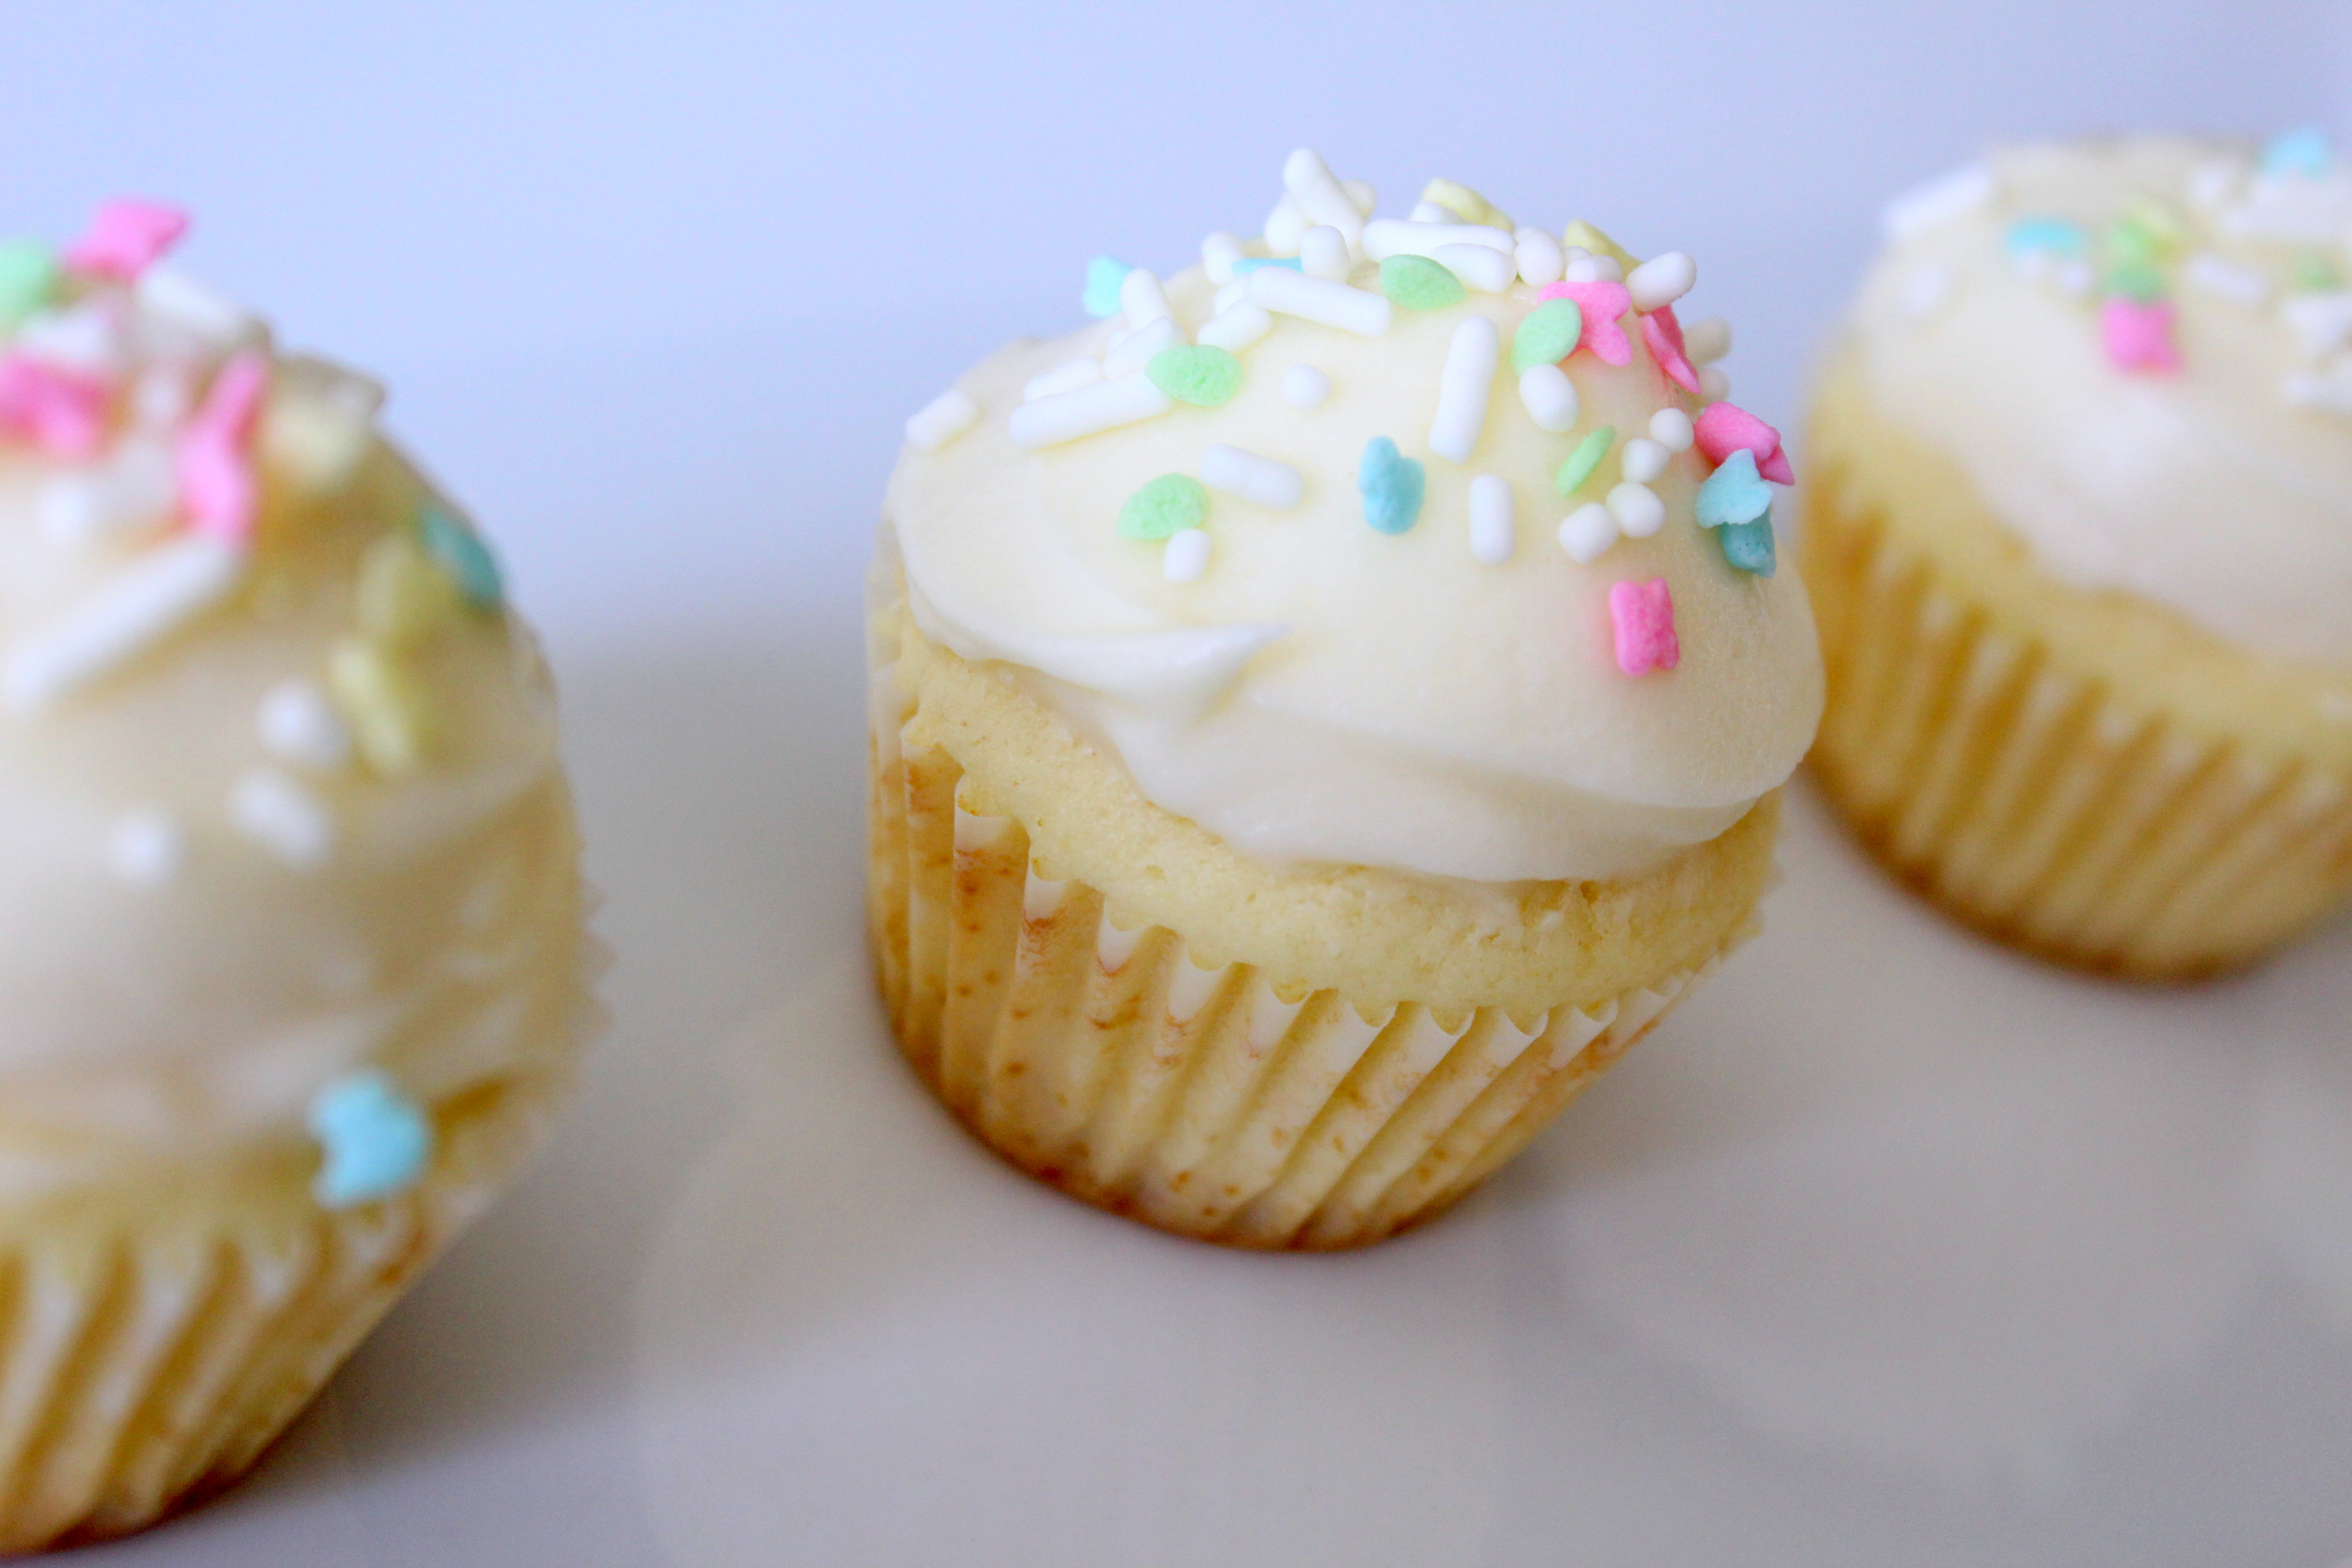
Decorate it any way you want!

Castella Cake
  • 2½ TB milk
  • 2 TB mirin
  • 1½ TB unsalted butter
  • 1 cup + 1 TB cake flour, sifted 2-3 times
  • 8 eggs, separated
  • 1 cup sugar, separated (see directions)
  • 2 TB honey
  • pinch of salt
  1. Preheat oven to 350°F. Prepare cake pans by greasing and lining all sides with parchment paper. (I just line the bottom and use a sharp knife to run around the sides for the cake since I’ll be covering it with frosting)
  2. Combine milk, mirin, and butter in a microwave-safe bowl and melt in microwave for 40 secs (until melted) then set aside to cool.  Sift the cake flour 2-3 times onto a piece of wax paper and set aside.
  3. In a clean mixing bowl, place all 8 egg yolks, 1/3-1/2 cup sugar (more or less depending on your sweetness preference), honey, and a pinch of salt and mix on medium to high speed until it turns a very pale yellow and starts to show peaks. If you don’t have another mixing bowl, then transfer the yolk mixture to a large bowl and wash this mixing bowl and dry it very well (also the whisk attachment).
  4. Place only 1/2 cup of egg whites into clean and dry mixer bowl (save the rest of the whites for another use), and beat with whisk attachment until it starts to foam.  Then slowly add 1/3 cup of sugar and beat only until SOFT peaks form.  The peak should fall over when you lift the whisk upright and not stand stiff and straight, so watch your whites carefully.
  5. Add a third of the egg whites meringue to the yolk mixture and quickly but gently, fold it in.  Then add half of the sifted cake flour and also quickly but gently fold in.  Repeat with another third of the meringue and the rest of the cake flour then end with the remaining meringue.
  6. Add a large dollop of the cake batter to the melted milk, mirin, butter mixture and mix it together.  Then add the milk mixture back to the cake batter and gently fold it in.
  7. Pour the cake batter into the prepared pans then drop the pans down onto the counter a few times.
  8. Bake the cake at 350°F for 10 mins then lower the heat to 335°F and bake for another 15 mins.  The cake should be done when it’s golden brown and springs back up when gently pressed.
  9. Allow cake to cool in the pan for 10 mins then gently remove from pan to finish cooling on a cooling rack.
Whipped Cream
  • 3 cups heavy whipping cream
  • 1/3 cup powdered sugar, sifted
  • 1 ½ tsp vanilla extract
  • ½ cup lemon curd (optional for filling)
  1. Whip the cream until it foams then add the powdered sugar and vanilla and whip until soft peaks form.  Don’t overwhip or it’ll curdle.
  2. To make the Lemon curd cream, add 1½ cups of the above whipped cream to a bowl and fold in ½ cup lemon curd. Use this cream to fill your layered cake.
  3. Use the rest of the whipped cream to frost the outside of your cake.
  4. Decorate ! Conjure up your creative side~

IMG_0678

Oh, and did I mention that refrigeration does wonders for this cake?  No more hard cake straight out of the fridge!  I used to have a strawberry flavor oil? and when I added it to the whipped cream after whipping it, it tasted SO good when I made this cake with strawberries instead of raspberries and no lemon curd, just whipped cream filling.

14314071255891

We are a bookworm family so please excuse all the books scattered on the table. They were some of the gifts little C received for her bday. 🙂

Pink Pillows of Nostalgia

IMG_0581

Boy, was this last week a blur of running around from morning til evening every day carting my older two kids to their respective schools, carting them back, errands, work, carting them to their activities, making multiple trips to almost every store within a 15 mile radius, planning a picnic, and feeling guilty for dragging my 2 (almost 3) yr old everywhere, so taking her to our local library for storytime.  This week should slow down a bit and I’m really looking forward to that. My daughter’s preschool had a Spring Social this past Saturday where current and new, incoming families join together for a little picnic and fun.  We had a great time with snow-cones, face painting, food, friends, and chicks hatching!  Yes, you read that right! Baby Chicks!  The preschoolers got to watch one of the chicks actually hatch out of it’s shell!  I must say, what impeccable timing, chicks!  The chicks’ due date had come and gone last Wednesday, so we were afraid they wouldn’t hatch and the kids would be disappointed.  At least they would get a heavy lesson on the ways life out of the experience, but the chicks decided to come so we were able to save that heavy life lesson for another day.  Not all chicks are fluffy and yellow as I had believed them to be, for these were black and cute and amazing to watch.

IMG_20150502_134015

peep peep!

When I was at BYU for college (not so long ago… okay… it was many years back), I would oftentimes indulge in those soft, fluffy, melt-in-your-mouth sugar cookies heaped with a generous slathering of pink (artificial) icing, topped with cute little sprinkles, and I must admit those indulges happened a little too often.  I still see copycat versions of these pink pillows of nostalgia at my local grocery store, and perhaps my taste buds have grown up, but now these cookies taste… *blah* to me.  That could also be the effect of actually looking at the list of ingredients and wondering ‘What in the world did I put in my body all those years? No wonder I’m…’

I’m not sure what they put into their cookies to make them so soft because I don’t think it’s possible to achieve that kind of softness without adding “other” ingredients into your dough.  But I’m ready with my go-to sugar cookies recipe whenever I catch myself eyeing those pink, frosted cookies made from “others” at the grocery store and this is one of the recipes I made for my daughter’s preschool’s Spring Picnic last Saturday.  This recipe uses regular all-purpose flour with no dough refrigeration time and the other one I like to use calls for cake flour and refrigeration time, which I don’t always have the patience for when I’m baking in a hurry; which is quite almost, always. So this recipe is my all-time go-to for pink, frosted, cut-out sugar cookies, and can’t forget the sprinkles to complete the look.  😉

The dough comes together beautifully for this recipe and, as I already mentioned, you don’t need to refrigerate the dough to roll-out and cut shapes.  Also, the dough doesn’t stick when you roll it out and the cookies actually hold their shape after being baked!  And did I mention that they taste delicious!  Let them sit overnight in an airtight container and you’ll get an entirely soft cookie.  They are great right out of the oven too.  What is there not to love about this recipe?!

Soft Cut-out Sugar COokies
  • 1 cup butter, room temp
  • 1 ¾ cups granulated sugar
  • 2 eggs
  • 3 tsp vanilla extract
  • 1 cup sour cream
  • 1 tsp salt
  • 2 tsp baking soda
  • 5½ cups all-purpose flour
  1. Preheat oven to 375ºF
  2. In a large bowl, combine flour with salt and baking soda and mix, set aside.
  3. Cream the butter and sugar together in a stand mixer with beater attachment until light and fluffy.
  4. Add eggs one at a time and beat to incorporate.
  5. Add vanilla and sour cream and beat to mix.
  6. Add the flour mixture and carefully mix on lowest speed.  Add more flour (a tablespoon) at a time if sticky, but don’t add too much!
  7. Roll out dough to 1/4″-1/3″ thickness and cut out in desired shapes
  8. GREASE parchment paper on cookie sheets and bake 6-7 mins.
  9. Let cool for 5 mins before transferring to cooling rack.
Fluffy Buttercream
  • 1 cup butter, room temp
  • 1 tsp vanilla extract
  • 4 cups powdered sugar
  • generous pinch of fine grain salt
  • 1/4 cup heavy cream
  1. Beat butter until light and fluffy
  2. Add powdered sugar and vanilla and beat
  3. Add salt and heavy cream and beat.
  4. Tint to desired color and frost cooled cookies.
IMG_0533

After you make your dough, lightly dust a piece of parchment paper with flour and get a hunk of dough ready to roll.

IMG_0534

Press it down and slightly flatten with your hands to make it easier to roll out.

IMG_0535

I like to place another sheet of parchment paper over the dough to roll it out. That way, it definitely doesn’t stick to my rolling pin.

IMG_0537

Peel off the top parchment (if you used one), then cut out into desired shapes. I stuck with circles this time.

IMG_0538

My little pretties ready to go into the oven.

IMG_0539

See how nicely they retained their shape (it’s easier to tell with other shapes, I suppose).

IMG_0540

Close-up of my pretty cookie 😉

IMG_0541

I baked these for 6 mins at 375 F

IMG_0545

While your cookies cool, whip up your buttercream and tint to desired color.

IMG_0579

Frost your cookies and top with colorful sprinkles

IMG_0582

Then eat, enjoy, and leave the grocery store pink “others” alone!

Thank you for reading and have another wonderful week, hopefully with some homemade sweetness along the way~

-Flora

Sewing with Knits: Peplum Top and Dress

2015-04-261

We got a teaser of rain last week and it seems we are jumping right into summer temperatures with most of this week’s forecast in the 80’s.  Quite unfortunate given the drought we are having here in California, but it is another reason to make some pretty tops and dresses for the warmer weather.  Oh, did I mention this time I will be sewing for me!?  I can’t recall the last time I cut out fabric pieces to make something for myself.  It might have been when I tried to make a coral-colored dress for my cousin’s wedding a few years ago, failed miserably after I read the sizing incorrectly for one of the Simplicity patterns, and ended up rushing to the mall and ransacking every store for a coral dress that had sleeves.  I couldn’t bring myself to throw away the hours of work I had put into the dress and it is still sitting in the back of one of my fabric stash bins.  I still feel a twinge of frustration every time I lay eyes on that dress… I should toss it. It’s not healthy.

Pretty fabric is one of my many weaknesses.  I had been eyeing and waiting for the Girl Charlee Knitfix to go on sale for weeks and even set an alarm on my phone so I wouldn’t miss it.  And of course, that morning I had a Kindergarten “Get-to-Know-You” for my A right when they went on sale, but what’s your smartphone for if you don’t use it in these emergency situations? I lucked out too because I had already done the volunteer clearance (for my B), which they were getting the parents to do while the teachers were meeting with my future Kindergartener.  When my precious fabric cargo finally arrived, I rushed it through the washer/dryer and made my first project using the Penelope Peplum pattern by See Kate Sew, soon followed by a dress using the same pattern but tweaking it a bit to make it a dress.

CYMERA_20150421_180029

Initially, I wasn’t sure about this “Lavender Animal Spot” fabric I saw in my fabric bundle; I’m not a huge animal print person. But I have definitely fallen in love with this top. I still can’t say I like animal print, but this one I do love.

IMG_0495

I thought this dress looked ‘frumpy’ when I first completed it, but I’ve since changed my mind.

Peplums, peplums!  I love peplums!  They are flattering and made in a knit, it becomes an everyday wear.  I may be making a peplum shirt out of each one of my knits for each day of the week. 🙂   I’m not usually a dress-wearer (aside from church), but knit dresses are definitely an exception.  I mean, it’s so easy to wear and what’s better than a nice cool breeze flowing through your skirt on an exceptionally warm day when our male counterparts are (usually) confined to shorts that don’t allow them this luxury.

The only thing I changed to turn the peplum top into a dress, was to change the length and width of the “peplum” portion of the pattern.  I had 62″ width of the flower pattern fabric and used that width with 25″ for the length of the skirt.  I think I may shorten the width next time so there aren’t so many gathers around the midsection, which can end up widening your waistline.  The skirt portion ended up hitting me right below the knee, although I was aiming more for right above the knee, but it works.  And of course you can make it even longer and turn it into a maxi dress.

IMG_0433

I laid out the fabric and went across marking (every 2 inches or so) 25″ up from the bottom of the fabric

IMG_0435

Made a bunch of those blue lines to mark 25″

IMG_0437

Then I connected the dots to make a skirt piece that was 62″x25″

IMG_0439

I have all my pieces cut!!! Ready to start sewing them together.

IMG_0441

I like to make marks at the halfway point between side seams on the bodice and the skirt to help me pin them so the gathers are evenly distributed.

IMG_0463

Matching the marks I made to the side seams

IMG_0464

All pinned together with marks matching the seams and halfway marks.  Sew it and hem the skirt.

IMG_0472

All done!

To Blog About

Now, what to make with the rest of my knitfix bundle of fabric…

IMG_20150420_144655

Thanks for reading and have an awesome week!

-Flora 🙂

Tonkatsu 돈까스: Japanese Breaded Pork Cutlets

IMG_0392

Another weekend gone!  We packed in our Saturday with dental appointments, T-ball game, ballet class, friend’s birthday party, and cleared out our little patio to make some extra room for the kiddos to hang out in.  We are planning to be adventurous and TRY to make our own DIY teepees in the near future so the kids don’t burn outside since we don’t have any good trees for shade.  But in the meantime, I made A and B’s favorite dish: Tonkatsu!  We like to serve it up with cabbage slaw, white rice, and the special tonkatsu dipping sauce.

Back in March, I asked A what dish she wanted for her birthday dinner and she asked for Tonkatsu! She loves the crunchy breaded pork dipped in the sauce with the slightly sweet and tangy cabbage slaw on the side.  I think it’s safe to say it’s a family favorite.  My kids have never been huge meat eaters but I can always count on them to clean their plate when I serve them Katsu.  C likes to lick her dipping sauce bowl clean… … …

CYMERA_20150419_184004

Before you start on anything, you want to make your rice since it takes a good 40 mins in my rice cooker.  I used my handy dandy electric rice cooker and made 3 cups of white rice (we like to have rice leftover for making rice balls or fried rice for lunch the following day).  After you cook your rice, you want to make the cabbage slaw, the tonkatsu sauce, and the tonkatsu (pork) last.

Tonkatsu is a Japanese dish, but is quite popular with Koreans and was a favorite of mine growing up (now you know why my kids love it).  I like adding some garlic into my egg to help offset any “pork smell” and I think it makes it taste better.   You could “hammer” down the pork to make it more tender, but I don’t find it necessary.  Feel free to substitute pork with chicken or beef, too. And you can add tonkatsu to curry, ramen, and other dishes. How can you go wrong with crunchy, fried pork?

IMG_0355

Look how pretty and green the cabbage is!

IMG_0356

I used half a head of cabbage and sliced it nice and thin.

IMG_0358

Make your cabbage slaw sauce by mixing the mayo, vinegar, and sugar.

IMG_0359

Then mix the sauce with your sliced cabbage and add some shredded carrots. I usually have a bag of shredded carrots on hand from Trader Joe’s.

IMG_0360

Make the Tonkatsu sauce by mixing all the ingredients together.

Before you touch the pork, you want to get all the prep ready.

IMG_0364

Heat the oil on medium heat in a pan deep enough and wide enough to fry about 4 cutlets at a time.

IMG_0363

Prepare the flour mixture by mixing in the salt and pepper.

IMG_0365

Start with 1 cup of panko bread crumbs in a wide dish. I ended up using 2 cups total.

IMG_0366

Lightly beat the egg (I used a fork) with 1 TB of milk and a cube of frozen crushed garlic (from Trader Joe’s)

IMG_0367

Get your assembly line ready! 1.Flour 2.Egg 3.Panko

IMG_0368

Now time to handle the meat!

IMG_0369

You can buy the thin cut pork, or if it’s thicker, just slice it in half, horizontally.

IMG_0370

All sliced and ready to “bread”

IMG_0371

Coat in flour mixture

IMG_0377

Dunk it in the egg mixture

IMG_0379

Press it into the Panko bread crumbs until coated

IMG_0382

Bread half (4) of the cutlets then carefully place into hot oil to fry before breading the rest

IMG_0383

Gently and carefully place the pork into the hot oil and fry

IMG_0384

It should be hot enough that it bubbles. I had my heat on Med high heat. Raise or lower the temperature as needed.

IMG_0385

Flip it and fry until nice and golden.

IMG_0388

You can cut one in half to see if it’s ready.

Now for the recipes.  The ingredients are all easy to find.  Mirin is a sweet rice wine and can be replaced with these and they can be found in the Asian aisle at most grocery stores.  And I can’t imagine any grocery store that doesn’t stock Panko Bread crumbs in this day and age.  🙂  And you know where to find all the other ingredients.

IMG_0391

Cabbage Slaw Recipe
  • 1/2 head of cabbage, thinly sliced
  • 1/4 cup shredded carrots
  • 3/4 cup mayonnaise
  • 2 TB vinegar
  • 1 TB granulated sugar
  • 1/4 tsp salt

Mix mayo, vinegar, sugar, and salt together in a small bowl then add it to the cabbage and carrots and mix.  You can add more or less vinegar and sugar to taste.  Cover and refrigerate until ready to serve.

IMG_0393

Tonkatsu Sauce Recipe
  • 1/2 cup ketchup
  • 2-3 TB worchestershire sauce
  • 1 TB light soy sauce
  • 1-2 tsp Mirin
  • 1-2 tsp sugar
  • 1/4 tsp garlic powder

Mix all the ingredients together in a small bowl.  Adjust worchestershire, mirin, and sugar to taste.  (If you like a stronger kick, then add 3 TB worchester, otherwise, just 2 TB) You can also omit the Mirin and add another 1/2 tsp of sugar, if desired.

IMG_0389

Tonkatsu (Breaded Pork) Recipe
  • 1.5 lb bonless pork loin chop (thin cut preferred)
  • 1/3 cup all-purpose flour
  • 1 TB salt
  • 2 tsp ground black pepper
  • 2 eggs, lightly beaten
  • 1 TB milk
  • 1 clove garlic, minced (1 cube frozen crushed garlic from Trader Joe’s)
  • 2 cups Panko bread crumbs
  • Canola or Vegetable Oil (approximately 4 cups, enough to fry the pork)
  1. Heat the oil over medium to medium-high heat in a saucepan or pot that is wide and deep enough to fry the pork (4 at a time).
  2. Prepare the flour mixture by placing 1/3 cup of flour into a wide plate and mixing in the 1 TB salt and 2 tsp ground pepper
  3. Lightly beat 2 eggs and add in 1 TB milk and garlic and mix.  Place in a wide plate deep enough to hold the egg mixture.
  4. Place 1 cup of bread crumbs into a wide plate and add more as needed.
  5. Prepare the pork by coating it in the flour mixture, dipping it completely in the egg mixture, then coating it with the panko bread crumbs.  Lightly press the pork into the bread crumbs to ensure a full and even coating.  Set aside and repeat for half of the pork.
  6. Check that the oil is hot, then carefully slide the breaded pork into the oil.  Fry about 2 mins on each side.
  7. Meanwhile, bread the remaining pork following the same order: flour, egg, panko.
  8. Fry the remaining pork cutlets in the hot oil and place the fried cutlets on a plate lined with paper towels.
  9. Cut and serve immediately with the dipping sauce, the rice, and cabbage slaw.

IMG_0390

If you’ve never tried Tonkatsu, then TRY IT!  L&L Hawaiian BBQ’s Chicken Katsu is sort of a spin-off of the Japanese Tonkatsu if you’ve tried that before.  I used to frequent L&L for their chicken katsu many times during my college years (I lived right behind it). Now I just make my own.  🙂

Thanks for reading and have a wonderful week!

-Flora

Upcycle: Men’s Dress Pants to Simple Boy’s Dress Pants

IMG_0334

Finally, something for my only boy!  If you haven’t noticed, my sewing projects usually consist of cute dresses or tops for my two beauties and the last time I sewed something for my son was… … … I’m ashamed.  My boy’s go-to wardrobe consists of two pairs of jeans (that he NEVER wears), sweatpants, a few “dress” pants (more like chinos and khakis), “comfortable” shorts (that he ALWAYS wears), graphic T-shirts, long-sleeved graphic shirts, some sweaters, a jacket, and a coat.  Throw in some baseball pants, caps, and jerseys and he’s all set for the year.  I’ve been wanting to add some handmade items to his wardrobe but when given the choice of making basketball shorts vs. a cute dress… well… the dress would call my name.

Recently Updated1

When my friend’s hubby fell off his bike and ripped his pants (no one was hurt in the process of acquiring these pants), she gave them to me and challenged me to give it new life.  I guess it’s happened more than once 😉 since she gave me 3 pants with holes in them.  I’ve never made pants with a zipper and fly and I wasn’t going to attempt to try just yet, so I used a shorts pattern from My Child’s Closet and made pants with a flat front and gathered, elastic-back waistband.  The back of the pants don’t look very sleek and tailored, but it’s acceptable for a 6 yr old boy to wear to church.  For those of you who don’t speak Korean, that sewing pattern book may be a challenge (to say the least), but I remember Dana from MADE has shorts patterns like the one I used, just make them longer to make pants.  You could also make your own pattern by using a pair of pants your child fits, trace it on freezer paper, and add a seam allowance.  Here’s a good tutorial on how to make your own pants pattern.

With the remaining two pairs of holey pants, I plan to make summer-dress-pants (aka: church shorts).  I know my boy will be thrilled to be able to wear “shorts” to church.

IMG_0330

Flat FRONT gives it a nice tailored look.


IMG_0344

The gathered BACK portion with elastic. See what I mean? Doesn’t look super sleek, but I pass it.

This pants/shorts pattern added a yoke to the back of the pants right under the waistband and I like the little detail that it adds.  The original pants had a lining halfway down the leg, which I kept and cut together with my pieces.  I zig-zag stitched the lining to the front leg pieces only and also zig-zag stitched all my pieces to keep the fabric from continuing to fray.  The pattern didn’t include belt loops around the waistband, but I just took a seam ripper to the belt loops on the original pants and snipped a little bit to fit a 6 yr. old’s 1-inch wide belt.

Recently Updated2

Click picture to see larger

  1. Use your pattern and cut out your pieces.  Remember to add seam allowance if it is not included in your pattern or if you are making your own pattern.
  2. Trace your pattern onto your fabric. Don’t forget to cut mirror images of your pattern pieces so you don’t have two front pieces for your left leg.
  3. My pattern added a little yoke to the back pieces which added a nice detail. Iron seam towards yoke then top-stitch the yoke.
  4. With ride sides together, pin your front and back piece together and sew along the non-curved, outside edge of the piece.  Iron seam open. Repeat for the other leg.
  5. With ride sides together, pin the curved, inside edge of the pieces and sew. Iron open seams.
  6. Turn one leg piece right-side out and tuck it into the other leg piece so right sides are together and the curved edges are matching.  Double-check to make sure your fronts and backs are matching.
  7. Pin the curved edges of the pieces together and sew only along the curved edge, not the waist!
  8. Turn right-side out and admire what’s starting to look like pants!
  9. Add a strip of interfacing to the waistband (looking back, I may not add it next time to the gathered back portion of the waistband).  Fold and press in half then fold and press the raw, long edges, about 1 cm, for seam.
  10. Pin the waistband, right sides together, to the waist of the pants with interfacing portion of the waistband closer to the pants.
  11. Sew along the seam fold right below the interfacing of the waistband.
  12. Measure your child’s waist and add elastic accordingly.  (I used about 9 inches of elastic for my 6 yr old).  The elastic only goes in the back half of the waist.
  13. Sew the elastic on one end of the back half, then stretch it across and sew the other end of the elastic to the opposite back, half of the waistband.
  14. Fold 1 cm seam under to conceal the elastic and make a casing then carefully sew across the back and front of the waistband without catching the elastic.
  15. You will have to pull the elastic while you sew the back half of the waistband.
  16. Hem the pants by pressing in onto the wrong side about 1 cm
  17. Fold and press again to get desired length of pants.
  18. Machine stitch hem or to get a more tailored look, hem by hand.
  19. I think it looks fine with machine stitching.
  20. You are done, unless you want to add belt loops, which I decided to do as an afterthought.
  21. I salvaged the belt loops from the original pants then snipped it to the right size and used fray check to prevent fraying.
  22. Pin it to the waistband with right sides together and spacing (5 loops) around the waistband.  Two in the front, three in the back with one centered in back. Sew.
  23. Fold the other edge of the belt loop under and pin
  24. Carefully sew as close to the edge with a machine or hand stitch.

IMG_0343

He’s a natural model.  🙂  I love my B and I plan to make more handmade items for this little boy.  They grow so fast…

Thank you for reading,

-Flora

Easy Seafood Soon Tofu (해물 순두부)

tofusoup

Friday nights = I don’t cook nights.  With the exception of this past Friday night, that equation proves true.  We made a trip out to the Korean Market in Oakland a couple Saturdays ago and bought all the ingredients to make this Tofu Soup but for whatever reason, never got around to making Ken’s favorite soup.  Friday nights are always pizza and a movie night with the family and last Friday was going to be no exception, but I got a text message from Ken asking if we could have the Seafood Tofu Soup for dinner that night… I immediately thought to reply “of course not!  I don’t cook dinner on Fridays!” but then thought… well… I guess I could.  And that, my friends, is because this soup so easy and quick!

I already mentioned this soup is Ken’s favorite soup, and it’s also high up on the list for my kids as well.  They love Korean soups and like to dump their bowl of rice into their soup and eat it together, which is exactly what I did growing up, and is exactly what Korean moms feed their little toddlers after they start solids.  This tofu soup is a bit spicy but the kids didn’t have a problem finishing their food with a cup of water on hand.

Easy Seafood Soon Tofu (Korean Soft Tofu Soup)

  • 2 cups kimchi, finely chopped
  • 1 pack frozen seafood mix, 12 oz (or canned chopped clams, about 3 cans)
  • 3-4 cups chicken stock or chicken broth
  • 5 packs silken tofu, 11oz each
  • 2-3 eggs, lightly beaten
  • 3 green onions, chopped
  • vegetable or canola oil
  • finely ground red pepper flakes
  • 1 tsp sesame oil
  • salt & pepper

Optional step: Add a teaspoon of vegetable oil to hot, large pot and add 1/2 teaspoon of red pepper flakes to make the spicy oil, then add the kimchi.

  1. Heat a large pot and add a teaspoon of oil.  Add the kimchi and cook the kimchi on med-high heat until it starts to become translucent, about 3-4 mins.
  2. Increase heat to high, add the frozen seafood and stir-fry until it is almost cooked. Or add the canned clams with the clam juice.
  3. Add the chicken broth and bring it to a boil.
  4. When the soup is boiling, add the silken tofu and break it up into big chunks with a spatula and bring to a boil.  Add the eggs and again bring to boil.
  5. Add a teaspoon of sesame oil and the green onions then season with salt and pepper.

Done!

Recently Updated

Super quick and easy. The only prep you need to do is to chop the kimchi and the green onions.  Tip: I like to wear food service gloves when handling kimchi so I don’t end up with orangey-red fingertips and a lovely kimchi smelling hand.

The soup tastes great with canned clams as well!  The clam juice in the canned clams make the broth really flavorful and gives it a stronger seafood taste.  Just add less chicken stock if you are using canned clams since the juice in the cans will count towards the liquid you are adding to make the soup.

Korean Soon Tofu is closer to a stew in the sense that your tofu chunks should not be swimming around in a lot of liquid, but if you like it with more soup then add more of the chicken stock, just don’t drown your tofu.

tofusoup9

The only “exotic” ingredient I used for this dish is the kimchi, and even that can be found at your local grocery store around the Bay Area.  I must confess, I buy my kimchi from the Korean market and don’t make my own.  But I have tried once!  Fun Fact: Did you know many Koreans have a separate Kimchi refrigerator that keeps their kimchi at their perfectly fermented state for months?  They actually sell these little (and sometimes, not so little) kimchi fridges.

Next time you’re at the grocery store, see if you can’t spot a little jar of kimchi! I bet you’ll see it, if you haven’t already.

As always, thank you for reading and hope you have a great week!

-Flora

Weekend Mashup: Cherry Blossoms, Cupcakes & Egg Hunt

IMG_0238

Spring and Easter season have the best colors!  The pretty pastels in pink, yellow, blue, the cute little bunnies, eggs, and chicks; flowers blooming, and the world waking from a winter slumber.  It’s definitely one of my favorite time of year.  I had heard there were pretty cherry blossoms at the Japanese Tea Garden in Golden Gate Park during March and April and I had been wanting to see them.  So our family took a trip out to see some pretty cherry blossoms Saturday morning, but I was disappointed.  I saw one fully bloomed, beautiful cherry blossom tree at the entrance of the garden and didn’t see any more inside.  The garden is really beautifully landscaped and we still had a good time taking photos, walking around the garden and watching the Koi in the pond, but I had envisioned paths strewn with cherry blossom petals that fluttered down from the branches throughout the garden.  Perhaps I need to go later in April or take a trip out to Japan!  (or a reality check)

IMG_0201

I had the privilege of taking dessert to a friend’s Easter egg hunt at her beautiful home over the weekend.  Her home had the perfect layout for hiding eggs and a nice size grass lot for the kids to run off all their sugar and play games like egg toss, egg-on-a-spoon-race, and more.  I know my kids had a blast and my youngest, C, who is not yet 3, participated in all the games.  It was fun watching her balance an egg on her spoon.

As you probably know, I enjoy baking and constructing layered cakes (eating them too!) but there’s something about pretty cupcakes, frosted and decorated in soft pastels that really make me happy.  I can’t look at one without eating them, which is why I get into trouble whenever I bake these little morsels of heaven.  I had been wanting to eat coconut cake, given it’s Easter season, so of course I thought I would make coconut cupcakes!  I love coconut, but I know not everyone is a fan, like my daughter A, who can’t stand anything coconut and banana.  Still can’t figure out why… they’re so tasty.  To make her happy, I added sprinkles on some cupcakes and only added shredded coconut on half of the batch.  I tried to make bunny ears with marshmallows like I’d seen on Pinterest, but they looked a bit awkward on the mini cupcakes.  I had recruited help from B and A to make the marshmallow bunny ears, but I didn’t use most of them.  Now they’re sitting in a container on my counter and getting snacked on every time I enter the kitchen.  I should probably move them to the back of my highest cabinet.

IMG_0221 Awkward on the mini cupcakes…

I used my go-to yellow cupcake recipe which uses cake flour and sour cream and replaces half of the vanilla extract called for in the original recipe with almond extract.  I did the same to the cream cheese frosting recipe and added almond extract so it would compliment the coconut nicely.  Perhaps it’s the cake flour or perhaps it’s the sour cream, but this recipe produces soft, moist, almost melt in your mouth cupcakes.

Yield: a dozen regular cupcakes or 40+ mini cupcakes

IMG_0236

Vanilla Almond Cupcakes
  • 2 cups cake flour
  • 2 tsp baking powder
  • 1/2 tsp salt
  • 1/2 cup (1 stick) unsalted butter, room temp
  • 1 cup sugar (I usually add 2/3 cup)
  • 2 eggs
  • 1/2 tsp vanilla extract
  • 1/2 tsp almond extract
  • 2/3 cup sour cream
  1. Preheat the oven to 350°F.  Prepare a mini muffin pan by greasing the cavities or inserting cupcake liners. (You may also use regular size muffin pans, see below for longer baking time)
  2. In a small bowl, whisk together the flour, baking powder, and salt.  In a separate bowl, beat together butter and sugar until light.  Add one egg at a time and then add vanilla and almond extract.
  3. Add half of the dry ingredients into the butter mixture, then half of the sour cream and repeat with the remaining dry ingredients and sour cream.
  4. Spoon the batter into the prepared muffin cups and bake mini cupcakes for 12-14 mins.  Bake regular size cupcakes for 20-25 mins.
  5. Let cool completely before frosting.
Cream Cheese Almond Frosting
  • 1/2 cup (1 stick) unsalted butter, room temp
  • 8 oz cream cheese, room temp
  • 3 cups powdered sugar
  • 1/2 tsp vanilla extract
  • 1/2 tsp almond extract
  1. Beat the butter and cream cheese together in a stand mixer  or a handheld mixer until smooth.
  2. Add the sugar, vanilla, and almond extracts and beat until smooth.
  • Sweetened shredded coconut
  • pastel colored sprinkles

After the cupcakes have cooled, use a butter knife or a small spatula to frost the cupcakes (or you can pipe) then top with shredded coconut or sprinkles.  I like using the shredded coconut for this rather than the flaked ones.  (They look better)

IMG_0229

Happy Baking and thank you for reading!

-Flora

On the Hunt for Korean & Japanese Sewing Patterns

It’s a week from Easter and here I am sewing a dress in a green that looks like it would be more fall appropriate.  But I don’t care, I love the color, the fabric, and the design of the dress.  It really is simple in construction, but it took a lot longer to finish this garment due to some language stumbling blocks which sent me searching the Korean-English online dictionary for words in Korean I have never heard before (I never learned “topstitch” or “interfacing” in Korean!!!).  Despite the hiccups, I was determined to finish the dress and am going to make almost every pattern in the book.  I’ll have to think about the little capri pants with a sideways uni-suspender though.
I’ve been wanting to get my hands on a few Korean and Japanese children’s sewing patterns books for a while and found them extremely difficult to get without having to pay 2x the price of the book for international shipping.  I know there are quite a few Japanese sewing books that have been translated into English and are available for purchase on Amazon, but they didn’t have the same draw that this book did.  I was able to see sample pictures of the book on a Korean e-bookstore and even tried drafting my own pattern (still in the works) after a cute and simple girl’s tunic from one of the books, but I still wanted the other patterns… Well, I found a copy of the book on Etsy in Korean and ecstatic is an understatement to the joy I felt when I finally got it in the mail; international shipping needs to be quicker.  I did have to pay a bit more than I would have liked in shipping fees, but it was better than other online bookstores shipping from Korea.
Direct translation of the title: My Child’s Closet
I know it’s hard to see the pictures of the patterns making up the table of contents, which is such a cute idea!  The book includes patterns for dresses, a tunic, shirts, pants/shorts/capris, tutu, and one too many jacket/coats; I will likely attempt no more than one coat pattern.  I learned the hard way that seam allowances are NOT included in the pattern pieces and you have to add seam allowances according to the book.  For example, you have a skirt, and it says to add 1 cm seam allowance on all sides except the hem, you add 4 cm.  Also another thing I wasn’t used to was the metric units and the different symbols they use for “fold” when you cut.  I’ve come to realize that I like having seam allowances already built into the pattern pieces.

This dress, “Baggy Look One-Piece”, is one of the first patterns I’ve tackled from this book and it just may be my favorite little girl’s dress design.  I love the loose, comfy linen fabric that’s shown in the picture, the colors, and the cute pockets.  I tried to find a linen-type fabric as close to the one in the picture as I could, but I think mine is a bit thicker and has a bit more structure than I would like.  I actually like the way the dress seems to be a bit baggy and drapey on the model…

My little A loves the dress (of course) and says it’s now her favorite dress, but then she says that every time she gets a new dress. My sweet little girl.  She says it’s her fave because of the pockets.  Come to think of it, I don’t think she has pockets in any of her other dresses.  I love pockets in my dresses too and I didn’t know some wedding dresses have pockets!

I cut the pieces out for the dress a week ago and finally got out my sewing machine last night to construct it.  I really thought I would be done in a couple hours, but like I mentioned before, I got stuck on the Korean…  and here I was pretty confident about my Korean… I guess what other opportunities do I ever have to brush up and practice my Korean?  The only other time I use Korean is when I talk to my mom (over the phone) and when I make a conscious effort to use Korean when talking to my kiddos (which I forget to do most of the time).  It’s hard to remember to talk to them in Korean and it’s also inconvenient because I know they’ll understand me right away when I talk to them in English…

I really do love this dress! I want one in my size!  Probably wouldn’t look to flattering on me though.  That’s why I love sewing for little girls.  They look so sweet and cute in almost anything.

Maybe a muslin-type fabric would give the dress the loose, baggy, look that I was going for.  Next time.

For now, thanks for reading!

-Flora

Night Owl Projects: First Day Dress

Hope everyone had an enjoyable weekend.  I think I did, but then every weekend seems to be a blur of activities with the only trace of it ever happening, safely documented on Instagram thanks to my overgramming addiction.  I do recall purchasing a pattern, tracing and cutting the pattern pieces, cutting out my fabric pieces, and sewing them all late into the night, but then I didn’t Instagram that process so I can only conjecture.  *wink*  As my kiddos are getting older and participating in more activities, our Saturday schedules are becoming packed with back to back activities.  I find it quite fun and fulfilling at this point, but ask me again in a year.

I used to print patterns for boy’s shorts, neckties, skirts, etc. from Dana Made It a couple years ago and really liked all the tutorials and free patterns she had on her site.  That was when I was trying to learn how to make children’s clothes for my littles and had been scouring blogs and printing off everything that was free.  When I revisited her site last week, I found this First Day Dress Pattern that I just had to get and make for my girls.  My older girl is 5 and she will only wear dresses (as mentioned in a previous blog post) and her little sister, almost 3, is following in big sis’s footsteps.  So I have been meaning to make more dresses and skirts for them in hopes to also use up some of my hoard of fabric I have been sitting on for years.  This was the perfect opportunity to kill two birds with one stone.

I love how simple and quick this pattern went and love that you get multiple dress and top options.  I made the A-line dress and the Swing dress both with full linings and it got so many compliments when the girls wore them to the Easter Egg Hunt on Saturday.

I know the navy blue one is not very Easter-y in color but I loved the little apples on it and thought it would be perfect for my my little C since she will be starting preschool for the first time this fall.  I made her dress in the size 3 and my older A’s dress in the size 5.  They fit nice but have to put it on with arms fully extended straight up and my help for now.  There’s enough growing room for them both for the duration of the year or so they wear it.  Good thing C loves hand me downs from big sis.  Such a waste otherwise.

A is loving the skirt portion of her dress and the way it can “twirl like a princess”.  They wore it all day yesterday and today for church.  I’m already thinking of making more of these.  I might even venture to add some pockets on C’s A-line dress.  We will see how that goes and I will document the process on a future post.

Thanks for reading and sharing in my enthusiasm for darling girls’ clothes!

Orange Pound Cake with Lemon Mascarpone

It’s technically winter and spring isn’t here for another 8 days but it’s been warm the last couple days and I see beautiful, sweet berries at the store so I decide it’s okay to eat raspberries layered with orange pound cake and lemon mascarpone as dessert for book club before spring/summer.  This is my first time hosting book club and I’m still a newbie in the club so I was racking my brain for days trying to come up with a dessert to serve and I remembered this Trader Joe’s Cookbook recipe I love that uses ladyfingers soaked in orange juice layered with berries and lemon mascarpone.  I decided to try it with Ina Garten’s Orange Pound Cake and it had to be pound cake since the characters in the book had pound cake after their eventful dinner.  We just read the book “Mother of Pearl” by Melinda Haynes and we all agreed the first third of the book was really hard to get through.  There was a lot of crude words and language that really didn’t need to be there and should have been cleaned up by the editor.  Plus the story was difficult to follow as was keeping track of the characters in the beginning.  But once we got through the first couple hundred pages of the book, it finally started to pick up and things were starting to make more sense.  Also, we weren’t reading swear words and the crude words for body parts in every other sentence (okay, I exaggerate).  There were great relationship developments towards the end and it was overall a good read, IF you didn’t end up tossing the book at the beginning :).

I baked the Ina Garten Orange Pound Cake the night before so all I had to do was simply mix the lemon curd with mascarpone and layer with the pound cake and berries.  I think the raspberries go really well with the lemon mascarpone and the Orange pound cake rather than other berries, but strawberries would work well too.  It tastes great with ladyfingers but also tastes even better with the orange pound cake and all the wonderful citrus zest it it makes for a fresh, delightful dessert!  
It’s assembled into an 8×8 inch glass baking dish but can be made in individual glass cups for an even more elegant presentation.  It it is so fast and simple to make and even more so when you use store-bought ladyfingers!  Here are the recipes below! 
Orange Pound Cake by Ina Garten – it makes two loaves and you only need one loaf for the trifle dessert so you can always give away the other half, eat it yourself, or freeze it.
Better-Than-Tiramisu
adapted from “The I Love Trader Joe’s Cookbook”
Ingredients
1 (10oz) jar Lemon Curd
1.5 (8oz) containers mascarpone
1/2 cup orange juice
1 loaf Orange Pound Cake (recipe link above) or 1 package ladyfingers
about 2 cups fresh raspberries, washed and dried
Directions
1. Mix the lemon curd with the mascarpone cheese until smooth but don’t overbeat.  May become grainy if you beat too long.
2. Slice the pound cake into 1/2″ slices and dip it in orange juice.  Place dipped side up in the bottom of an 8×8″ dish and repeat until you fill the bottom of the dish.  Do the same for ladyfingers, if using.

3. Spread half of the lemon curd mascarpone mixture over the cake then top with half of the berries.
4. Repeat with another layer of sliced pound cake dipped in orange juice and top with remaining lemon mascarpone and raspberries.
5. Cover with plastic wrap and refrigerate at least an hour.
  
Serve and enjoy~
Thanks for reading! Please subscribe!
Cheers,
Flora