I hope you all had a wonderful holiday season! This is going to be a quick post on an easy and quick recipe that I saw today and just HAD to try right away. I was browsing FB and saw this video: https://www.facebook.com/dingo.food/videos/854615187974792/
Bake a cake in a rice cooker???? say what???
I always wondered why my Zojirushi Rice Cooker had a “cake” button and who would be crazy enough to bake a cake in their rice cooker… I guess I was crazy not to try it sooner! At least with this Castella recipe, the rice cooker was just the right amount of heat and steam to make a fluffy, light, and airy Castella cake, which is basically a type of sponge cake, but a far cry from those dry sponge cakes that need to be soaked with syrup. It’s a childhood favorite growing up and now my own children have adopted a love for them as well. Try it with a tall glass of milk! You’re welcome.
And without further adieu, here are my converted measurements for the ingredients which were all in grams. (If you know Korean and you watched the video, you may have noticed I substituted Mirin for Soju, since that’s what I have in my pantry and we don’t have soju in our home.)
Quick Rice Cooker Castella
Ingredients
6 large eggs, separated
1 cup granulated sugar, divided into 1/2 cups
1 TB Mirin
1/3 tsp salt
2 1/2 TB honey
1 1/2 cups cake flour
4 TB oil (canola, vegetable)
scant 1/4 cup milk
Directions
Grease your rice cooker with Canola oil spray.
Whip 6 egg whites in a clean stand mixer with whip attachment and add 1/2 cup sugar in 3 increments until stiff peaks form. Set aside.
Whip 6 egg yolks with 1/2 cup sugar. Add the Mirin, salt, and honey and whip. Add the cake flour and mix.
Fold in a third of the meringue (egg whites) into the yolk batter and carefully fold in. Add another third and fold. Finally, add the remaining meringue and fold.
Mix the oil and milk together then fold into the batter.
Pour the batter into greased rice cooker pot and push your “cake” button or the video says “steam” setting for 60 minutes.
carefully invert the cake out of the pot onto a plate, cool, and eat!
*Note: the top of the cake will look pale when you open the rice cooker and you may wonder if the cake is “cooked” through. You’re welcome to try the toothpick test, but it was nicely browned on the bottom of the cake (which becomes the top when you invert it).
Now go and try it yourself!!! I’m never baking my Castella in the oven again!!!
It’s a cold, rainy day here and I’m enjoying just shuffling around the home and being grateful for the warmth, shelter, and food in our tummies. I’ve got a little slot of time before the Thursday afternoon madness resumes so I thought I would post an old-time favorite snack of mine that we made a while back but I never got around to posting. If you noticed my last post was some time ago … there’s been some crazy real estate swapping that went on which kept me just a bit preoccupied. I’m the type that likes to concentrate on one thing at a time and feel frazzled if I have too much going on and of course I ended up starting a part-time job at the same time we decided to sell and buy… so there’s my excuse 🙂
Back in SoCal, I loved walking through our big neighborhood Korean grocery store and walking to the back of the store where they made “Wang Mandoo” and sneaking a pack into the grocery cart. “Wang” means king and “mandoo” means dumpling. So you can imagine they were giant, softball-sized dumplings filled with my favorite “Japchae” or glass noodles. The slightly sweet steamed bun exterior mingled with the savory beef and veggie japchae interior was perfection that would leave you feeling like the “after” of a Snickers Bar commercial.
I found this recipe for steamed Korean buns many years ago on a Korean baking site, and it’s just perfect when you live 30 mins from the nearest Korean store (compared to 5 mins growing up) and you do not want to do the Caldecott Tunnel but you want some “Wang Mandoo”. Plus, homemade is always better, right? The recipe was all in grams so I measured all the ingredients into volume measurements for my own sake and I’m sharing them with you. I didn’t notice any difference in the result when I used my converted volume measurements to make them again and again.
I made two different fillings for my buns: “Wang Mandoo” with Japchae filling and “Hobbang” with sweet red bean paste filling.
You can use my Japchae recipe here for the “Wang Mandoo” and the red bean paste filling was purchased at my past Korean store excursion. You can really put anything you want inside the bun, Spam and kimchi is super yummy, too! Or you can just make buns without any filling! I made both japchae filling and the red bean paste filling and they were both so delicious! Would be perfect for this cold, rainy day… wish I had some right now.
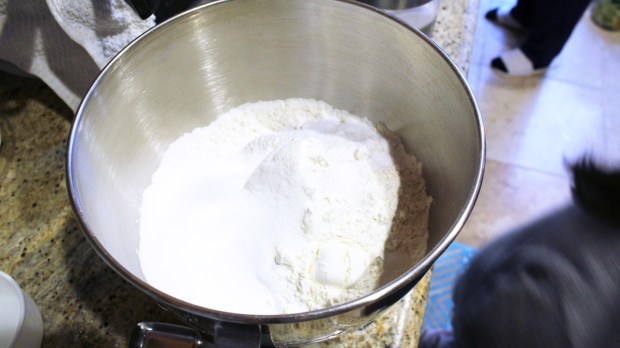
In a large mixing bowl, mix together the flour, baking powder, yeast, sugar, salt, and dry milk powder.
Add the warm water and mix/knead until dough forms. You can use a stand mixer with a dough hook attachment. Once you have a ball of dough, add in the oil and knead until you have a nice, shiny dough that isn’t sticky.
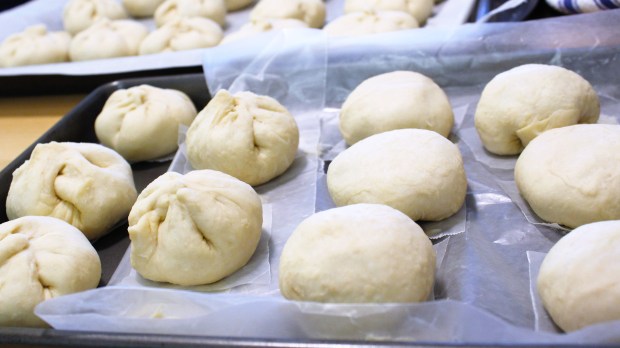
Divide the dough into little balls (60 gram balls, about the size of a golf ball). Place on a baking sheet lined with wax paper, cover with clean cloth and let rest for 15 mins.
Flatten a ball of dough and fill with desired filling of choice. Pinch ends closed then place onto a square of wax paper. (If not using filling, just place ball of dough onto wax square)
Watch my mom pinch and close the dough for the bun. Apologize for the static background noise. watch with sound off 🙂
This is my store-bought Red bean paste
Traditionally for the “Wang Mandoo” you place the seam side facing up and for the “Hobbang” you place it seam side down.
Let dough rise in a warm place for 30 mins
While the dough is rising, start heating your pot of water for the steamer over med high heat
Place the dough into the steamer (don’t over-crowd, they will grow) once the water is boiling and you see steam rising. Steam for about 10 mins. Don’t open the lid while steaming.
And Voila~ beautiful, fluffy, warm, delicious buns!!!
Steamed Korean Buns Recipe (왕만두/호빵)
Makes: about 2 dozen buns
Ingredients (Bun)
scant 3 cups all purpose flour
3/4 TBS baking powder
1 1/2 TBS dry yeast
1/3 cup granulated sugar
1 tsp salt
2 TBS non-fat dry milk powder
1 cup warm water (more or less)
1/6 cup vegetable or canola or grapeseed oil
Filling
Japchae Recipe or store-bought Red Bean Paste or be creative! 🙂
Directions
Prep: cut out 24 little 3″x 3″ squares of wax paper.
In a large mixing bowl, mix together the flour, baking powder, yeast, sugar, salt, and dry milk powder.
Add the warm water and mix/knead until dough forms. You can use a stand mixer with a dough hook attachment. Once you have a ball of dough, add in the oil and knead until you have a nice, shiny dough that isn’t sticky.
Divide the dough into little balls (60 gram balls, about the size of a golf ball). Place on a baking sheet lined with wax paper, cover with clean cloth and let rest for 15 mins.
Flatten a ball of dough and fill with desired filling of choice. Pinch ends closed then place onto a square of wax paper. (If not using filling, just place ball of dough onto wax square) Traditionally for the “Wang Mandoo” you place the seam side facing up and for the “Hobbang” you place it seam side down.
Let dough rise in a warm place for 30 mins
While the dough is rising, start heating your pot of water for the steamer over med high heat
Place the dough into the steamer (don’t over-crowd, they will grow) once the water is boiling and you see steam rising. Steam for about 10 mins. Don’t open the lid while steaming.
Carefully remove and enjoy your steams buns!!!
Before my mom devoured hers 🙂
I’m going to get my butt out to the Korean store soon. My stock of Korean ingredients is dwindling… probably when it stops raining. Yes, I’m spoiled with good weather here and don’t go out when it rains… and my parents live in WA… ha.
Thanks for reading and stay dry and warm out there!
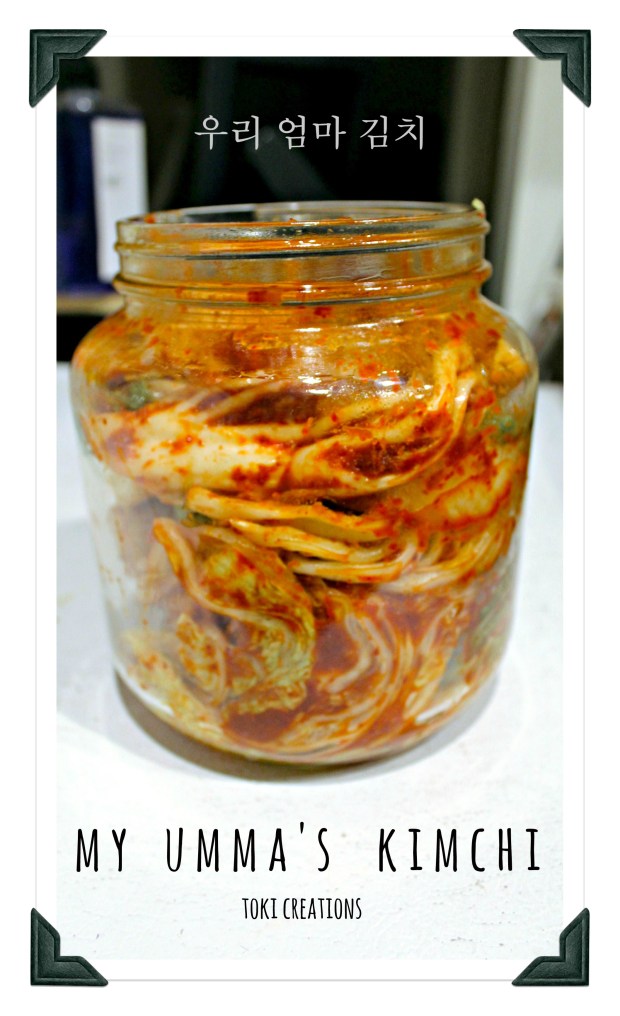
I have a confession to make. I am Korean. Okay, that wasn’t my confession. Here it is:
I am Korean. And I buy my kimchi. -_- I know, I know. I don’t deserve to lay claim to my Korean roots if I don’t make my own kimchi or own a kimchi refrigerator. (Yes, there is such a fridge and it keeps kimchi and regular produce fresh forEVER!) But wait, do you know what kimchi is? It’s only the best, tastiest, and healthiest Korean mealtime staple with natural probiotics and lots of Vitamin A and C. Basically it’s fermented Chinese cabbage (can also be made from a variety of other vegetables and seasonings) that is eaten as a side dish and ranges from mild to spicy, to watery, to fishy.
My mom’s visiting and I’m taking full advantage of her Korean cooking skills and documenting her kimchi-making process so I can try to replicate it next time I run out of her kimchi. I’ve made kimchi by myself once before in my lifetime and I must confess it was a fail. My mom sort of walked through the steps and ingredients with me over the phone and I tried to mimic it… and well… it just wasn’t the same. Hopefully, standing over her shoulder and breathing down her neck while watching her make this kimchi will help me the next time I attempt it. We sort of measured the ingredients as she went along because, like many Korean moms out there, her measurements and recipe is in her head and her hand. She just sort of eyeballs it and adds more or less by taste. I was probably frustrating her whenever I stopped her to measure the ingredients 🙂 but she was super patient with me. So here is how my mom makes her kimchi:
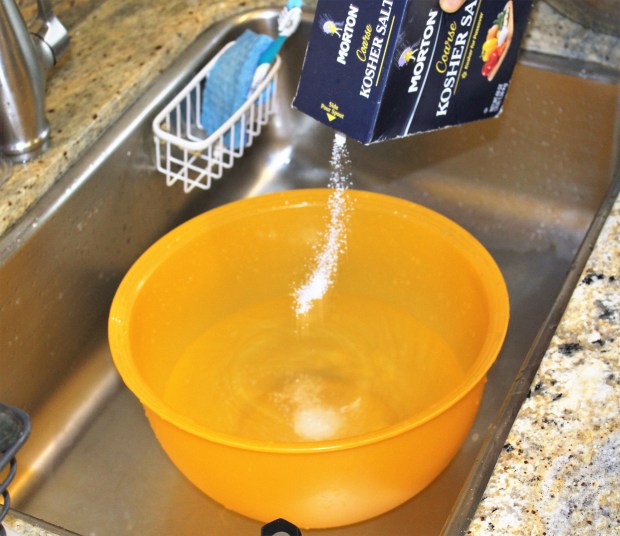
Add lots of salt to a bucket of water (should taste like the sea). We used Kosher Salt because I don’t have Kimchi salt, but my mom prefers to use Kimchi salt (which might be the same as rock salt).
Slice your cabbage in half, vertically.
Slice again, so you have quartered your cabbage. Cut off the hard core/stem, but we want enough of the stem to keep the leaves together.
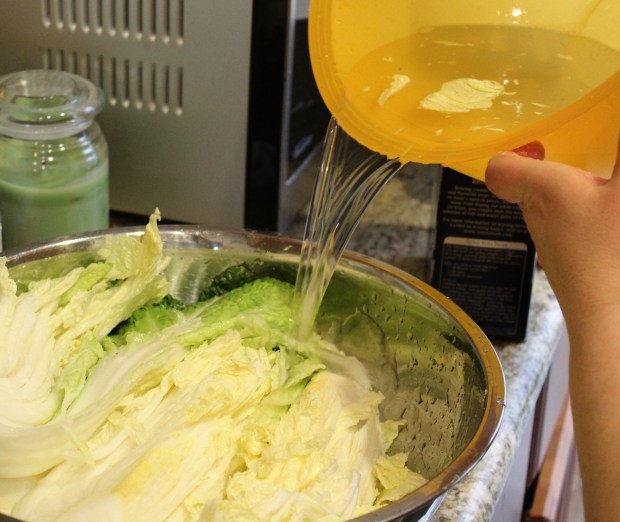
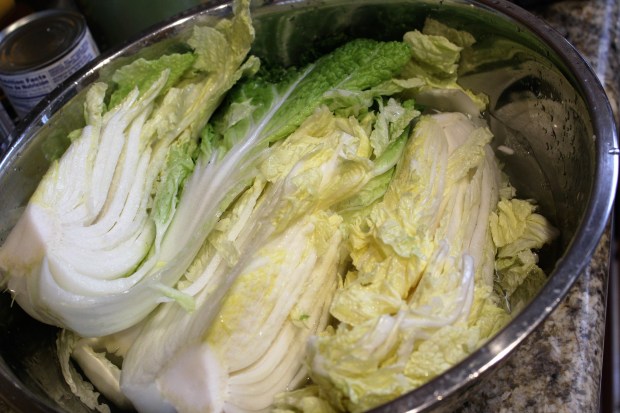
Dunk your cabbage quarters in the brine water, let it drain, then salt between each leaf, concentrating on the thicker, white (non-leafy) portion of the cabbage. Repeat for all.
Here’s a quick video to help you (and me) see how to prep/brine the cabbage.
After salting all the cabbage, pour the rest of the salt water over the cabbage and let it brine for about 2-3 hours. (depends on how much salt and water. taste it after 2 hours to determine)
Turn and rotate the cabbage halfway through brining
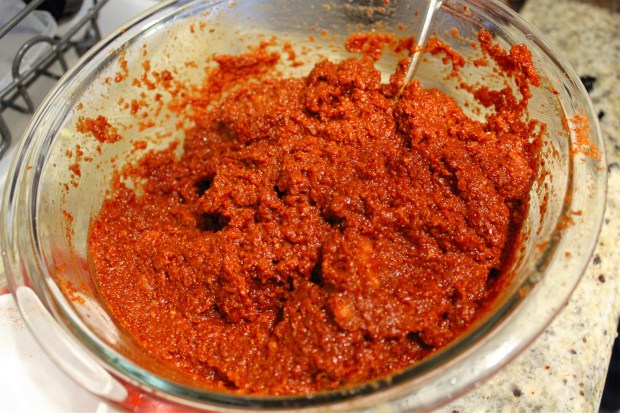
Meanwhile, make the kimchi paste/marinade by chopping your onion, Korean pear, ginger, garlic, and radish, place in a blender, add your fish sauce, then puree.
Add your red pepper flakes and brown sugar to your puree and you have your kimchi paste
After the cabbage is salty enough, dump out the salt water, then rinse your cabbage in running water 2-3 times and let drain for about 30 mins. Now get on some food service gloves (the red pepper on your skin will sting) and smear on that kimchi paste all over and between the cabbage leaves. “Wrap” the outer most leaf around the quarter of cabbage then carefully tuck into a glass jar. Fill the jar (cover w/ lid) then place in the refrigerator (or to eat it sooner, leave it out at room temperature for a day). And you lucky ducks with a kimchi refrigerator, you know what to do.
Ingredients
2 Napa (Chinese) Cabbage, washed
Lots of Coarse salt (Preferably Kimchi salt)
1 cup fish sauce (I used Tiparos brand Thai Fish Sauce. Korean ones are saltier and less sweet, so add more or less according to taste)
1/2 onion, chopped
1/2 Korean pear, chopped
1 cup Daikon radish, chopped
1 inch ginger root, chopped
~13 cloves garlic, sliced
1 ½ cups coarse red pepper flakes
1 TB brown sugar
*You will need a big, wide bowl to brine, a bucket, food service gloves, and wide-mouth glass (preferably) jar to store kimchi)
Directions
Add lots of salt to a bucket of water (should taste like the sea)
Slice your cabbage in half, vertically. Then slice again, vertically, so you have quartered your cabbage.
Cut off the hard core/stem, but we want enough of the stem to keep the leaves together.
Dunk your cabbage quarters in the brine water, let it drain, then salt between each leaf, concentrating on the thicker, white (non-leafy) portion of the cabbage. Repeat for all.
After salting all the cabbage, pour the rest of the salt water over the cabbage and let it brine for about 2-3 hours turning and rotating the cabbage halfway through brine period . (depends on how much salt and water. taste it after 2 hours to determine)
Meanwhile, make the kimchi paste/marinade by chopping your onion, Korean pear, ginger, garlic, and radish, place in a blender, add your fish sauce, then puree.
Add your red pepper flakes and brown sugar to your puree and you have your kimchi paste
After the cabbage is salty enough, dump out the salt water, then rinse your cabbage in running water 2-3 times and let drain for about 30 mins.
With food service gloves (the red pepper on your skin will sting), smear on the kimchi paste over and between the cabbage leaves.
“Wrap” the outer most leaf around the quarter of cabbage then carefully tuck into a glass jar. Fill the jar (cover w/ lid) then place in the refrigerator (or to eat it sooner, leave it out at room temperature for a day). And you lucky ducks with a kimchi refrigerator, you know what to do.
*I bought only one Napa cabbage but the recipe makes enough kimchi paste for two Napa cabbages so the recipe calls for two of the cabbages.
Happy Father’s Day (yesterday) to all the wonderful dads, granddads, uncles, and all the male figures out there who are a role model/father figure to our little ones (and sometimes not so little ones…). I am lucky to have an awesome partner to help me raise our three little ones in this parenting experiment we have undertaken that we, hopefully, don’t mess up.
We had a wonderful weekend filled with fun activities ranging from adult softball to swimming to a birthday party before our relaxing Father’s Day Sunday at home. I had grand plans for Father’s Day… but well… it didn’t pan out. I found myself standing in line at Safeway on Saturday night with some nectarines and whipped cream to make crepes for Sunday morning breakfast when I saw a college student in line before me with the Sports Illustrated Warriors Champs edition. I asked him how much the magazine was, then I thought I should grab one as a last minute gift for my Warriors fan hubby. He loved it! And the crepes got raving reviews from the hubby and all three of the kids, so that was a score! It was such a simple crepe, too! Just used the basic crepes recipe that I always use, spread raspberry jam onto half of the crepe, then added sliced nectarines (peaches would be great too) and whipped cream. So good! You can never go wrong with peaches and cream.
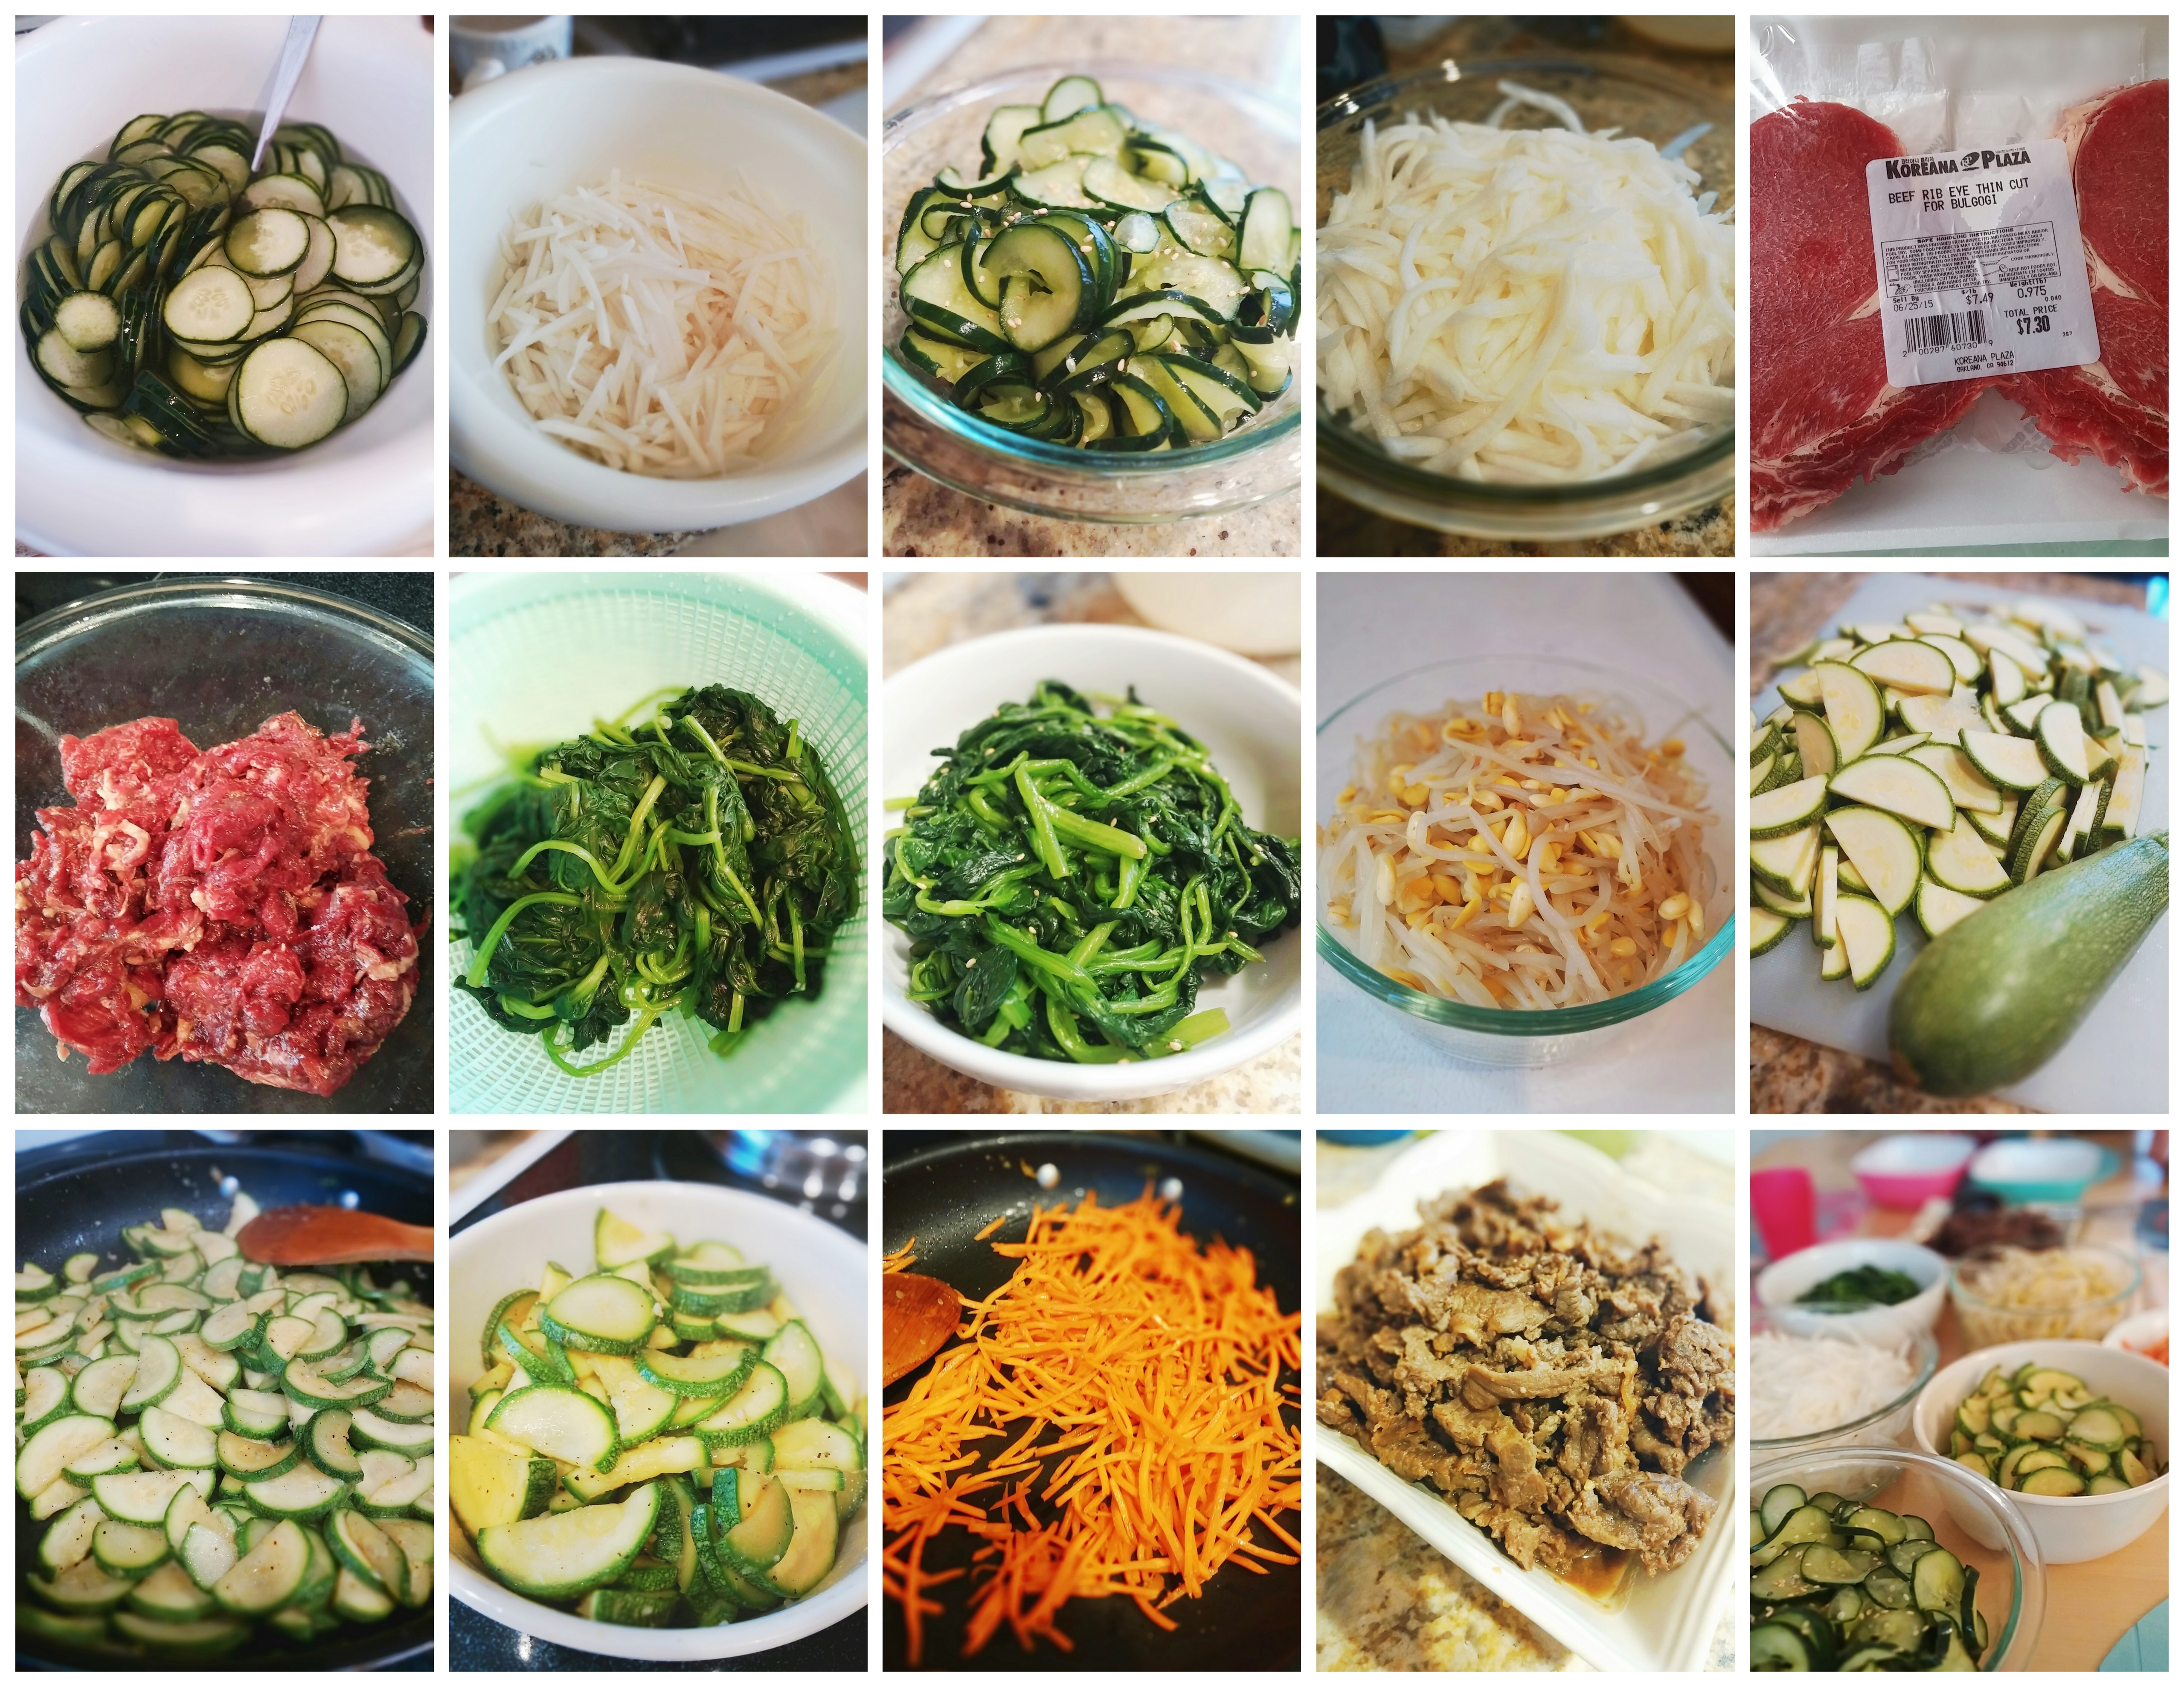
Ken hubby married a Korean woman, me, so we eat a lot of Korean food, and luckily, he loves Korean food! (most of it anyway… I can’t get him to eat rice cakes though) So dinner tonight was bibimbap. It’s basically lots of different seasoned vegetables (some pickled, others boiled or stir-fried) with some teriyaki-style marinated beef all mixed with rice; I like to add red pepper paste to mine. It’s gotta be one of the healthiest dishes out there, and it’s Soooooo good! My mother-in-law joined us for dinner and this is her favorite dish. She always orders the stone bowl bibimbap whenever we go to Korean restaurants, which is the same thing, they just put the rice in a hot stone bowl so the rice touching the bowl becomes nice and crunchy.
I put together a recipe and measured the ingredients while making this today so I would be able to share it. I eyeballed some of the ingredients but you can always adjust the seasonings to your own taste. I tend to make my ingredients slightly more salty then I would normally season them because you’ll be mixing it with the rice, which is not seasoned.
Bulbogi Bibimbap
serves about 5-6
Ingredients
2 large cucumbers, thinly sliced
1 daikon radish, julienned (about 4 cups)
2-3 bunches spinach (not baby)
1 bag soybean sprouts (different from mung bean sprouts)
3 carrots, peeled and julienned
4-5 Mexican squash, cut in half vertically, then sliced
1 lb bulgogi beef (thinly sliced beef)
salt, pepper, oil, vinegar, sugar, brown sugar
sesame oil, sesame seeds,
soy sauce, brown sugar, crushed garlic
cooked calrose rice (sushi rice, not long grain) (4 cups uncooked)
Directions
Cook your rice in your rice cooker and cut/prep your ingredients.
At least 1 hour ahead of time, pickle the sliced cucumbers by submerging them into a large bowl with salty water (should taste like the ocean) 🙂
At the same time, but in a separate bowl, pickle the julienned radish by adding 3/4 cup vinegar, 1/3 cup white sugar, 1TB salt and 1/4 cup water. Set them both aside.
Marinate the beef by massaging about a tablespoon of sesame oil into the meat with gloved hands then add 1/4 cup soy sauce, 4 TB brown sugar, and 3 crushed garlic cloves and mix. Set aside to marinate.
Bring a medium pot of water to a boil, then boil the soybean sprouts for 5 mins (becomes somewhat translucent) and drain. Place drained sprouts into a bowl then season with salt, 1/2 tsp of sesame oil, and 1/2 tsp sesame seeds. You can also add some crushed garlic if desired; about 1 clove. Mix with gloved hands. Sprouts are done, so set aside.
Bring another pot of water to a boil and blanch the spinach. Don’t overcook the spinach! Just about a minute should be enough. Drain, gently squeeze out the water and place the spinach into a bowl. Add salt, 1/2 tsp sesame oil, and 1/2 tsp sesame seeds, (again, garlic optional) and mix. It works best if you use food service gloves to mix by hand.
Add about a tablespoon of oil onto a frying pan, heat over med high heat. Add a clove of crushed garlic then stir fry the Mexican squash until cooked. Season with salt and pepper.
Add about a tablespoon of oil onto a frying pan, heat over med. high heat. Add a clove of crushed garlic then stir fry the julienned carrots. Season with salt and pepper.
Drain the cucumbers, gently squeeze excess water from the cucumbers, then place them into a bowl. Add a little sesame oil (about 1/2 tsp) then mix and the cucumbers are ready. Sesame seeds optional
Scoop out the radish from the vinegar and place into a bowl. You don’t need to drain it completely of the liquid. You can add red pepper flakes if you want a kick to it, but I didn’t add it for the kids’ sake.
Heat the pan and cook the meat until ready.
Serve cooked rice in large bowls then place each of the vegetables and meat on top and mix. Add a little more sesame oil if desired and also red pepper paste if you can handle the heat. 🙂
My kids ate really well tonight! The girls actually asked for seconds and my boy asked for a huge bowl of food to start off with and finished it! We love bibimbap!!! Try making your own~
Thanks for reading and have a wonderful, fantastic, awesome week!
Friday nights = I don’t cook nights. With the exception of this past Friday night, that equation proves true. We made a trip out to the Korean Market in Oakland a couple Saturdays ago and bought all the ingredients to make this Tofu Soup but for whatever reason, never got around to making Ken’s favorite soup. Friday nights are always pizza and a movie night with the family and last Friday was going to be no exception, but I got a text message from Ken asking if we could have the Seafood Tofu Soup for dinner that night… I immediately thought to reply “of course not! I don’t cook dinner on Fridays!” but then thought… well… I guess I could. And that, my friends, is because this soup so easy and quick!
I already mentioned this soup is Ken’s favorite soup, and it’s also high up on the list for my kids as well. They love Korean soups and like to dump their bowl of rice into their soup and eat it together, which is exactly what I did growing up, and is exactly what Korean moms feed their little toddlers after they start solids. This tofu soup is a bit spicy but the kids didn’t have a problem finishing their food with a cup of water on hand.
Easy Seafood Soon Tofu (Korean Soft Tofu Soup)
2 cups kimchi, finely chopped
1 pack frozen seafood mix, 12 oz (or canned chopped clams, about 3 cans)
3-4 cups chicken stock or chicken broth
5 packs silken tofu, 11oz each
2-3 eggs, lightly beaten
3 green onions, chopped
vegetable or canola oil
finely ground red pepper flakes
1 tsp sesame oil
salt & pepper
Optional step: Add a teaspoon of vegetable oil to hot, large pot and add 1/2 teaspoon of red pepper flakes to make the spicy oil, then add the kimchi.
Heat a large pot and add a teaspoon of oil. Add the kimchi and cook the kimchi on med-high heat until it starts to become translucent, about 3-4 mins.
Increase heat to high, add the frozen seafood and stir-fry until it is almost cooked. Or add the canned clams with the clam juice.
Add the chicken broth and bring it to a boil.
When the soup is boiling, add the silken tofu and break it up into big chunks with a spatula and bring to a boil. Add the eggs and again bring to boil.
Add a teaspoon of sesame oil and the green onions then season with salt and pepper.
Done!
Super quick and easy. The only prep you need to do is to chop the kimchi and the green onions. Tip: I like to wear food service gloves when handling kimchi so I don’t end up with orangey-red fingertips and a lovely kimchi smelling hand.
The soup tastes great with canned clams as well! The clam juice in the canned clams make the broth really flavorful and gives it a stronger seafood taste. Just add less chicken stock if you are using canned clams since the juice in the cans will count towards the liquid you are adding to make the soup.
Korean Soon Tofu is closer to a stew in the sense that your tofu chunks should not be swimming around in a lot of liquid, but if you like it with more soup then add more of the chicken stock, just don’t drown your tofu.
The only “exotic” ingredient I used for this dish is the kimchi, and even that can be found at your local grocery store around the Bay Area. I must confess, I buy my kimchi from the Korean market and don’t make my own. But I have tried once! Fun Fact: Did you know many Koreans have a separate Kimchi refrigerator that keeps their kimchi at their perfectly fermented state for months? They actually sell these little (and sometimes, not so little) kimchi fridges.
Next time you’re at the grocery store, see if you can’t spot a little jar of kimchi! I bet you’ll see it, if you haven’t already.
As always, thank you for reading and hope you have a great week!


 In a large mixing bowl, mix together the flour, baking powder, yeast, sugar, salt, and dry milk powder.
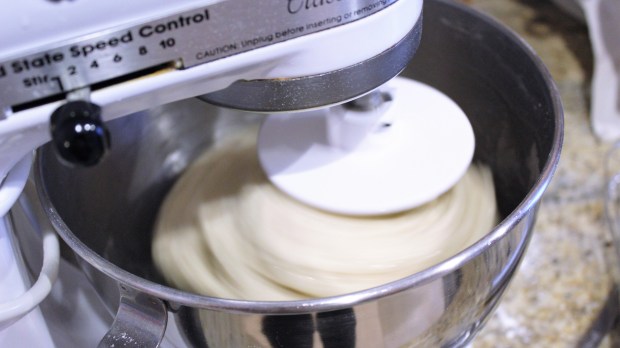 Add the warm water and mix/knead until dough forms. You can use a stand mixer with a dough hook attachment. Once you have a ball of dough, add in the oil and knead until you have a nice, shiny dough that isn’t sticky.
 Divide the dough into little balls (60 gram balls, about the size of a golf ball). Place on a baking sheet lined with wax paper, cover with clean cloth and let rest for 15 mins.
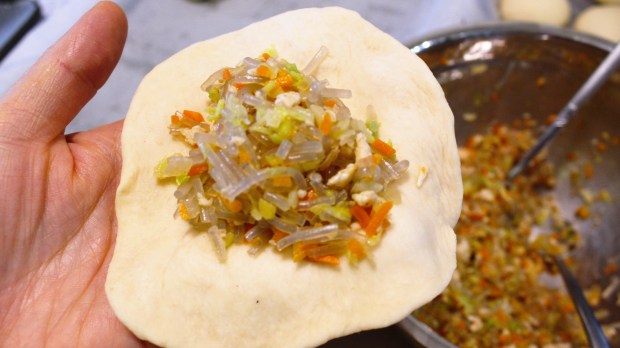 Flatten a ball of dough and fill with desired filling of choice. Pinch ends closed then place onto a square of wax paper. (If not using filling, just place ball of dough onto wax square)
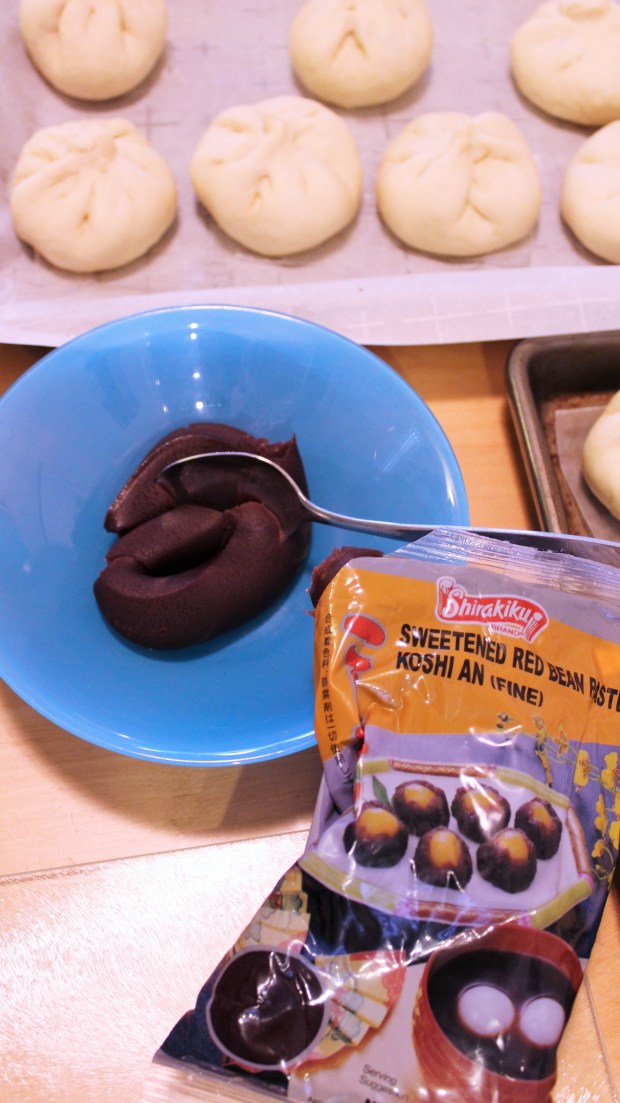
 Let dough rise in a warm place for 30 mins
 While the dough is rising, start heating your pot of water for the steamer over med high heat
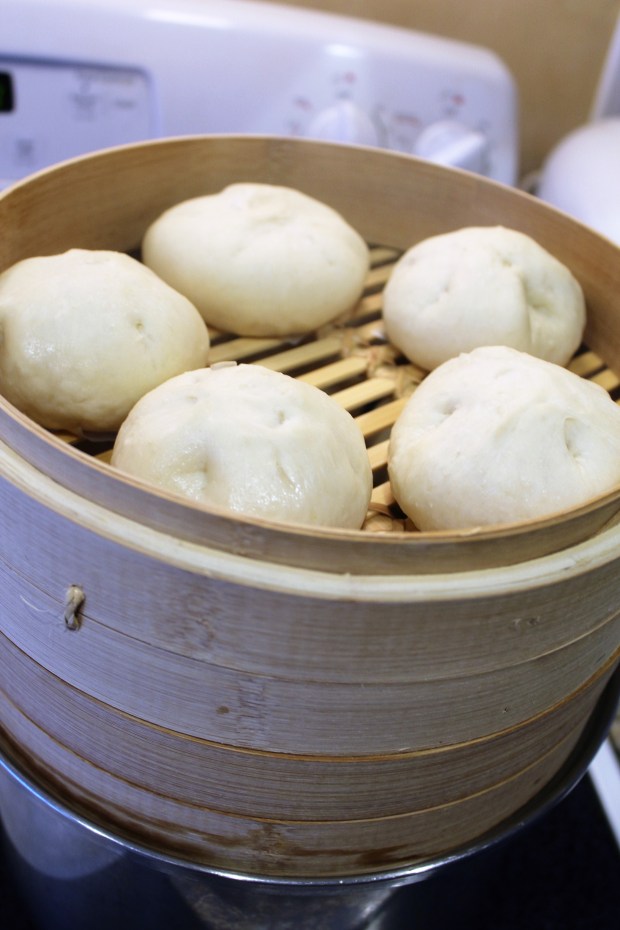 Place the dough into the steamer (don’t over-crowd, they will grow) once the water is boiling and you see steam rising. Steam for about 10 mins. Don’t open the lid while steaming.