Coconut Oatmeal Chocolate Chip Cookies

Yeah, they’re SO good that only half (or less than half) of the cookie made it on this picture 😉  I LOVE coconut.  It’s awesome how there’s so many coconut and coconut oil recipes out there with everyone going gluten-free.  I love it!  This one definitely is NOT gluten-free and has a whole lot of butter in it, but that’s what makes them so good-old-fashioned spectacular.  They’re sooooo yum!  You won’t be able to eat JUST one.  That’s what I told myself I was going to do… I’m going to eat JUST ONE, but alas… I’ve eaten… 3? ok 4… ALRIGHT… I can’t remember.  They may not be fancy or much to look at, but are your eyes going to do the eating?!?! Yeah, that’s what I thought.  
I actually found this recipe on my phone… meaning I was probably perusing through some baking books at the library, liked the recipe, took a picture of it on my phone and forgot about it.  I found it the other day while trying to organize some of the pictures and thought, ‘hey, I have all the ingredients!’  Tried the recipe and love it!  Don’t bake them on those air-insulated cookie sheets… I did for some of them and the cookies spread like mad.  Bake them on a regular cookie sheet with parchment paper.  Works perfectly.
Coconut Oatmeal Chocolate Chip Cookies
Ingredients:
2 cups all-purpose flour
1 tsp baking soda
1 cup (2 sticks) unsalted butter, room temp
1 cup granulated sugar
½ cup packed brown sugar
1 tsp salt
2 large eggs, room temp
1 TB pure vanilla extract
12 oz semisweet chocolate chips
1 cup sweetened shredded coconut
1 cup old-fashioned rolled oats (not instant)
Preheat the oven to 350ºF.  Line 2-3 baking sheets with parchment paper.
Whisk together the flour and baking soda and set aside.
Beat the butter, sugars, and salt with a paddle attachment until light and fluffy, about 2-3 mins.  Scrape down sides of the bowl halfway though.  Add the eggs one at a time, allowing it to incorporate before adding the next one.  Scrape down sides and add vanilla and beat. 
Add the flour mixture with mixer on low speed.  Then fold in the chocolate chips, coconut, and oats using a rubber spatula.  Drop by tablespoonfuls onto the prepared cookie sheets about 2 inches apart. 
Bake for about 10-12 mins, rotating pan halfway so they brown evenly.  Lift the parchment paper with the cookies on them to a cooling rack and cool until set.  Then lift with a spatula and allow them to cool completely on the rack.  

My 4 year old son LOVES to help me bake and loves to help me eat them even more.  He definitely takes after me in the sweet tooth department.  Oh, and that goofy plate is one that my husband used growing up!  My Mother-in-law has kept it all these many, many years!  Pretty neat.

Ginger Tomato Beef Soup

After getting married, my mother-in-law picked us up from the airport and when we arrived at her house late at night with rumbling tummies, gave us some of this soup for us to eat.  I completely fell in love with this soup and she verbally gave me the ‘recipe’.  It became THE soup to expect when my husband would return home from a business trip and whenever I would leave him alone at home while I went to visit my family with the kids.  (THE soup and lasagna would sustain him for a few days)  Poor him.  ha.

It’s a really soothing, delicious soup and healthy at that.  Just eat it with some rice or bread and you’ve got you and your family a healthy and great-tasting meal.  This recipe makes a large pot of soup so it’s great if you have a hippo for a husband who drinks soup by the gallon.  😉  Gotta love my hubby.

Ginger Tomato Beef Soup
Ingredients
1 ½ lbs beef shank (or beef stew meat*)
1 ½- 2 inches fresh ginger, peeled and sliced
4-5 carrots, peeled and chopped
5-6 celery stalks, chopped
½ head of cabbage, chopped
1 qt chicken stock
1 qt creamy tomato soup (Trader Joe’s tastes best)
Salt and pepper
Tabasco(optional, gives it a really nice kick)
*if you use beef stew beef, then the soup base may be a little less hearty, and can substitute half of the chicken stock for beef broth
prep all your veggies by washing, peeling, and chopping
 That’s about how much ginger I use.  Peel and slice.
Add the beef and sliced ginger to a pressure cooker pot and add water just until the meat is almost submerged.  
Lock the pressure cooker lid and heat on high until it comes to a boil, then boil for about 30 mins on med-low heat.  Turn off the heat and allow it to cool and release all the steam. 

 You can skim off some of the fat/oil floating on the surface.  Once the steam is released and you are able to unlock the pot, remove the beef and cut it up into small cubes, trimming away and tossing the fat and the small bone in the middle.  Strain the liquid through a strainer, toss the ginger, and transfer the beef and the strained liquid to another large pot.

 Add the chicken stock, creamy tomato soup, and all the vegetables and bring to a boil, skimming the foam that rises.  Boil until the vegetables are soft then season with salt and black pepper.  

That’s IT!  Serve with some Tabasco, if you dare 😉

Japchae 잡채- Korean Glass Noodles

We woke up excited to have a good friend and her daughter come visit and play with us all day today!  It was so nice to hang out and chat while the kids entertained themselves, yes, I really don’t have many friends here.  We got a good laugh watching “Pitch Perfect” (my 4th time) while our little girls were taking their afternoon nap and my 4 yr old boy did his ‘quiet time’, more like movie time, with us.  We went to the park after their nap and after our movie to run the kids around and use up some of their energy.  But before we left, we did the vegetable prep that way we could just throw the ingredients together after we got back  So dinner tonight was Korean Japchae and bulgogi with lettuce that you wrap up with rice and a spicy bean paste.

Oh, and on a side note, my 9 month old daughter just started waving “hi” and “bye” and can also shake her head when we shake our head.  Except she moves her whole body while she’s shaking her head with extreme gusto.  She is so cute and I could just eat her up!  Her little chipmunk cheeks are to die for.  I wish she would stay this happy and unrebellious forever!
And back to our subject: Japchae is a very well known and popular Korean noodle dish that is different from other “noodle” dishes because instead of it being a main dish in a meal, Koreans use is as a side dish to be eaten with rice and other side dishes.  I think rice is Korean people’s main dish in every meal.  It’s always there, oh, and kimchi, can’t forget our mealtime staple.  Serve up a plate of lasagna and my dad will ask for rice and kimchi to go with it.  A meal just isn’t a meal without rice and of course if there’s rice, there needs to be kimchi.  Many Korean restaurants will serve japchae as a side dish with their Barbeque meats.  It’s fairly easy to make other than the fact that it has quite a few steps for prep.
I normally make Japchae without a recipe and without using any measuring cups or spoons so when my aunt (on my husband’s side) asked me for a recipe, I obviously couldn’t give it to ber.  So this time, I used measuring cups and spoons to measure how much of each ingredient I was adding so I could share it with everyone.  As with all recipes (usually non-baking), I think it’s a good rule of thumb to use your instincts and taste as you go so you can add more or less seasoning according to your taste.

Japchae
printable recipe (no step-by-step pics)

Ingredients
1 pack Korean dried glass noodles (sweet potato noodles) about 1 lb.
4 medium carrots, peeled and julienned
1 medium onion, sliced
1 bunch spinach, blanched for a few seconds and drained
4 dried shitake mushrooms, soaked in warm water for 15 mins
.25 lbs beef*, sliced into 1-inch strips (marinated bulgogi works great)
2 cloves of garlic, minced or use garlic press (divide in half)
vegetable oil
1/3 plus 4 TB lite** soy sauce
1/4 plus 1 TB brown sugar
2 TB sesame oil
sesame seeds

salt and pepper

*you can omit the beef for a vegetarian version.  Just add a little more of the vegetables, like another carrot or two and some more spinach or add zucchini and cook it with the other vegetables.

** If you are using regular soy sauce, add just the 1/3 cup soy sauce to begin with and add more as needed.
1.  Soak the dried shitake mushrooms in warm water before hand and prepare your vegetables by washing, peeling, and cutting.  Mix the soy sauce and brown sugar in a bowl
2.  Bring a medium pot of water to a boil and blanch the spinach for a few seconds until it withers then drain and gently squeeze excess water.  Add a 1/4 tsp of salt, 1 clove of garlic, minced, (or I use a garlic press), a 1/4 tsp sesame oil and mix.
 
3.   Bring a large pot of water to a boil and cook the glass noodles for about 5-7 minutes.  Test it by tasting the noodle for doneness.  It shouldn’t be hard.  Rinse under cold water and drain.
4.  Put the noodles into a large mixing bowl and add most of the soysauce and brown sugar mixture to the noodles and mix well.  Taste and add the rest of the soysauce mixture if needed then add the 2 TB sesame oil and mix.  A food service glove, like the one pictured above, comes in very handy.
5.  Add a tablespoon of vegetable oil to a hot wok or large pan and stir fry 1 minced garlic clove (again I use garlic press) then add the carrots, saute for a minute and lastly, and add the onions and mushrooms.  Add 1 tsp salt and a little pepper and stirfry until the vegetables are cooked, but not soggy and overcooked.  Add the vegetables and the seasoned spinach to the noodles and mix.
6.  Using the same pan, cook the meat, adding some salt and pepper if the meat is not marinated.  Again, you may omit the beef if you wish for a vegetarian dish and just add some zucchinis to step 5.  Add the meat to the noodles and mix.
7.  Mix the noodles well using your gloved hand and taste.  Add more soysauce or brown sugar according to taste.  Add some sesame seeds and mix, then sprinkle some more sesame seeds to the middle when serving for a pretty presentation.

Turkey Tomato Mabo Tofu (mild)

I LOVE spicy food!  But alas, my little ones can’t handle the heat just yet.  Although my almost 3 yr old daughter can eat kimchi as long as it’s not super spicy.  In fact, she’ll ask for a glass of water just so she can continue to eat it.  
Most mabo tofus I’ve seen at Chinese restaurants seem to be just meat with tofu and sauce.  My husband loves those, but I like to add a healthy dose of vegetables to mine.  Maybe since I’m Korean and grew up with mabo tofu swimming with vegetables, like most of our other dishes.  Did you know my mother always made spaghetti marinara sauce with ground beef, celery, bell peppers and all other sorts of vegetables she could find?  And I love it like that.  I used to think that the cook forgot or was too cheap to add vegetables to marinara sauce when I ate out because I assumed everyone put a plethora of vegetables to their marinara sauce.  Come on now, everybody knows that!  So how do I make my mabo tofu?  I use creamy tomato soup!  It actually tastes really good.  The ginger makes it very fragrant and the tomato soup just makes it extra special, even without the spiciness.  
Ingredients:
1 pack of firm tofu, cut into cubes
1 pack ground turkey
1-inch piece of fresh ginger root, minced
3 cloves of garlic, minced (or I just use a garlic press)
2 TB Vegetable Oil 
1-2 zucchinis, chopped (1 if large, 2 if small)
1 red bell pepper, chopped (any color really)
2-3 stalks of celery, chopped
1 medium onion, chopped
2-2.5 cups of chicken broth or stock
1 cup creamy tomato soup
1/4 cup water
2-3 TB corn starch
salt and pepper

1. Prep all your vegetables by chopping and mincing.
2. Heat the oil in a wok or large saucepan over high heat.  When it is hot, add the ginger and garlic and saute for a minute then add the ground turkey.  Add some salt, about 1 tsp.  
3.  When the turkey is almost cooked add the onions and all the vegetables (not the tofu).  Cook for a couple mins but don’t completely cook the vegetables just yet because you will need to add liquid to boil it and we don’t want the vegetables to get soggy.    

4.  After the vegetables are almost, but not completely, cooked, add the tofu, chicken broth, and tomato soup and bring it to a boil.

5.  While you are waiting for it to boil, mix the 1/4 cup water in a small bowl with the 2-3 tablespoons of corn starch and mix.

6.  Once it starts boiling, add 2/3 of the cornstarch mixture to the wok  and mix.  Add more cornstarch to the wok if the sauce seems too runny.  We don’t want it to become gelatin, but we don’t want it to be soupy.  Add enough cornstarch so it is in between a sauce and soup consistency.

7. Add salt and pepper to taste.

AND you are DONE!

Dish it up over rice and you’ve got yourself a healthy and very tasty meal.

Banana Cream Pie meets Key Lime in a Cake!

I’m definitely blessed to be living in California where we are currently enjoying sunny, fairly warm weather in the high 60’s almost 70’s and it’s the middle of winter.  Whereas those living in the east coast will be cursing their California relatives while they blunder about mummified in a twist of coats, scarves and hats.  So please forgive me for conjuring up thoughts of fresh, cool bananas and key lime pies.  Actually, you can blame my husband for injecting my mind with such criminal thoughts in the middle of winter.  He would then turn around and point his finger at me since I was the one who asked him what kind of cake he wanted for his birthday coming up this Superbowl Sunday!  He’s turning the big 3-0 and too bad we don’t have the budget presently for a big birthday/Superbowl party for him.  Maybe we’ll do one for him next year.

I’m always excited when we have a birthday coming up because I know I have an excuse for those butter-laden hunks of goodness glopped with generous amounts of BUTTERcream.   Any other time, I try to be more health conscious by baking with margarine or oil and sneaking in blended chickpeas into my kids’ chocolate chip cookies.  None of that in this green beauty!

So if you haven’t already guessed, he said he would like either a banana cream pie, a key lime pie, or a Black Forest Cake.  I’ve already made Black Forest cakes for his birthday before (twice, from scratch without any of those yucky maraschino cherries) and I remembered saving a recipe for key lime buttercream and a banana lime cake that I thought he wouldn’t mind if I changed up his request a bit and made it into a cake instead of a pie.  Besides, who has pie for a birthday cake??? OK, maybe some people do.  But he’s getting the better end of the deal with me including both the banana and the lime (and we can’t forget the cream) into the cake here!

The recipes are from here and here
I changed it up a bit and made it into a cake, instead of cupcakes and instead of the shortening/butter buttercream recipe they used, I just added the lime zest and lime juice to a swiss meringue buttercream recipe instead.  I’m not a huge fan of those butter and powdered sugar-type frostings… they taste too sweet and are quite unpalatable for me.  I do make them when I don’t feel like whipping a meringue and boiling the sugar syrup, my favorite is the Sprinkles Cupcakes strawberry buttercream recipe revealed by Martha Stewart.  I just prefer the taste of Swiss buttercream, but we digress.

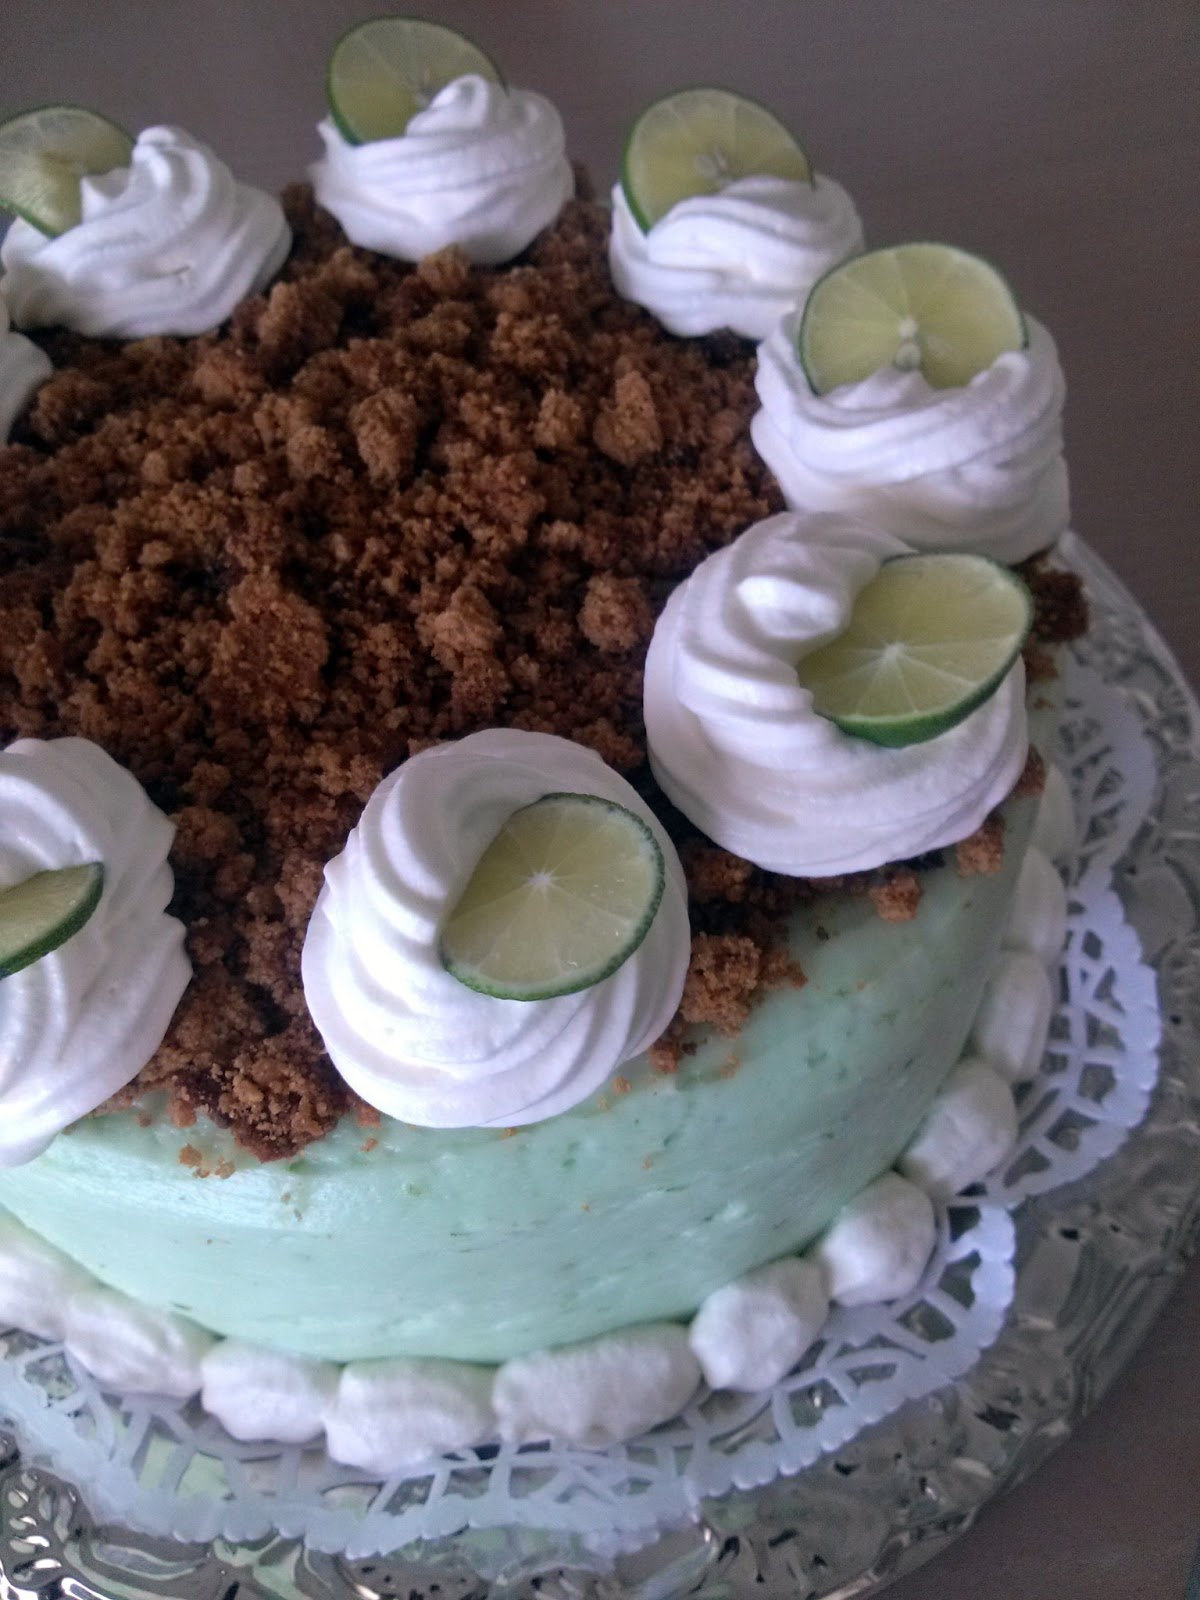
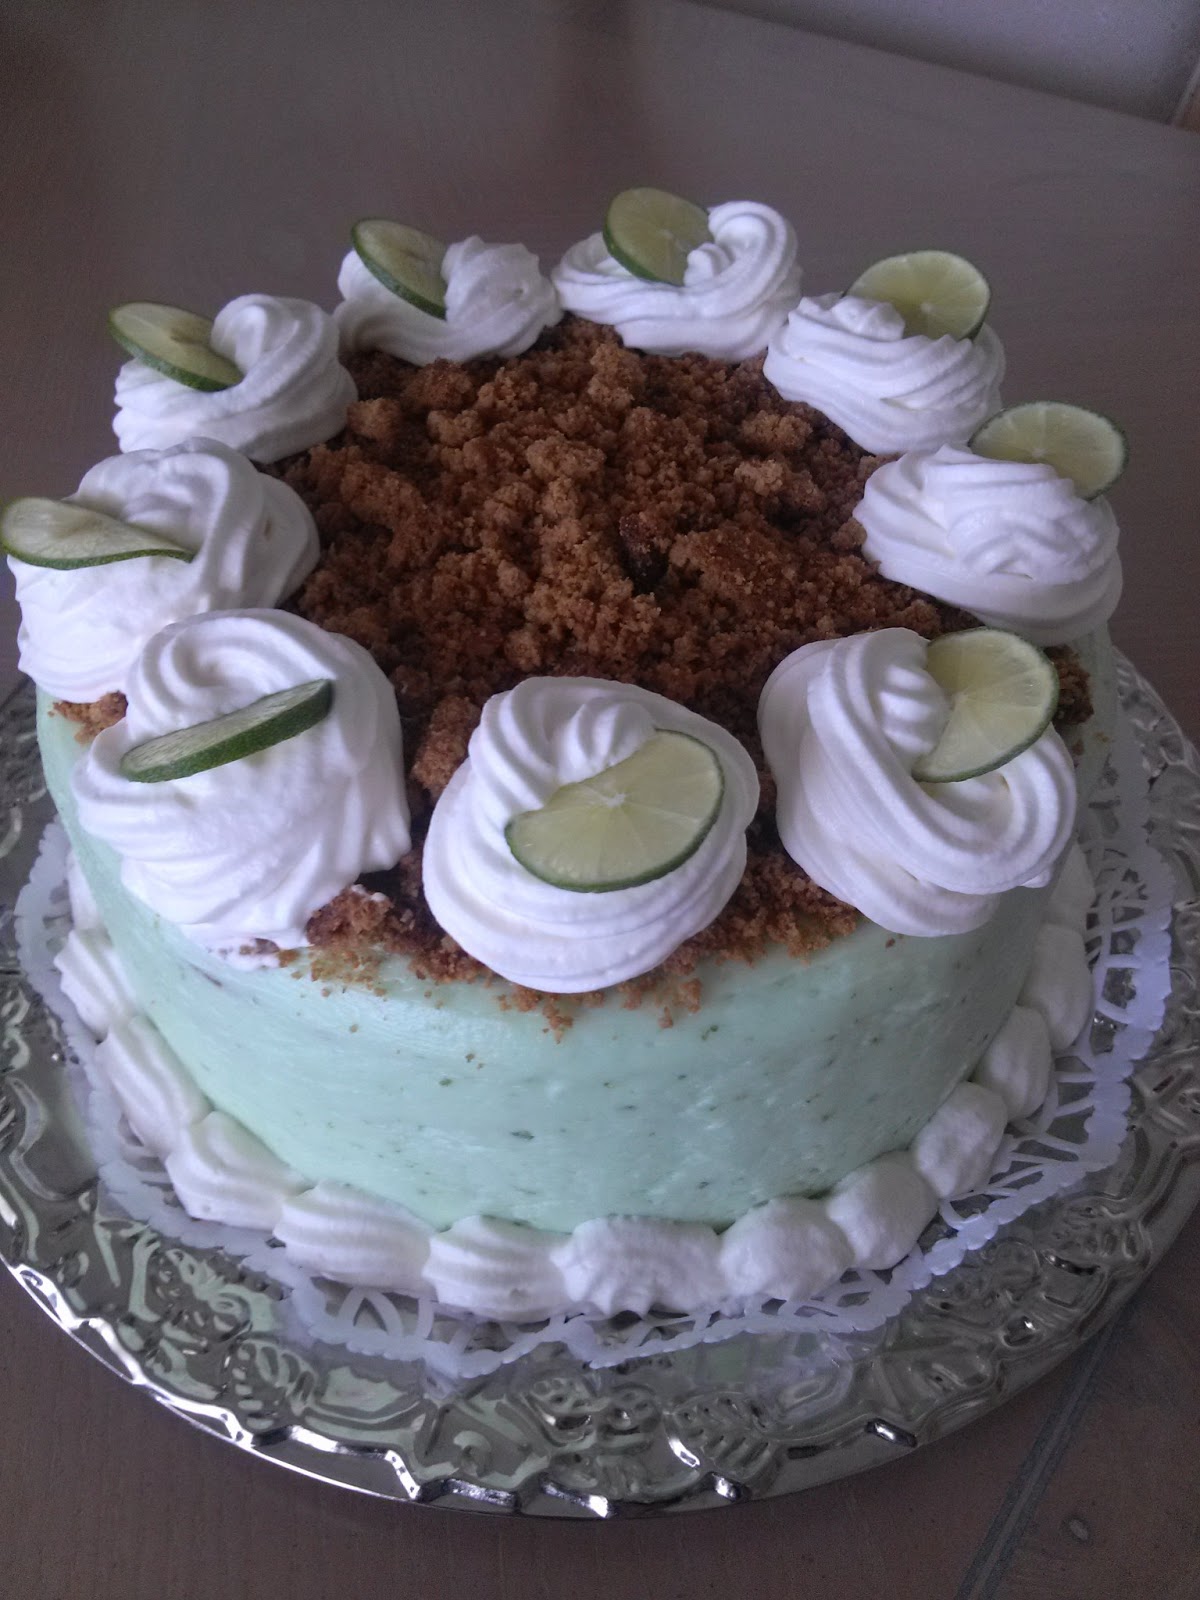
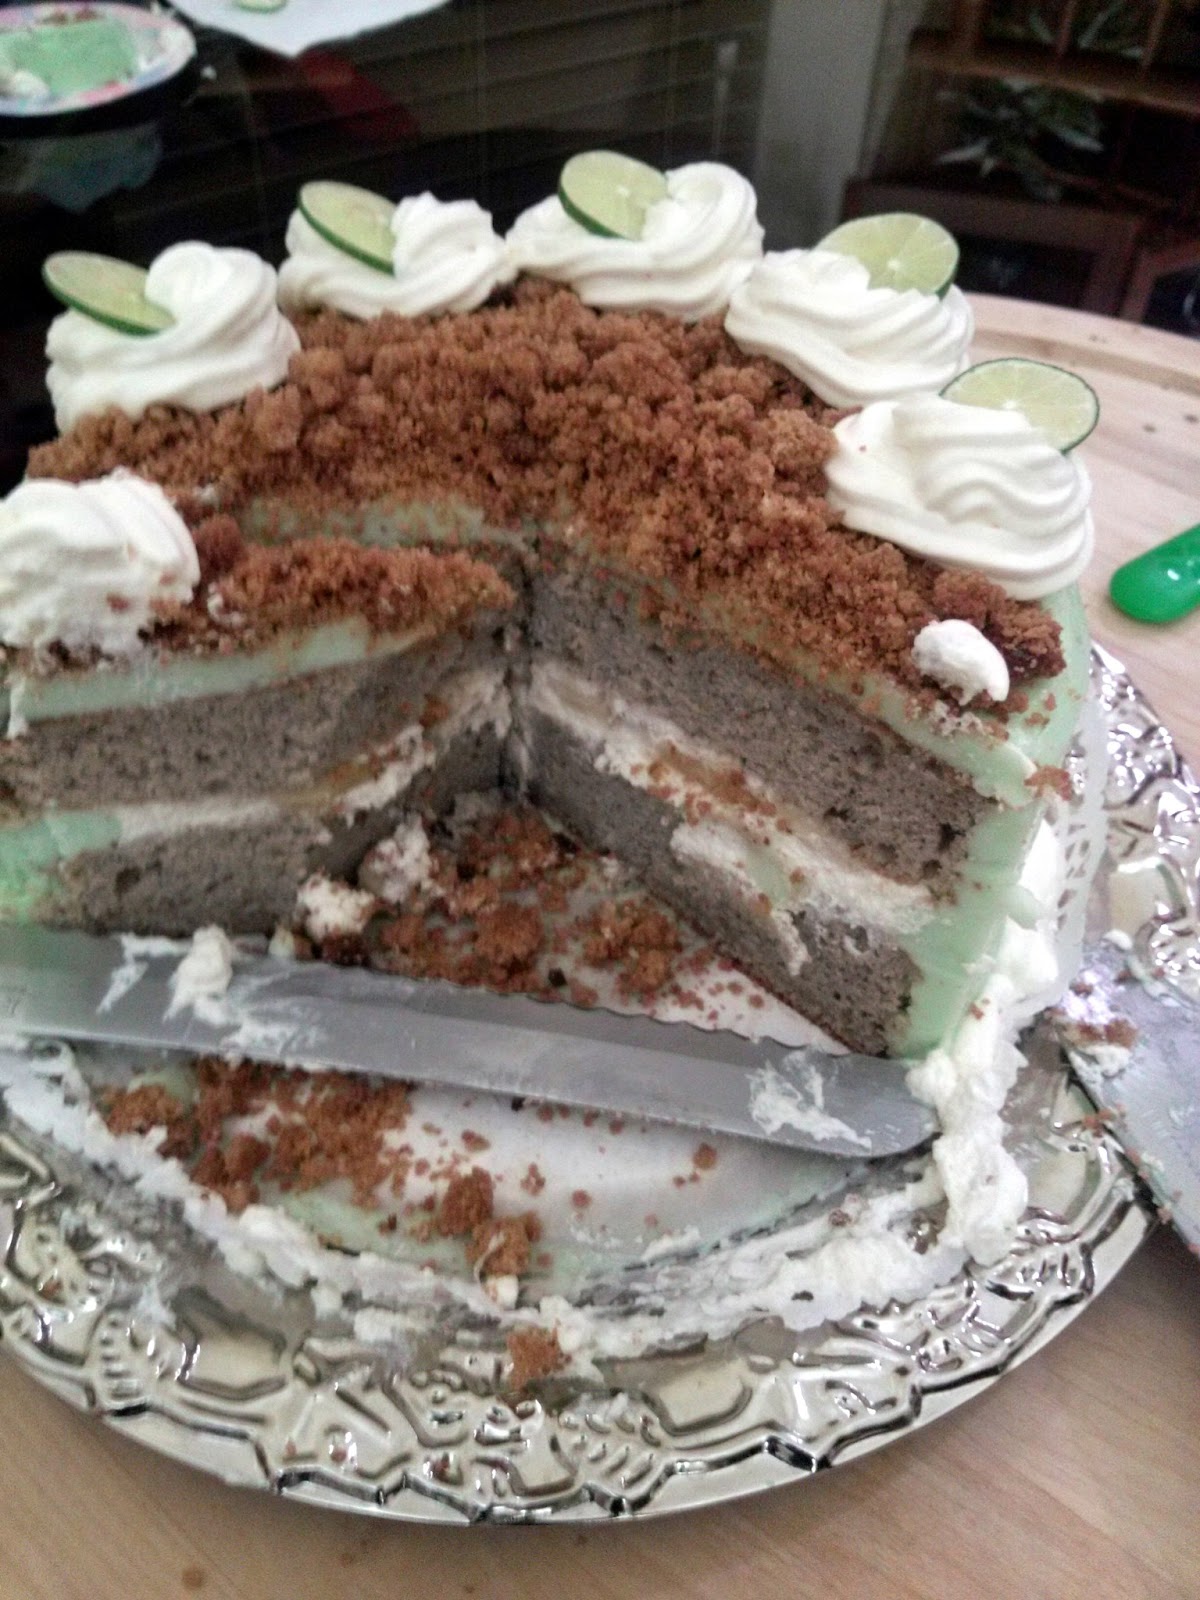
Banana-lime cake layered with sliced bananas and whipped cream, frosted on the outside with Key Lime Buttercream frosting, topped with crumbled graham cracker pie-crust, with dollops of more whipped cream and decorated with slices of lime.  Can you say YUMMMMMM~

Directions

There’s a whole lot of steps to make this cake, so feel free to make the buttercream ahead of time and refrigerate it, then just bring it back to room temperature and beat it on your mixer with a paddle attachment and it’ll be good as new.  Bake the cake (you could bake it a day before and refrigerate it), make the graham cracker crumble and whip the cream on the same day you will use it.

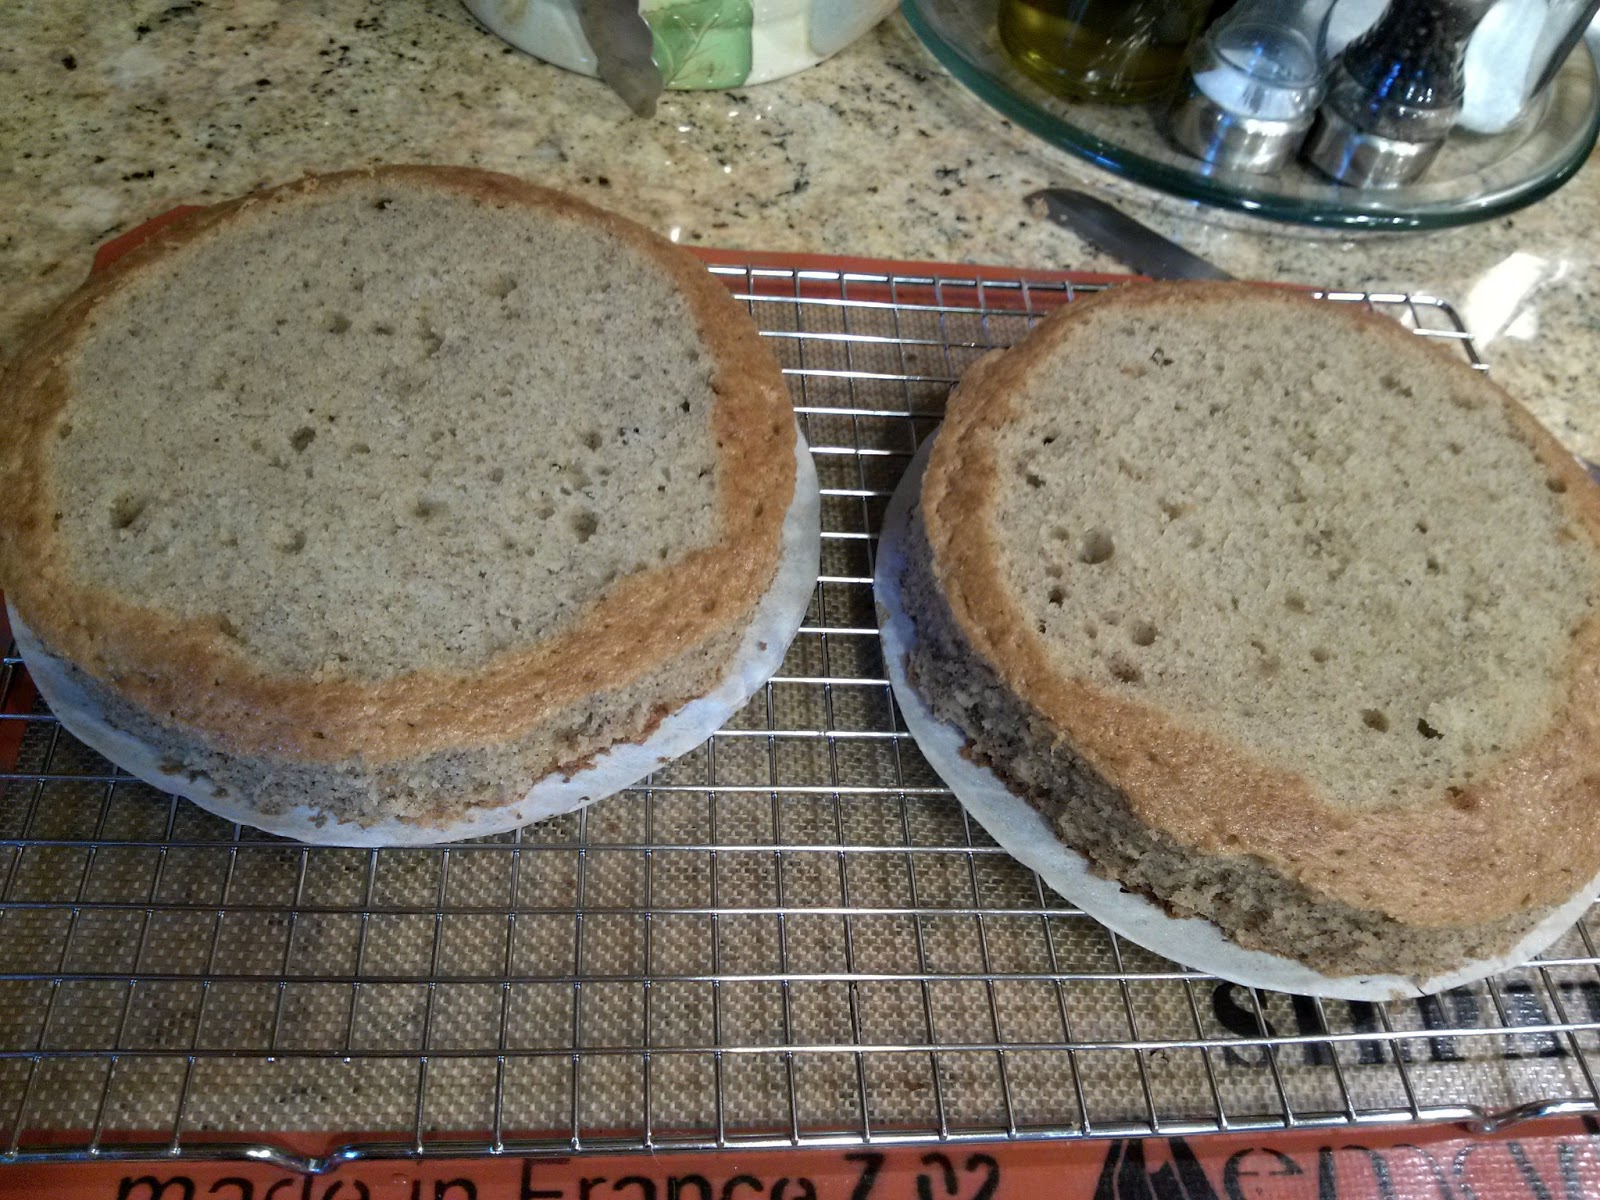
After the cake is cool, I like to cut off about a 1/2″ crust from around the cake so that you don’t have the crunchy/hard part in you cake.  But that is optional.

I then use a bread knife to cut off the top so that we get a flat surface to work with when we stack the cakes.   No sliding cakes from Sleeping Beauty here.

It doesn’t have to be perfect, I just eyeball it.

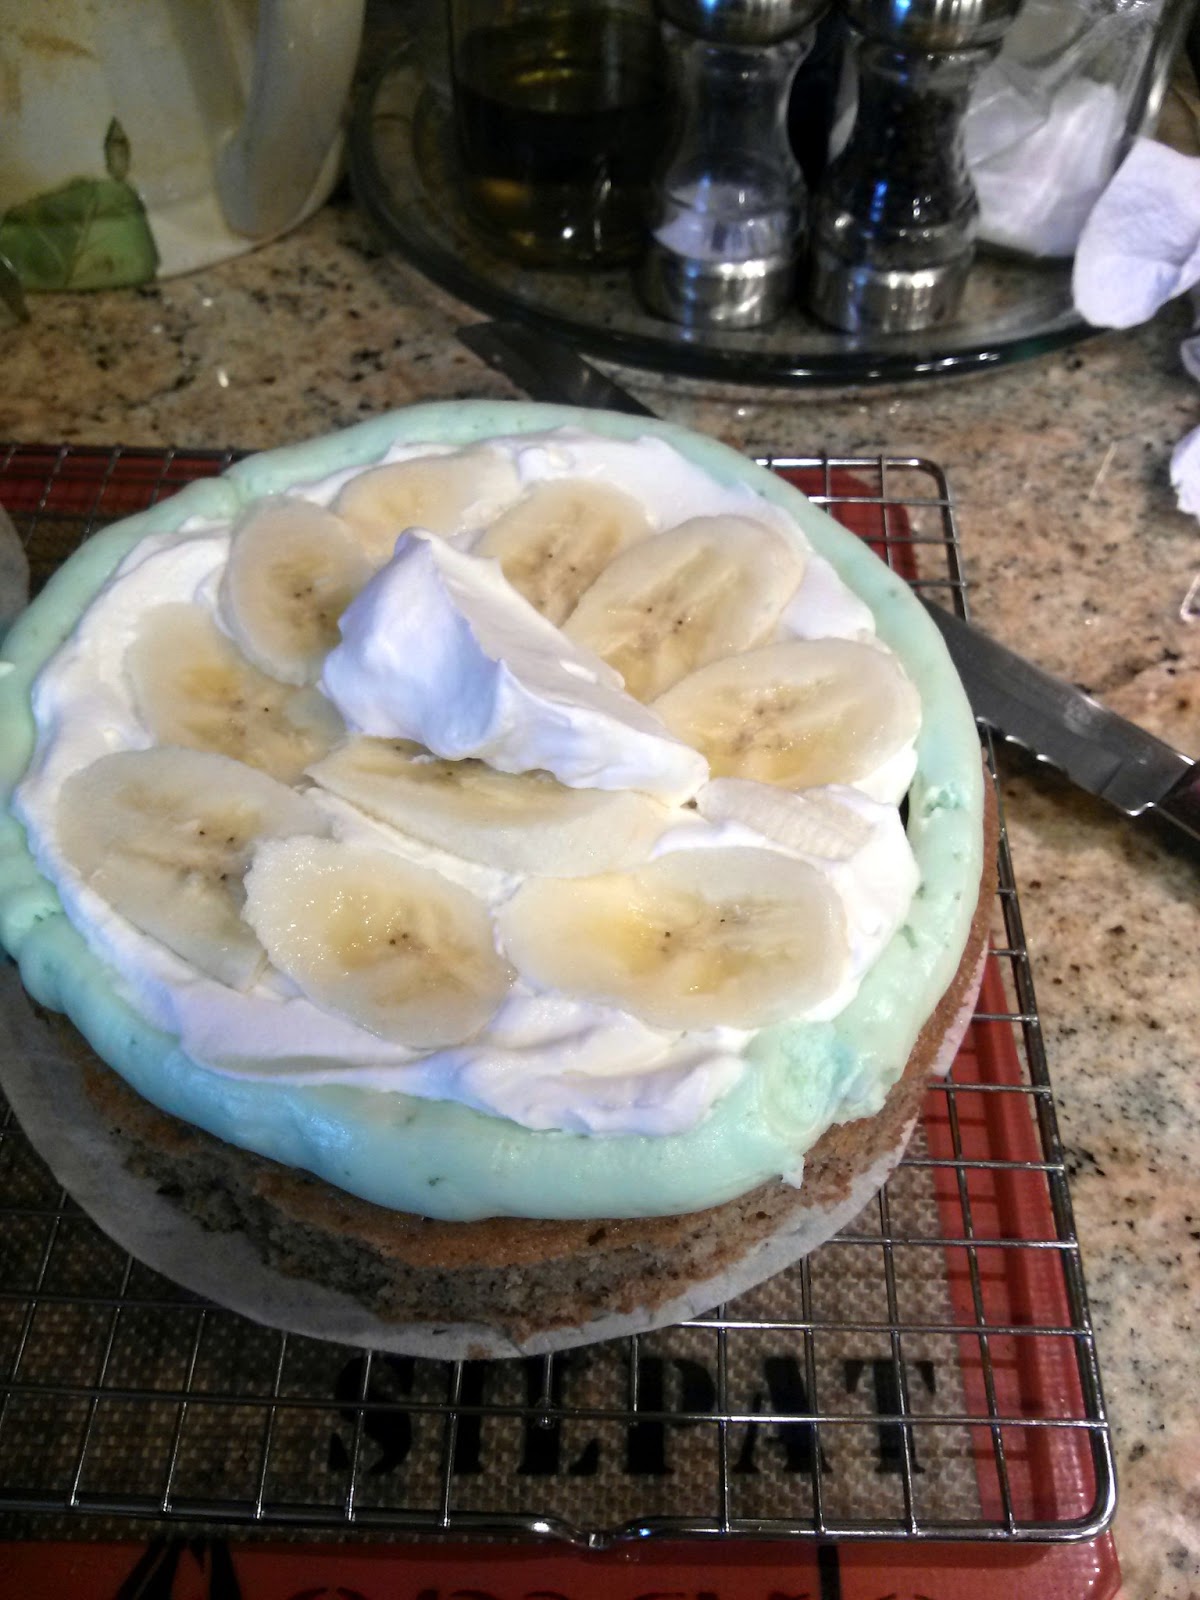
I like to make a dam before I fill layered cakes with whipped cream, especially with a denser cake like banana cake.  You pipe the lime buttercream close to the edge, all around the cake.  Then you fill it with the whipped cream and bananas and a little more whipped cream.  That way when you stack the other cake layer on top, the weight of that cake won’t completely squeeze the whipped cream out the sides.  (Since whipped cream is so light compared to buttercream)

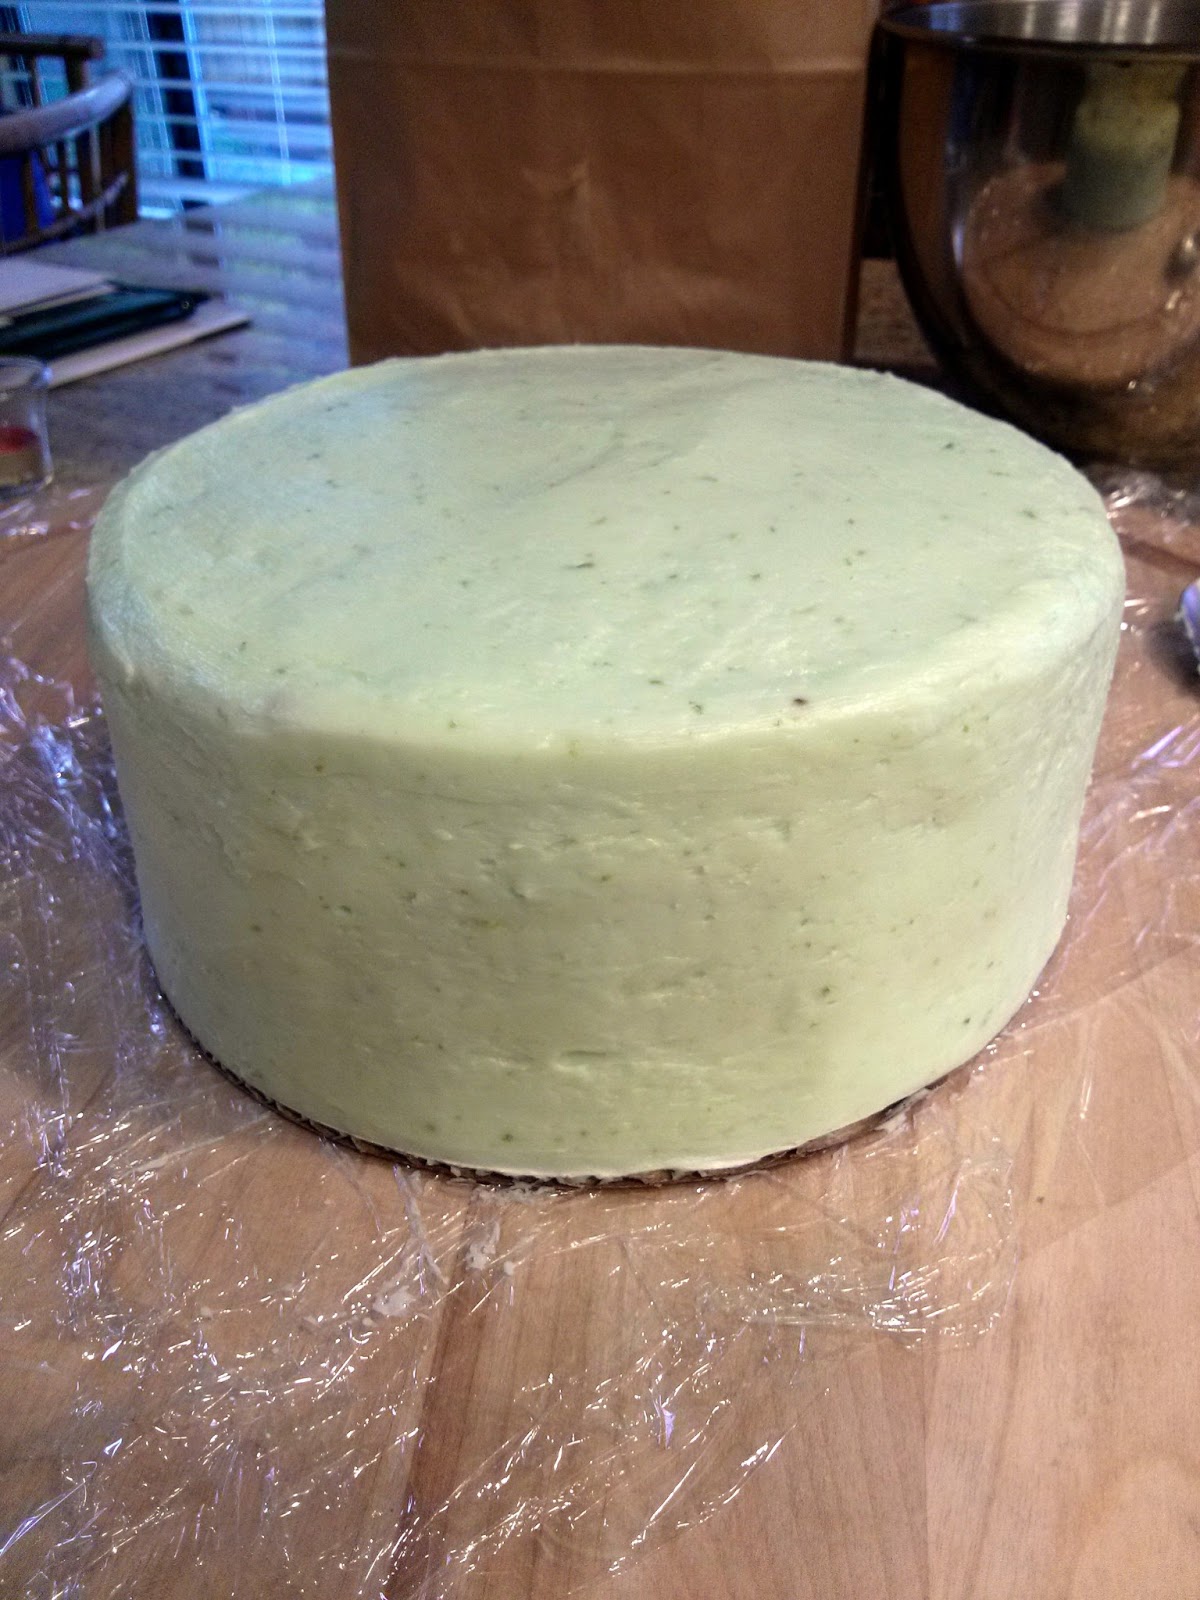
There’s a nice looking pre-dressed cake that looks more like a mint patty hamburger than a cake.
You know when you try to frost a cake and the frosting breaks off cake crumbs every time you lift the spatula and so you end up with unwanted cake crumbs all over the frosting?  Well, I like to bypass the crumb coat and pipe the frosting all over the outside of the cake so that all you have to do is smooth out the frosting with a spatula and you’re good!  No cake crumbs!  Just make sure you cover the cake well with plenty of frosting so you don’t introduce any crumbs.  

VOILA~
Next you add the crumbled graham cracker pie-crust all over the top of the cake, make pretty swirls with your whipped cream, and decorate with sliced key lime.  

It was a big hit!  Really good cake!  Sweet banana cake with the perfect balance of key lime tartness topped off with light whipped cream and crunchy piecrust!  SOOO good!

Here are the recipes:

Banana-Lime Cake

2 1/4 cup all-purpose flour
1 tsp baking soda
1/4 tsp salt
3/4 cup butter (1  1/2 sticks)
1  1/2 cup sugar
3 eggs
1 T lime juice
2 ripe bananas, mashed
1 tsp lime zest
3/4 cup sour cream

Preheat oven to 350°F. In medium bowl, combine flour, baking soda, and salt; set aside. 
In large bowl, cream butter and sugar with electric mixer until light and fluffy. Add eggs, lime juice, vanilla, banana and lime zest; mix well.  Add flour mixture alternately with sour cream; blend thoroughly but do not overmix. Pour into prepared pans. Bake 30-35 minutes or until toothpick inserted comes out clean. Cool 10 minutes in pan on rack; remove and cool completely before decorating.
*I used two 8″ cake pans

Key Lime Buttercream with Swiss Meringue base

5 egg whites
1 cup plus 2 TB sugar
pinch of salt
1 lb (4 sticks) butter, room temperature
1/2 tsp vanilla extract
zest of 8 key limes
1  1/2 TB lime juice
*I added 1 drop of green food coloring

  1. Mix the egg whites, sugar, and salt in the heatproof bowl for your stand mixer and set it over a pan of simmering water. Whisk constantly by hand until it’s warm to the touch and sugar has dissolved (you shouldn’t feel any sugar grains when you rub it between your fingers)
  2. Using a whisk attachment, start on low speed and gradually increase to medium-high speed until stiff (but not dry) peaks form. Keep mixing until the mixture is fluffy and glossy, and completely cool, about 10 minutes.
  3. With mixer on medium-low speed, add the butter a few tablespoons at a time, mixing well after each addition. Once all butter has been added, whisk in vanilla, lime zest and lime juice. Switch to the paddle attachment, and continue beating on low speed until all air bubbles are eliminated, about 2 minutes. Scrape down sides of bowl with a flexible spatula, and continue beating until the frosting is completely smooth. Keep buttercream at room temperature if using the same day.
  4. (Optional) To tint buttercream (or royal icing), reserve some for toning down the color, if necessary. Add gel-paste food color, a drop at a time (or use the toothpick or skewer to add food color a dab at a time) to the remaining buttercream. You can use a single shade of food color or experiment by mixing two or more. Blend after each addition with the mixer (use a paddle attachment) or a flexible spatula, until desired shade is achieved. Avoid adding too much food color too soon, as the hue will intensify with continued stirring; if necessary, you can tone down the shade by mixing in some reserved untinted buttercream.
adapted from Martha Stewart recipe

P.S.  When you are whipping the butter into the meringue mixture, don’t panic when it starts to look like cottage cheese!  Don’t throw it out either!  Just keep mixing for a few mins or more and it’ll come back together.  Cover the mixer with a towel so you don’t spray your kitchen (or yourself) with frosting.

Whipped Cream
1 cup heavy whipping cream
2 T sugar
1/2 tsp vanilla extract
Add sugar to the cream and whip with whisk attachment on stand mixer until soft peaks form then whisk by hand (with a whisk, not your hand silly) until you get stiff peaks.

Graham Cracker Crumble 
1 cup graham cracker crumbs
1/4 cup melted butter
2 T sugar
spread over a baking sheet and bake at 400 F for about 8-10 mins. We are using it as a crumble decoration/topping and not a piecrust so you don’t need to press down.

Other
1-2 bananas (sliced, for cake filling)
thin sliced key limes for decoration (about 4)

Click here for printable recipe (Recipes only, no step-by-step pictures for putting the cake together)

Crab Rounds

This is a really simple but delicious side dish made with just a few ingredients.  The imitation crab meat from the local grocery tastes much better than the dry, frozen ones from the Korean market.  I usually buy the leg style since I like to use it to make California rolls, but the flake ones work just fine for this.

 I used one package of the crab meat, 4 eggs, 4 green onions, some mushrooms with some salt and pepper.  Mix the 4 eggs and add the crab meat (chopped or flaked), chopped green onions and sliced mushrooms (or the tiny mushrooms that don’t need to be sliced).  Then add some salt and pepper to it.

Heat a pan with some oil (I use cooking spray) and place about a tablespoon of the mix to make little rounds.  Cook over medium heat until it browns slightly then flip it and cook until the egg is done and enjoy.
We ate it as a side dish to our Seaweed Miso Soup and rice.  YUM!