For Birthdays September Is…

September is the most exciting, busy, and tiring month of the year.  It beats even the holiday frenzy of Thanksgiving and Christmas in our family with the number of birthdays we have along with all the back-to-school shenanigans.  My birthday is also guilty of being in September along with my now, 7 yrs old son, who we just finished throwing a themed party for last weekend.  My son has always had something he was obsessed with since he was a baby, starting with airplanes, dinosaurs, etc, and now we’re at Star Wars, so you can probably guess the theme of his party.  I always start off saying I’m going to make the party as simple as possible, then I start adding things here and there until I find myself staring at the ceiling with about a gazillion things running through my head at 3am and wondering what I got myself into.  We ended up having his party at our local park with about 2 dozen 1st grade boys after inviting school friends, church friends, and his soccer team.  Let’s just say I’m glad that this park is usually empty so we had the place mostly to ourselves and so relieved that there were no injuries aside from a rope burn.

Brayden Star Wars shirt

So I am kicking myself in the butt for not taking more pictures at the party, but I was more concerned at that time in making sure I didn’t lose anybody’s kid and that they were safe than try to document the setup/party.  Just imagine I posted pretty pictures of the “Yoda Soda” made from green Gatorade powder in a large, glass, drink dispenser and a beautiful spread (who am I kidding? ha ha) of a huge bowl of our own hodgepodge trail mix ranging from a “seasonal” Star Wars Lucky Charms type cereal, Star Wars Honey Maid grahams, M&M’s, pretzel sticks, Chex cereal, to Rocket Ship Crackers (Trader Joe’s).

In preparation for the party, I wanted to make those lightsabers from pool noodles, but after some research, I was disappointed that the pool noodles were actually quite expensive.  But I found a pinterest image of one made from pipe insulation and duct tape to make the lightsabers which I thought was perfect; especially the price.  I got the 6 ft. insulation at OSH for $1.29 (Home Depot was cheaper but further from me) and I was able to cut them into 3 pieces.  I got red, blue, green, and gray duct tape to cover the pipe insulation and later added thin black duct tape to add a finishing touch to the handles.

lightsaber_steps_instructions

0930151218

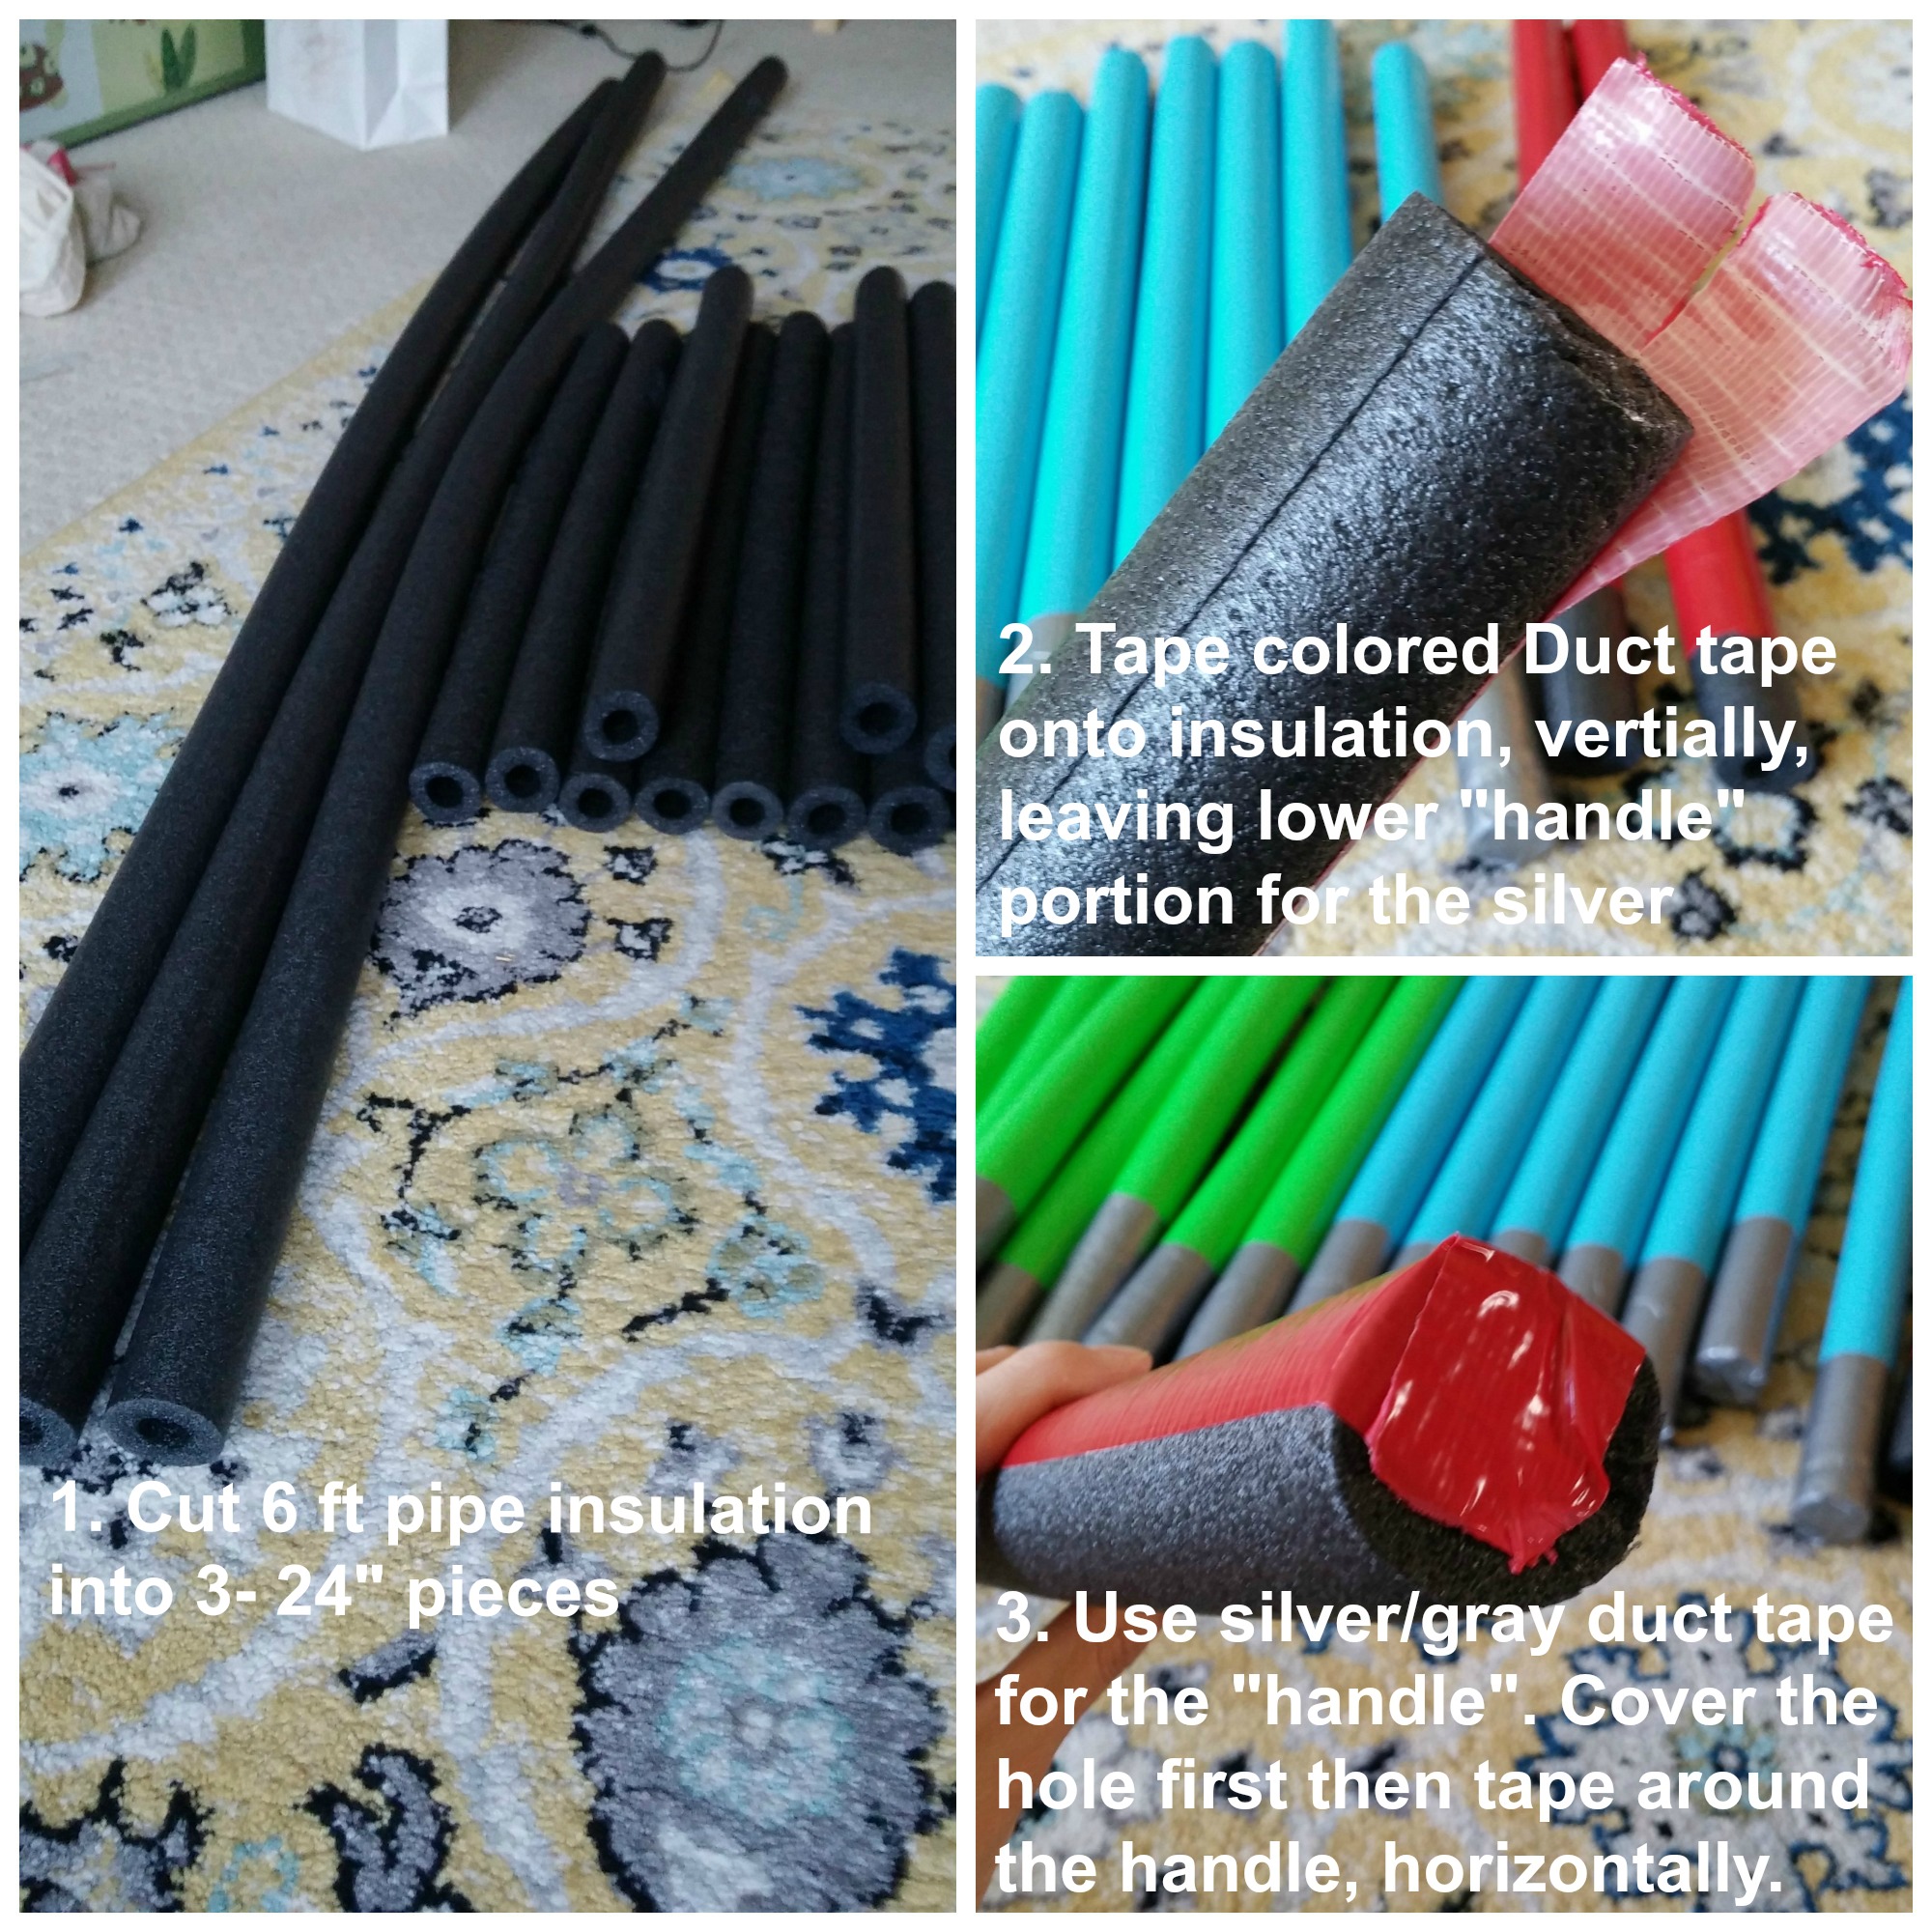
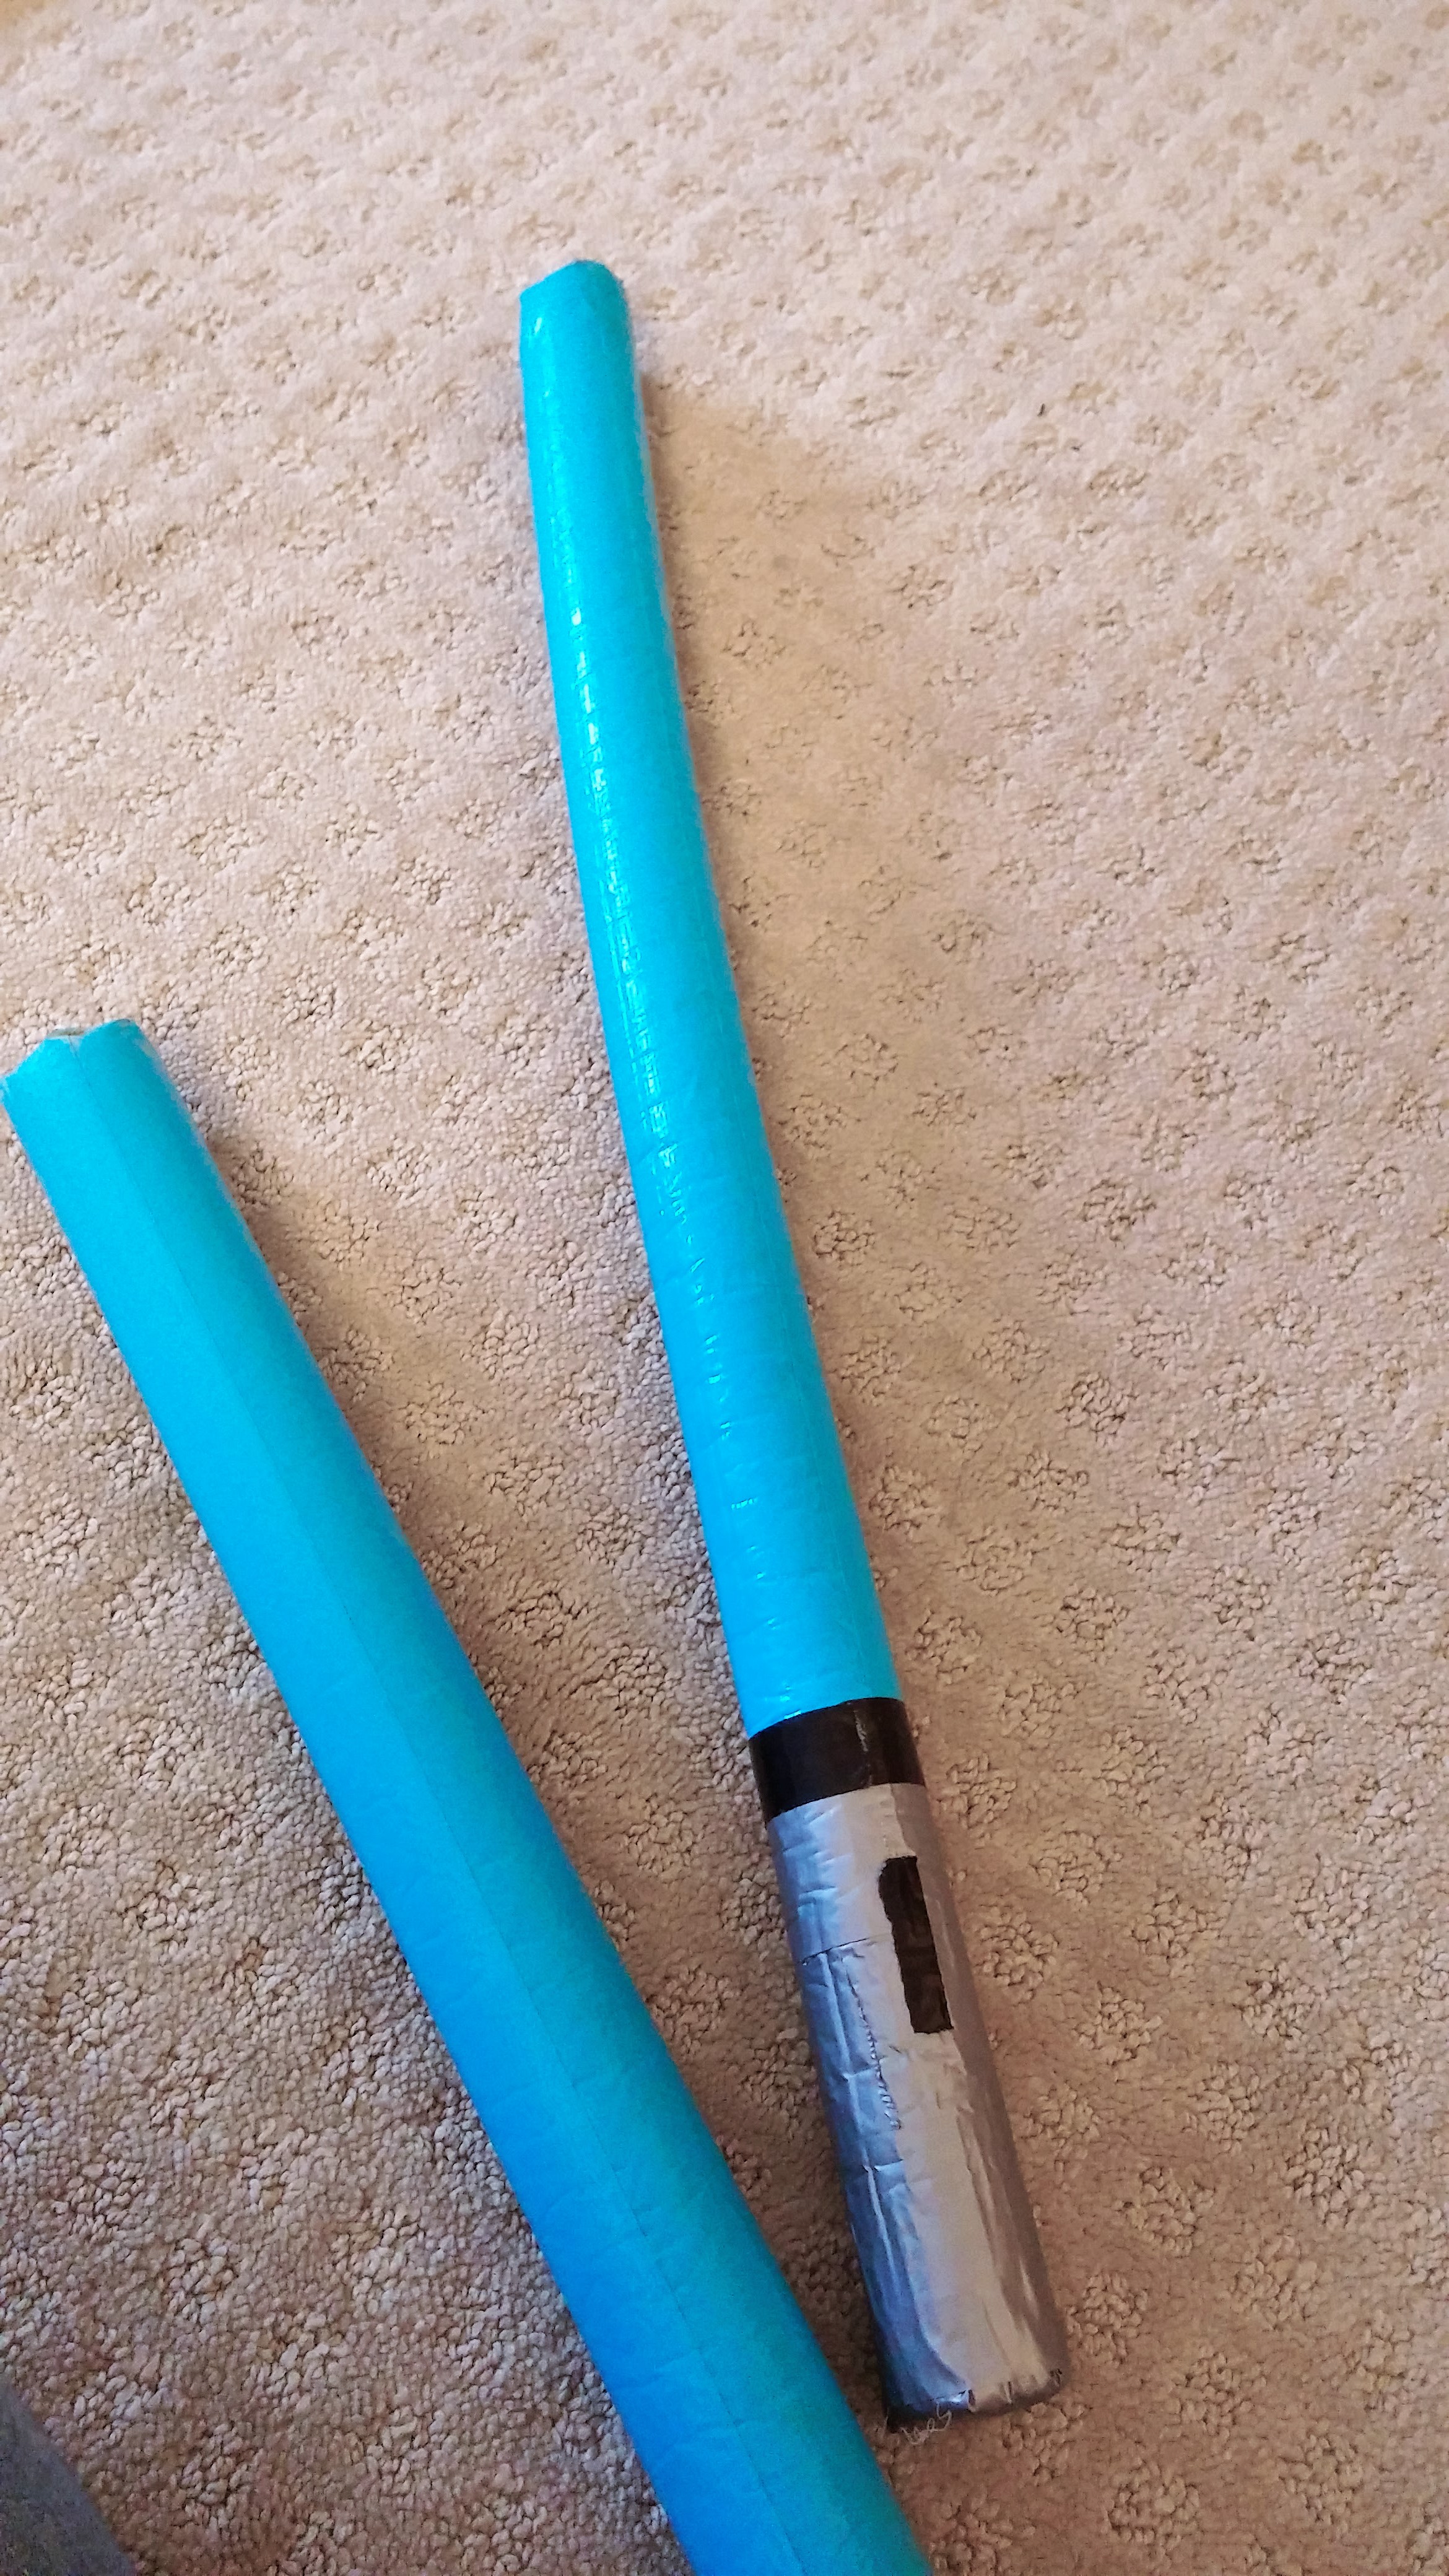
This is also an after-the-party picture (if you can’t tell by the slight warp to the lightsaber).  It was pretty crazy when I handed out the lightsabers to the boys to play with… had to take them back after 2 kids started crying because someone hit them on the head and they didn’t like it… so hand them out at the END of the party.  -__-

IMG_1392

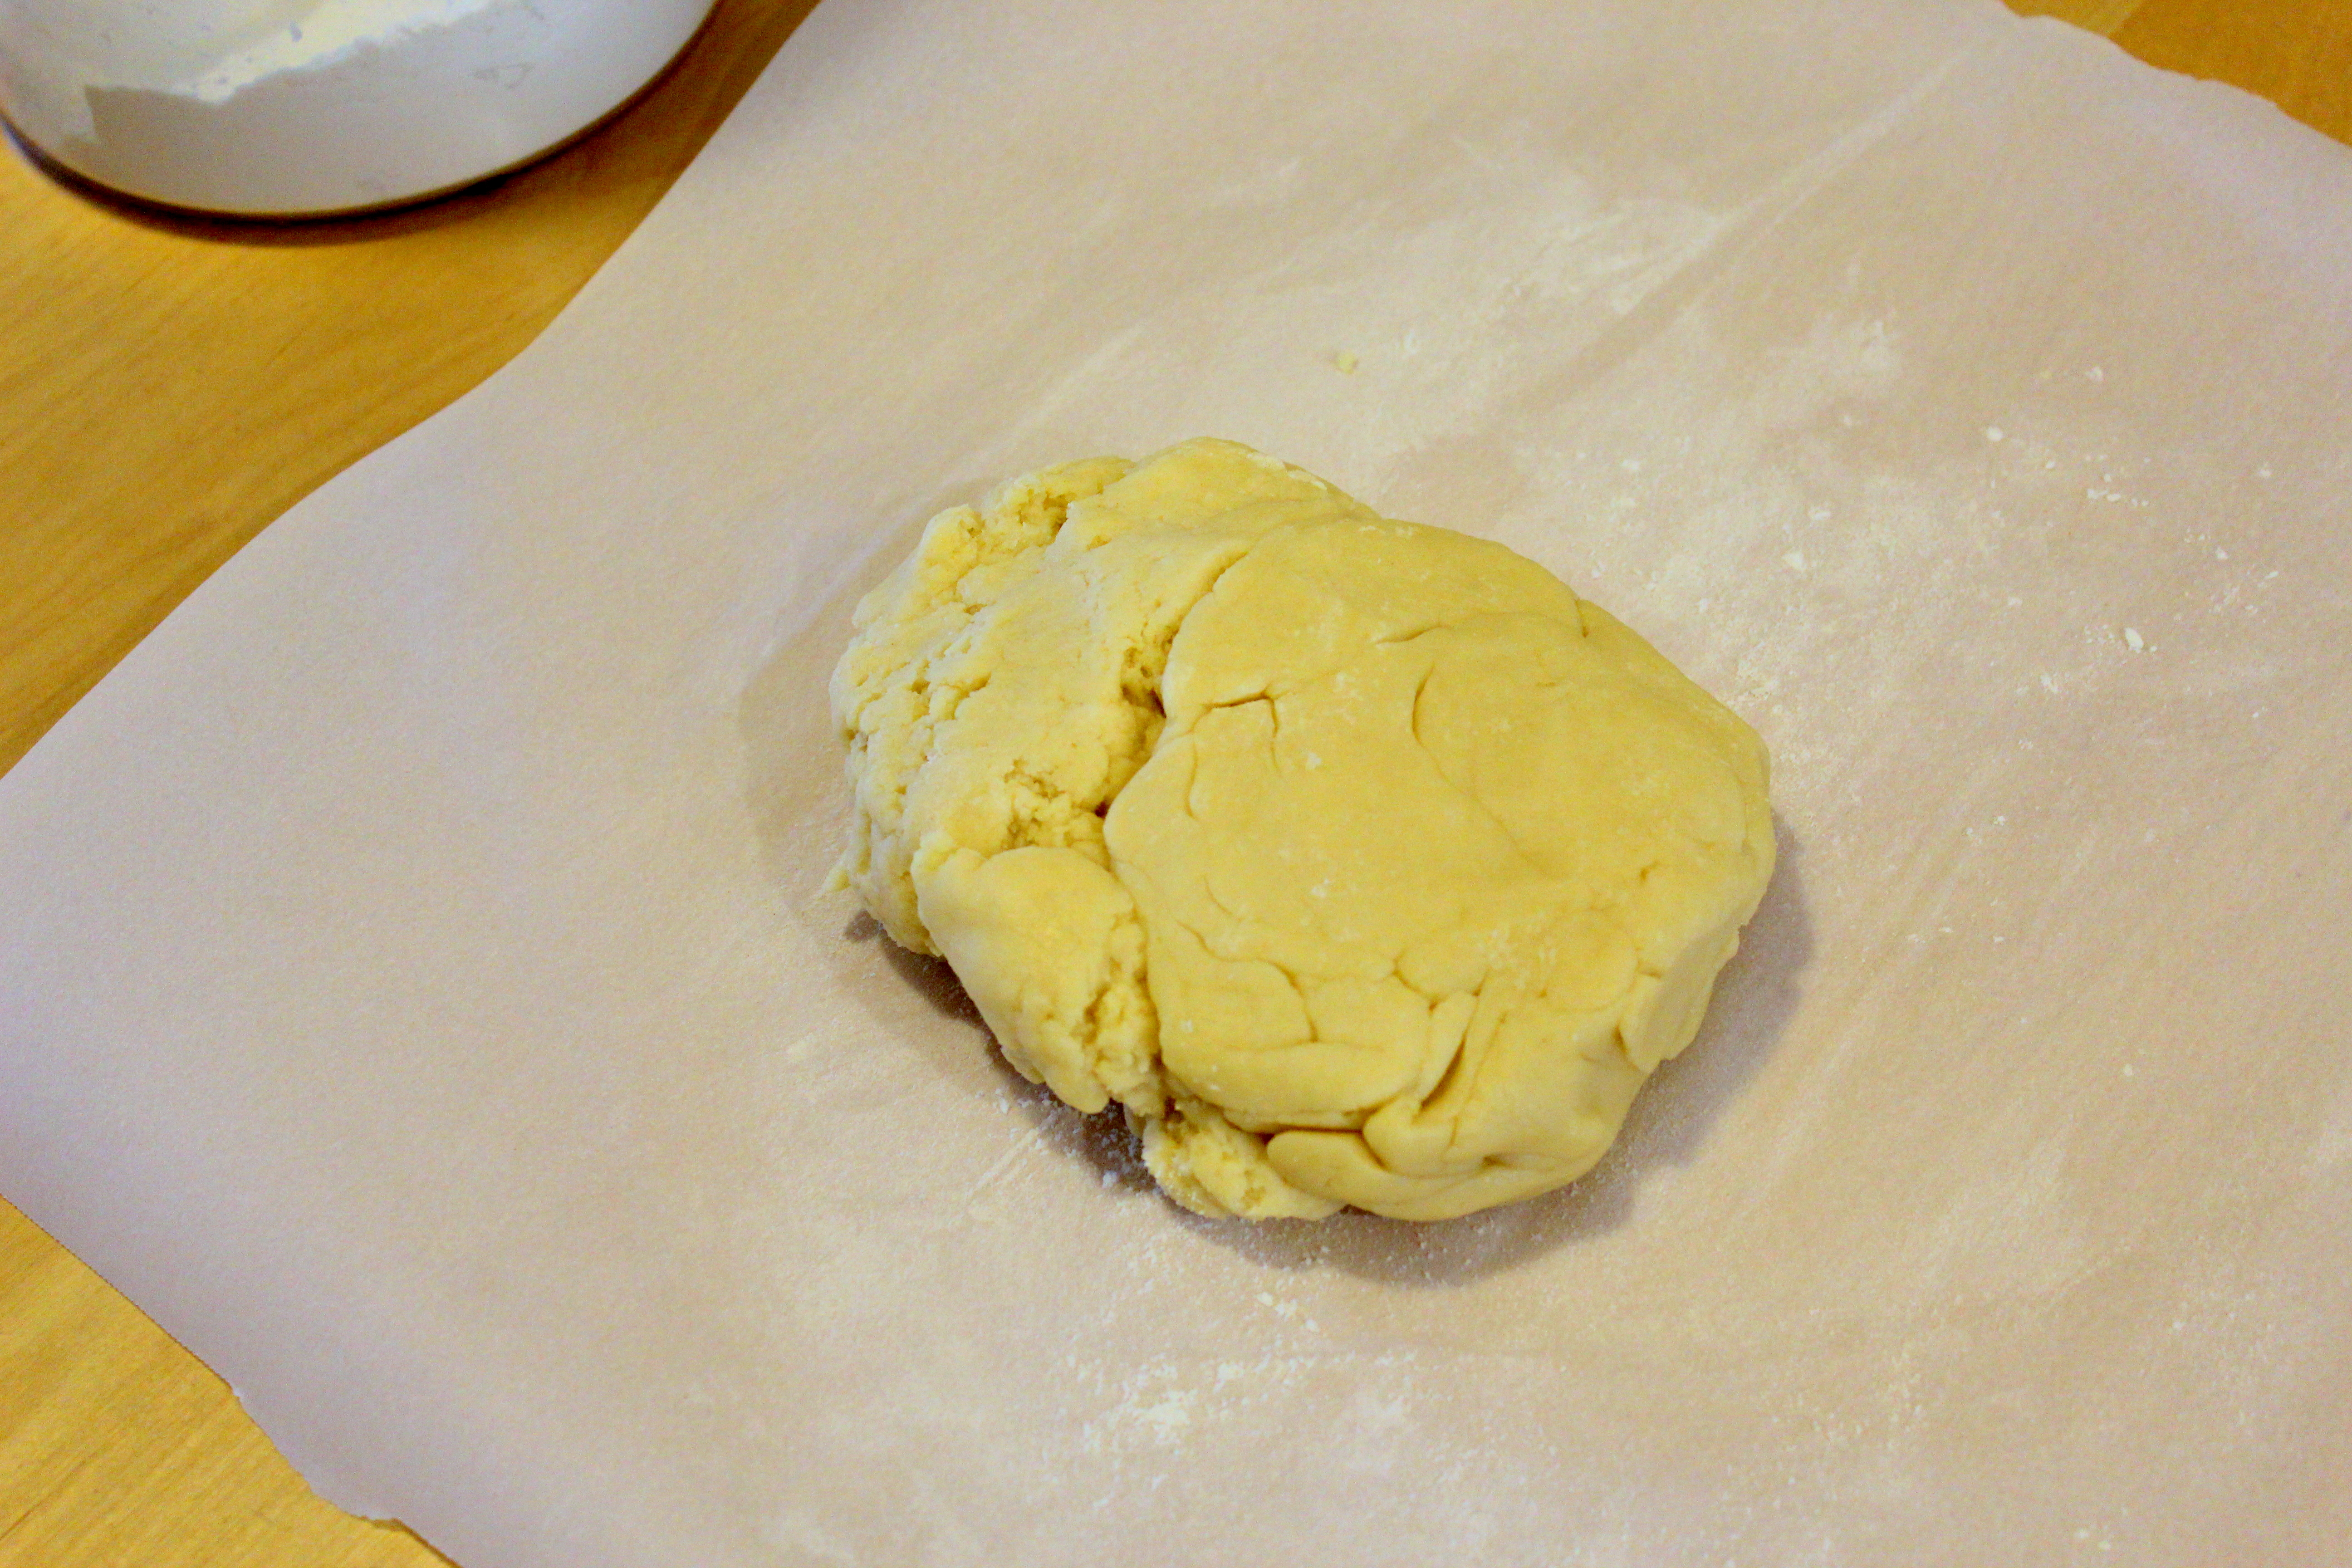
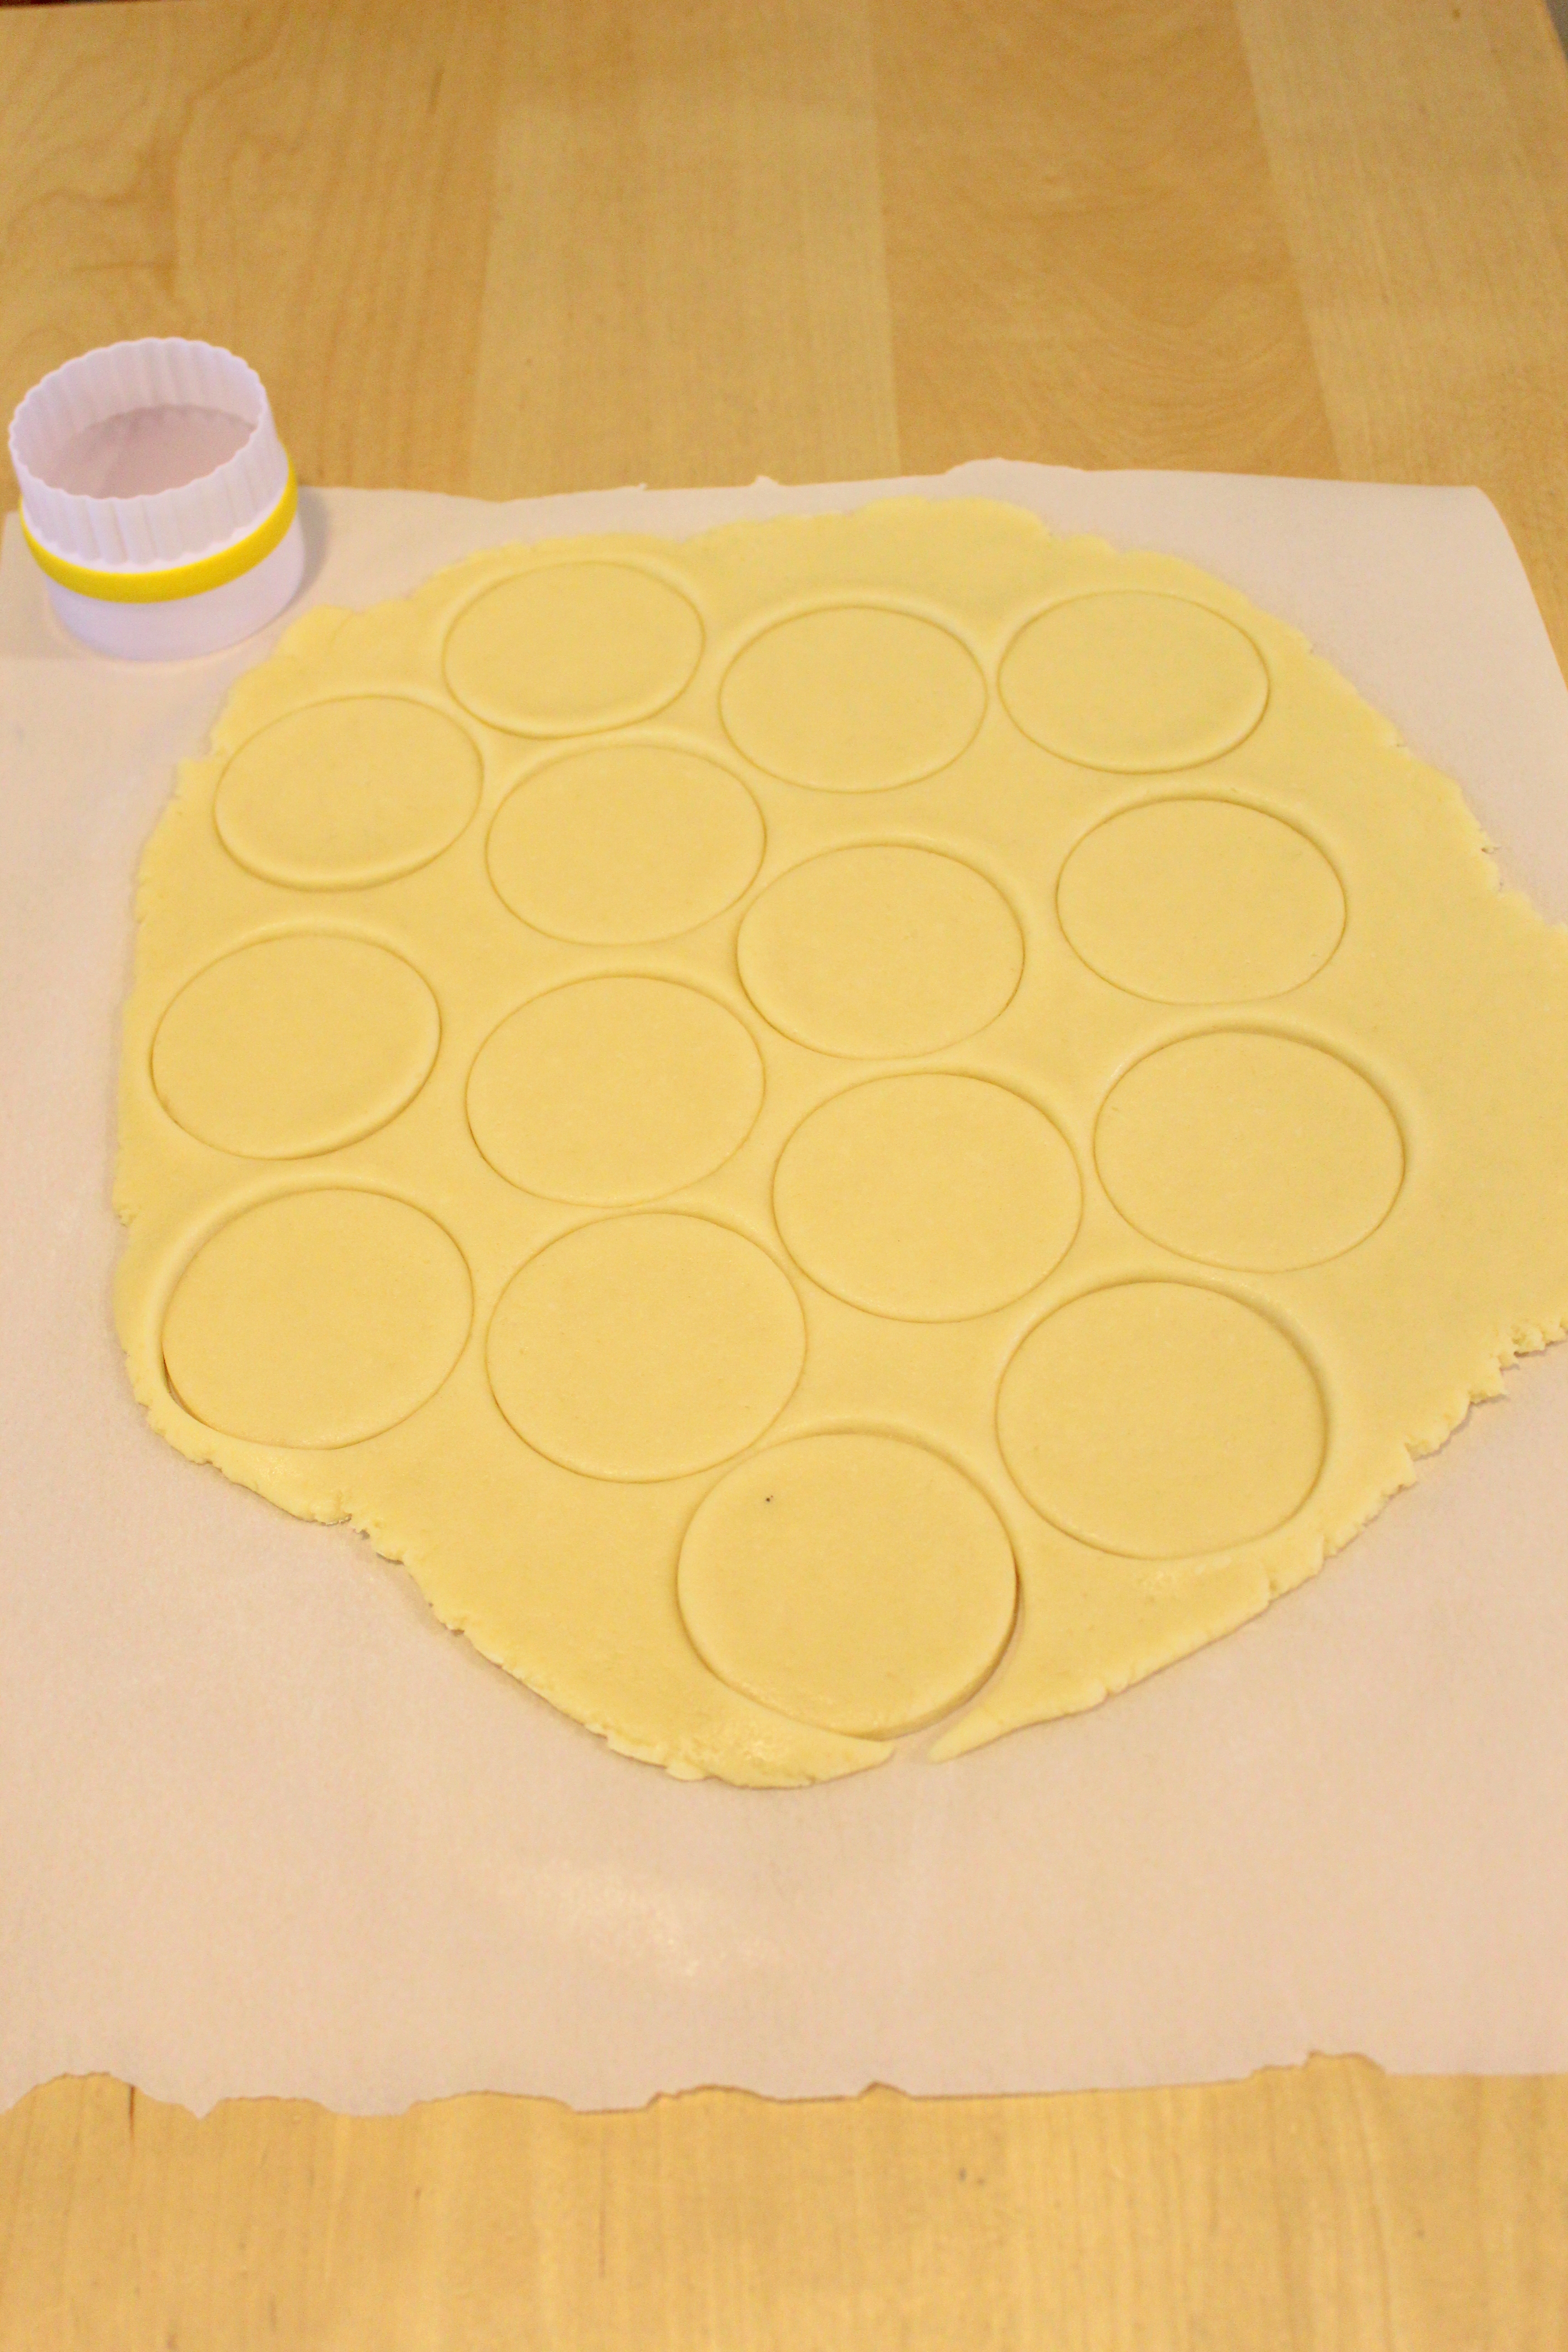
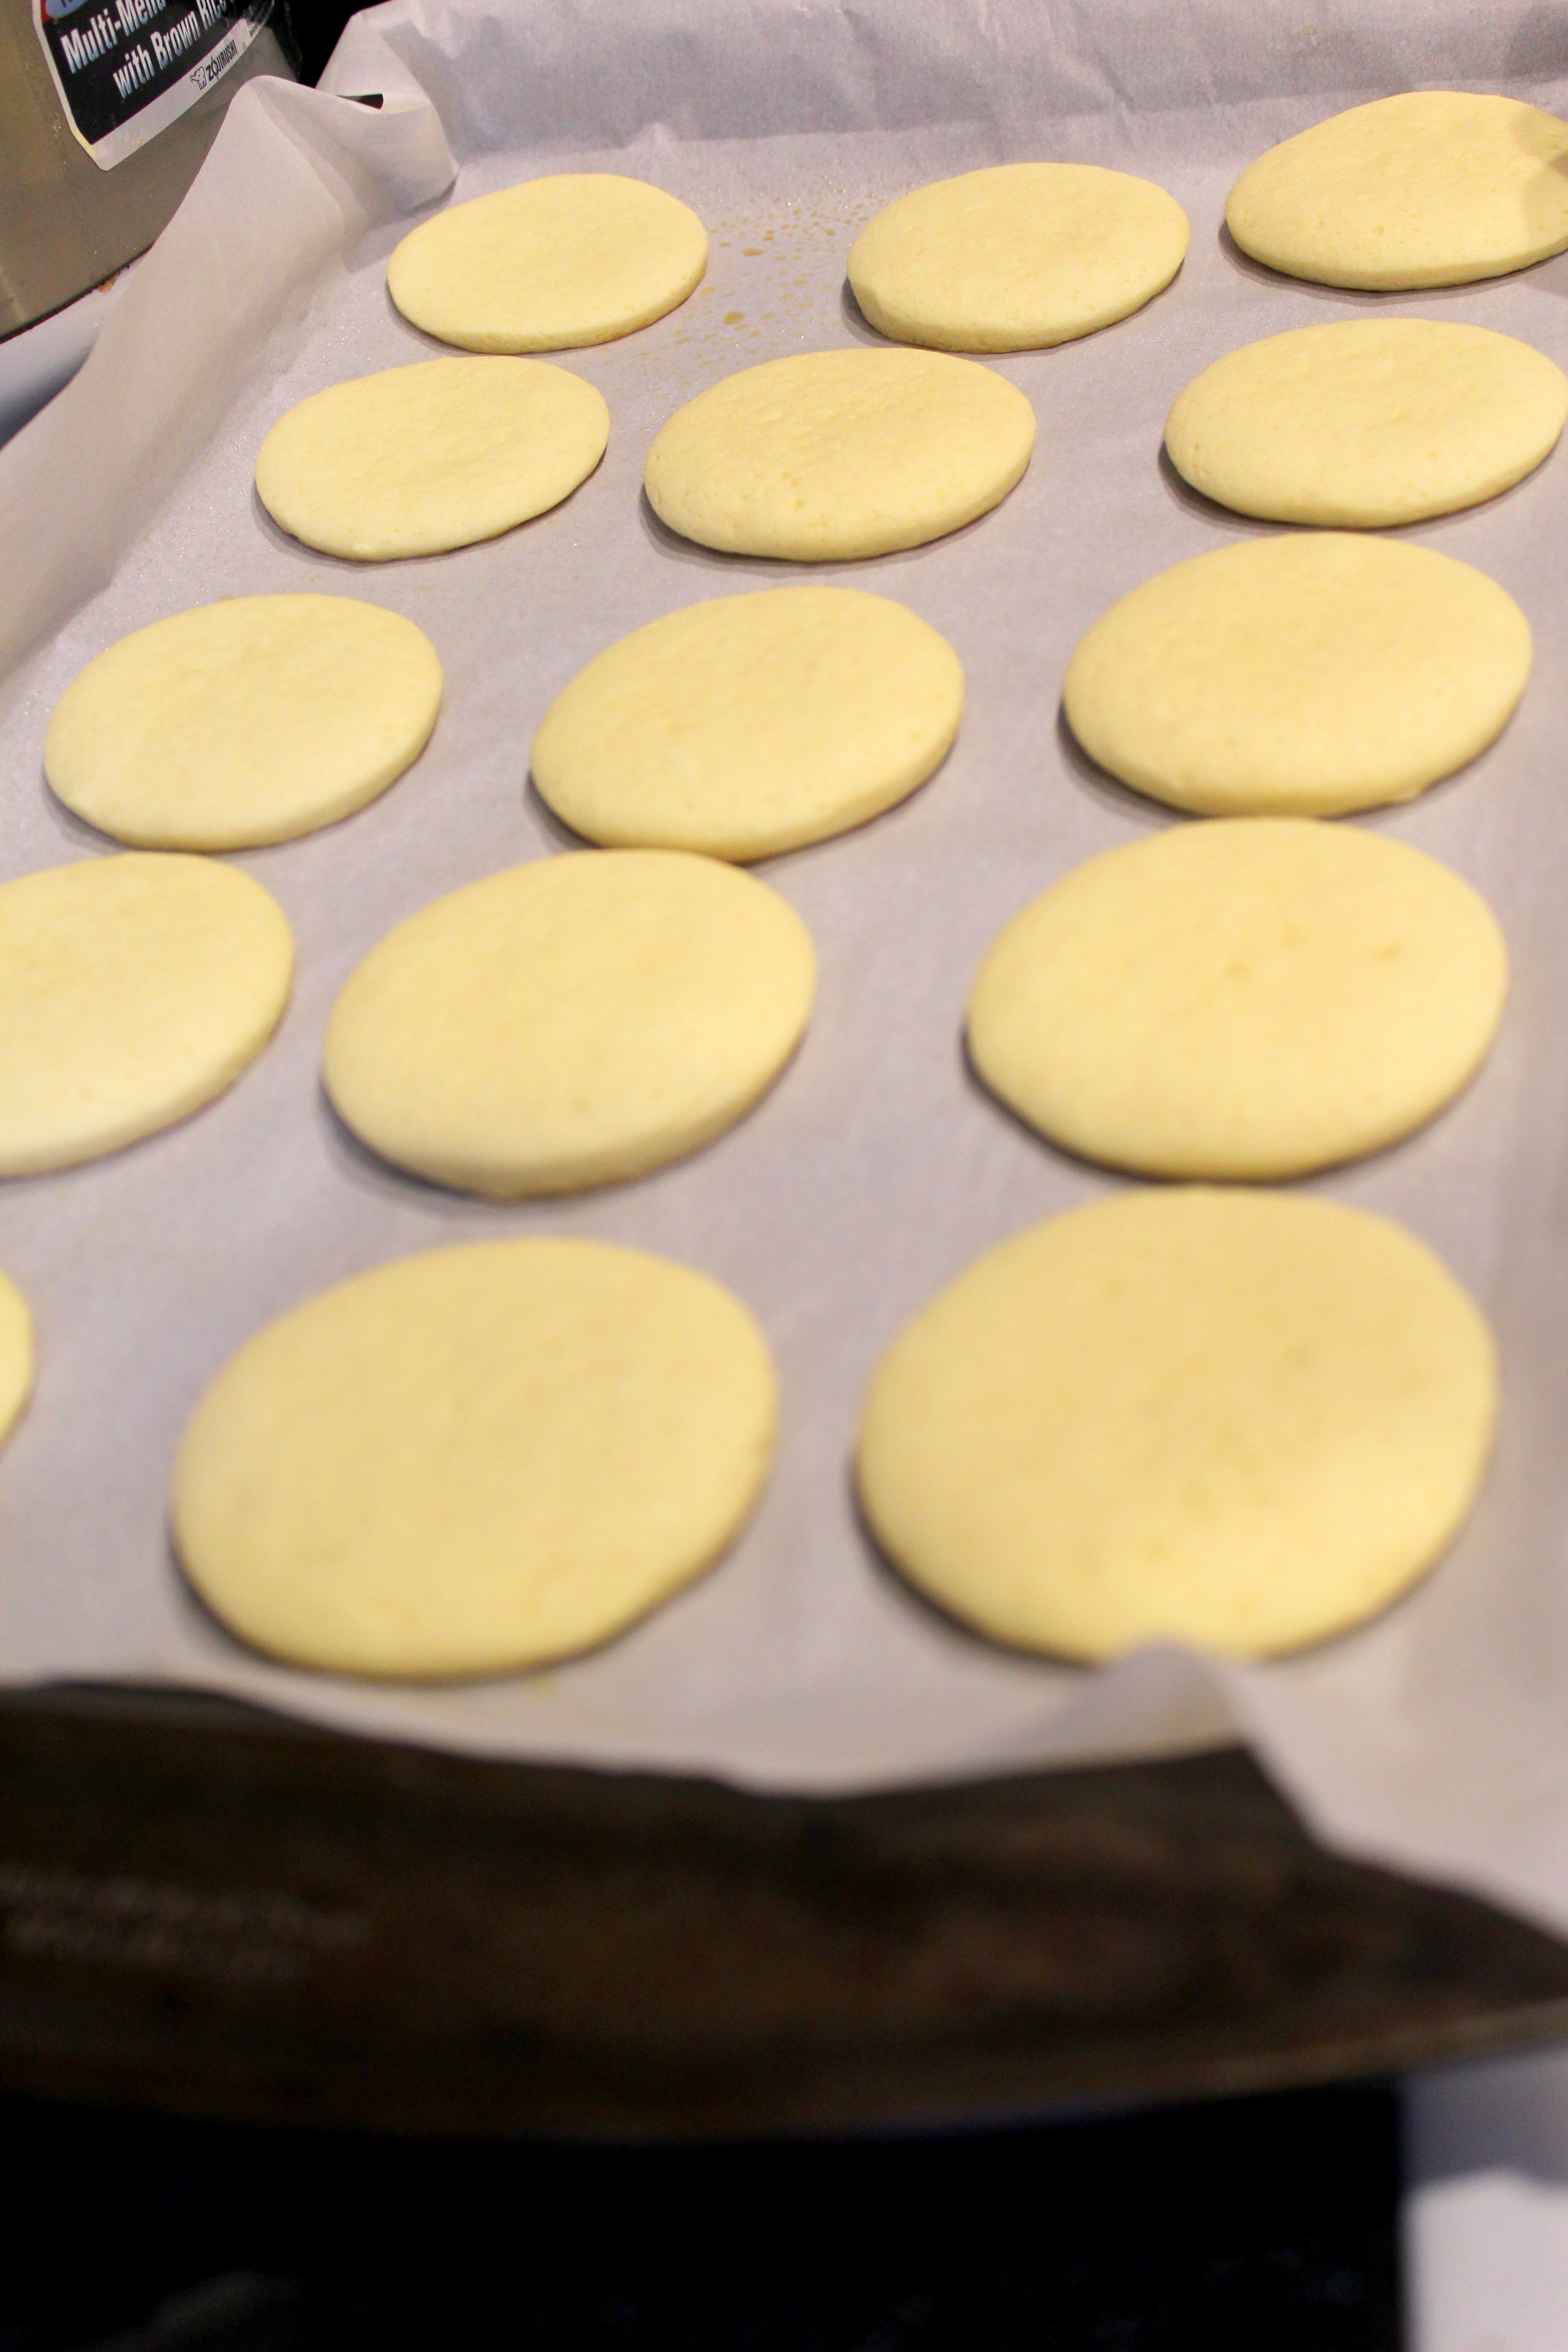
I used my go-to Soft Sugar Cookie recipe to make the cookies and got the Star Wars stencils from this Etsy shop.  I used store-bought black cookie icing (the kind that hardens, aka. royal icing) to “scrape” the Star Wars stencil designs onto the cookies.  See the step-by-step pictures below.  You could do that really with any stencils.  I did have to wipe down the stencils carefully after each cookie so the edges and lines would stay neat and not get smeared from leftover icing.  Sort of a tedious task, so I used buttercream to frost some of the cookies 🙂

stencil icing steps

cookies closeup

Obviously, I made a huge black mess on my first try with the icing and stencils , but the key is to make sure the stencil doesn’t move and scrape carefully so that the icing doesn’t seep through the cracks and “muddy” the lines and edges.

IMG_1370

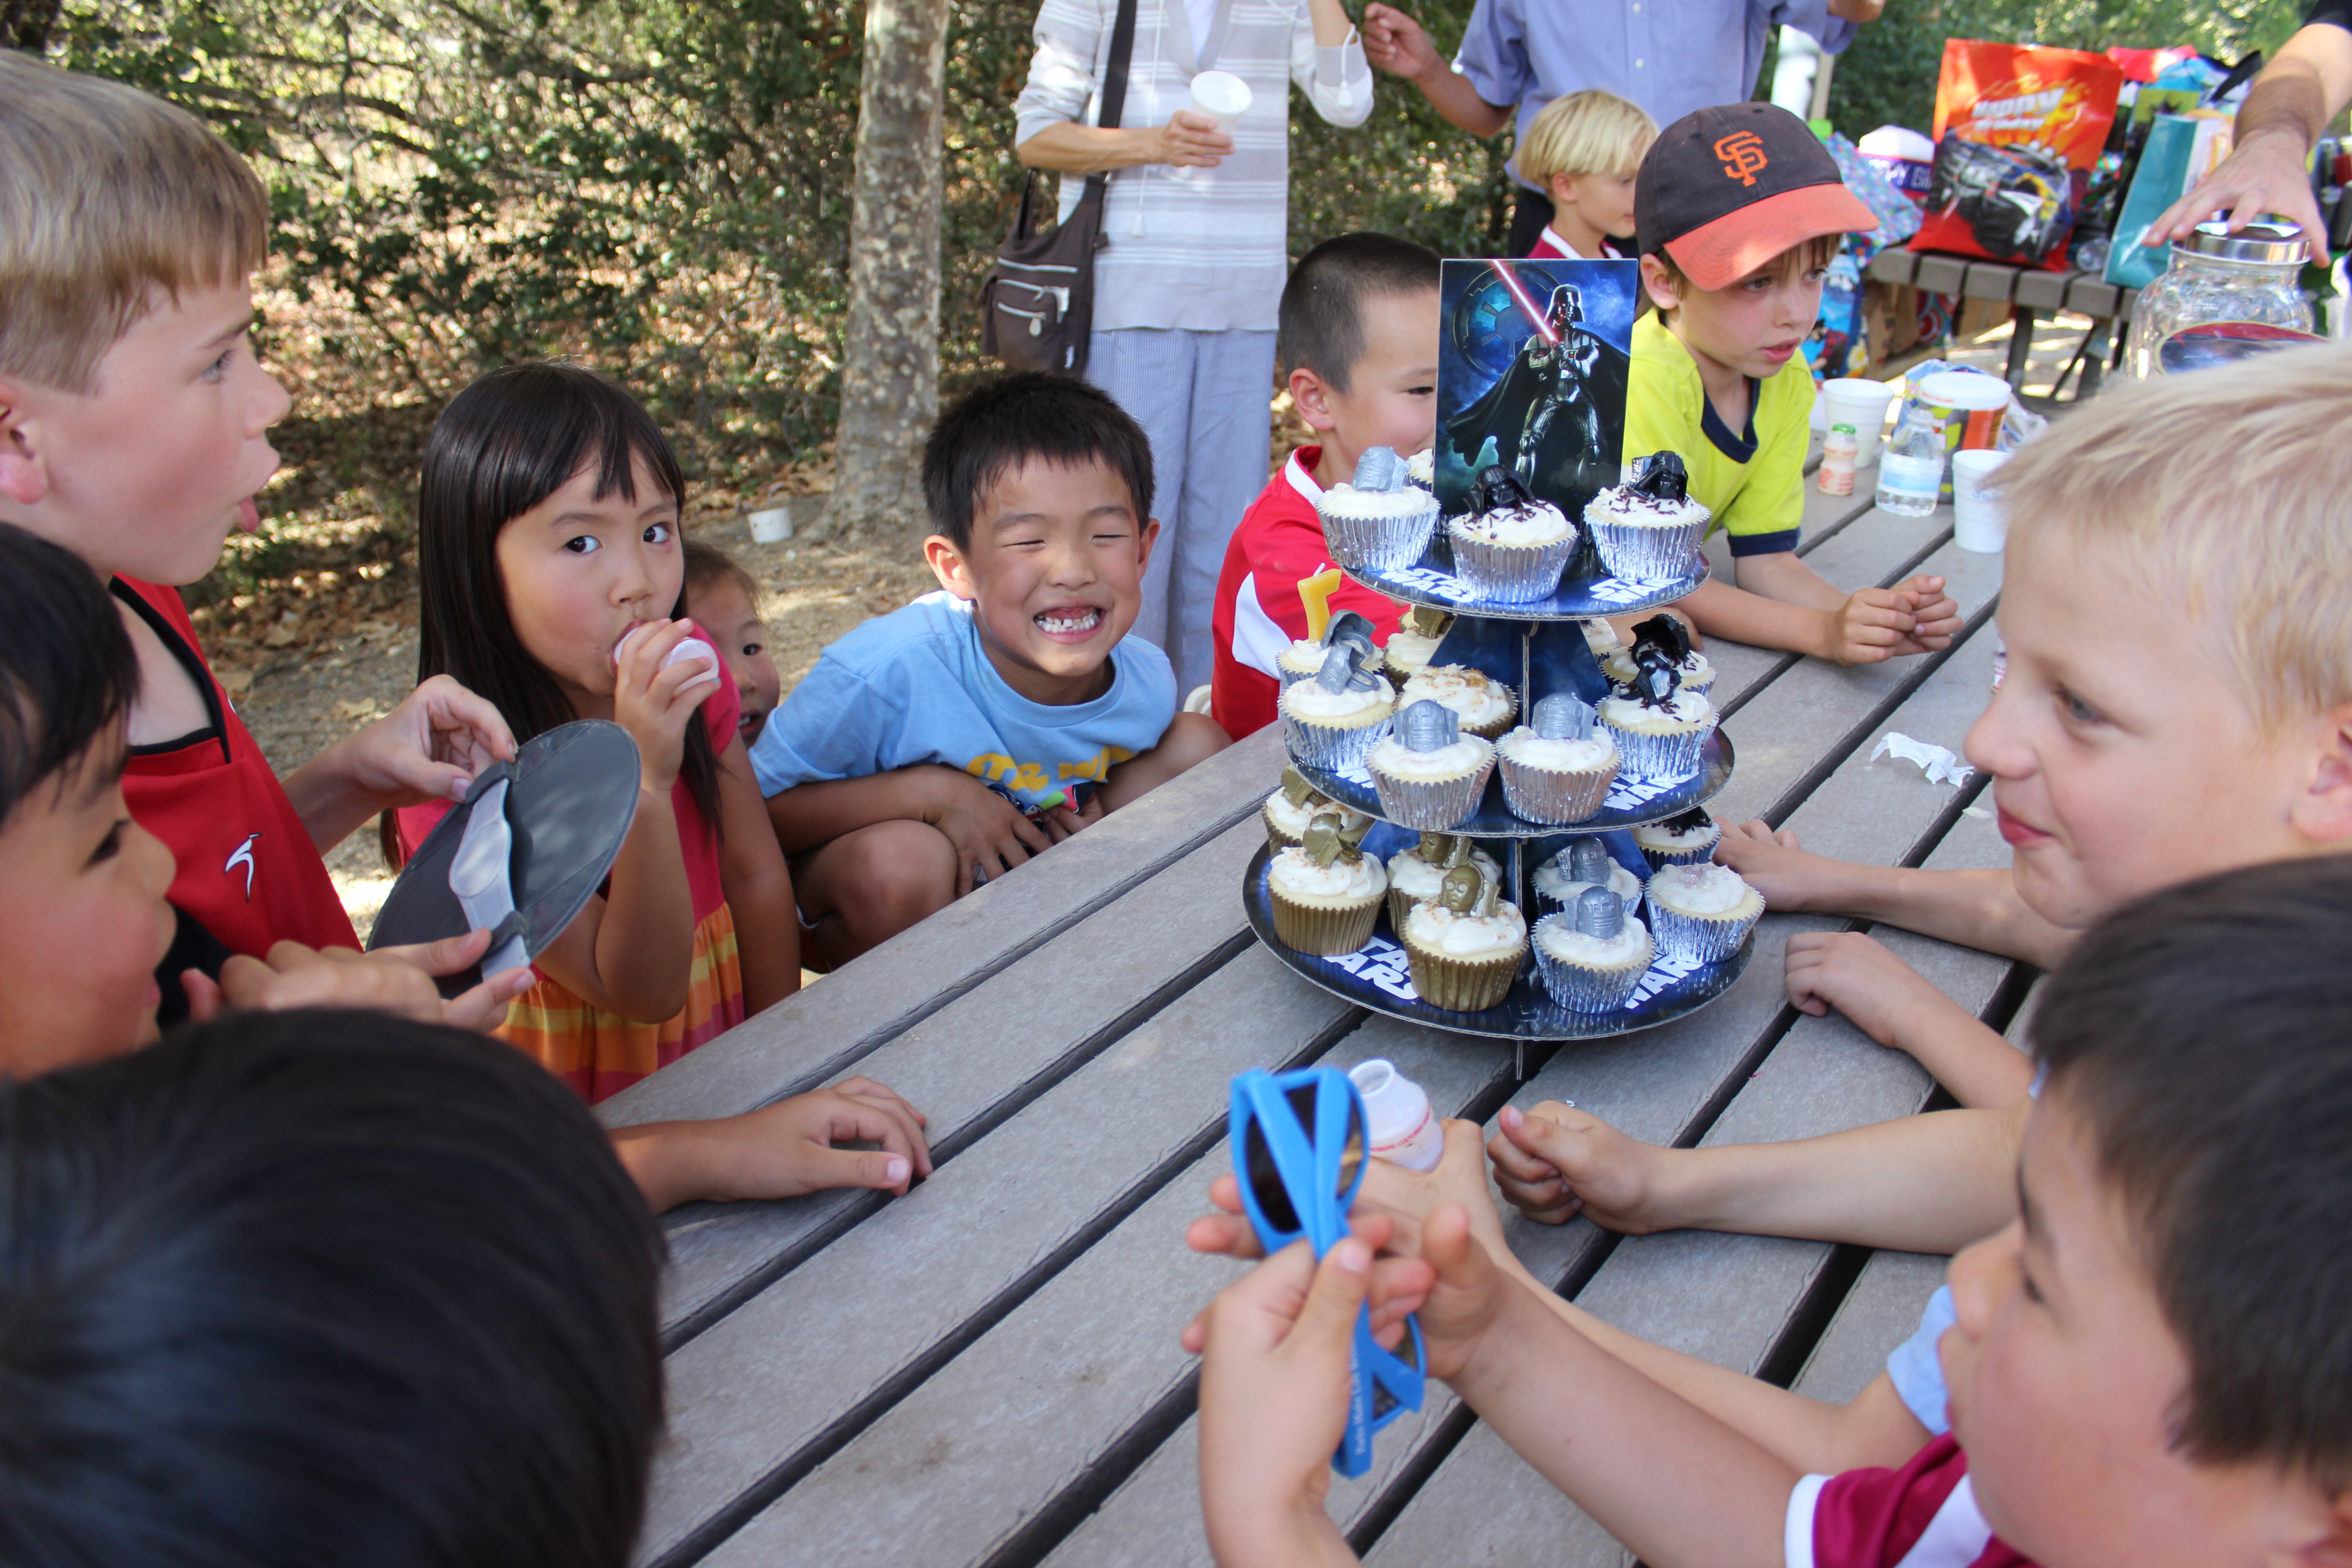
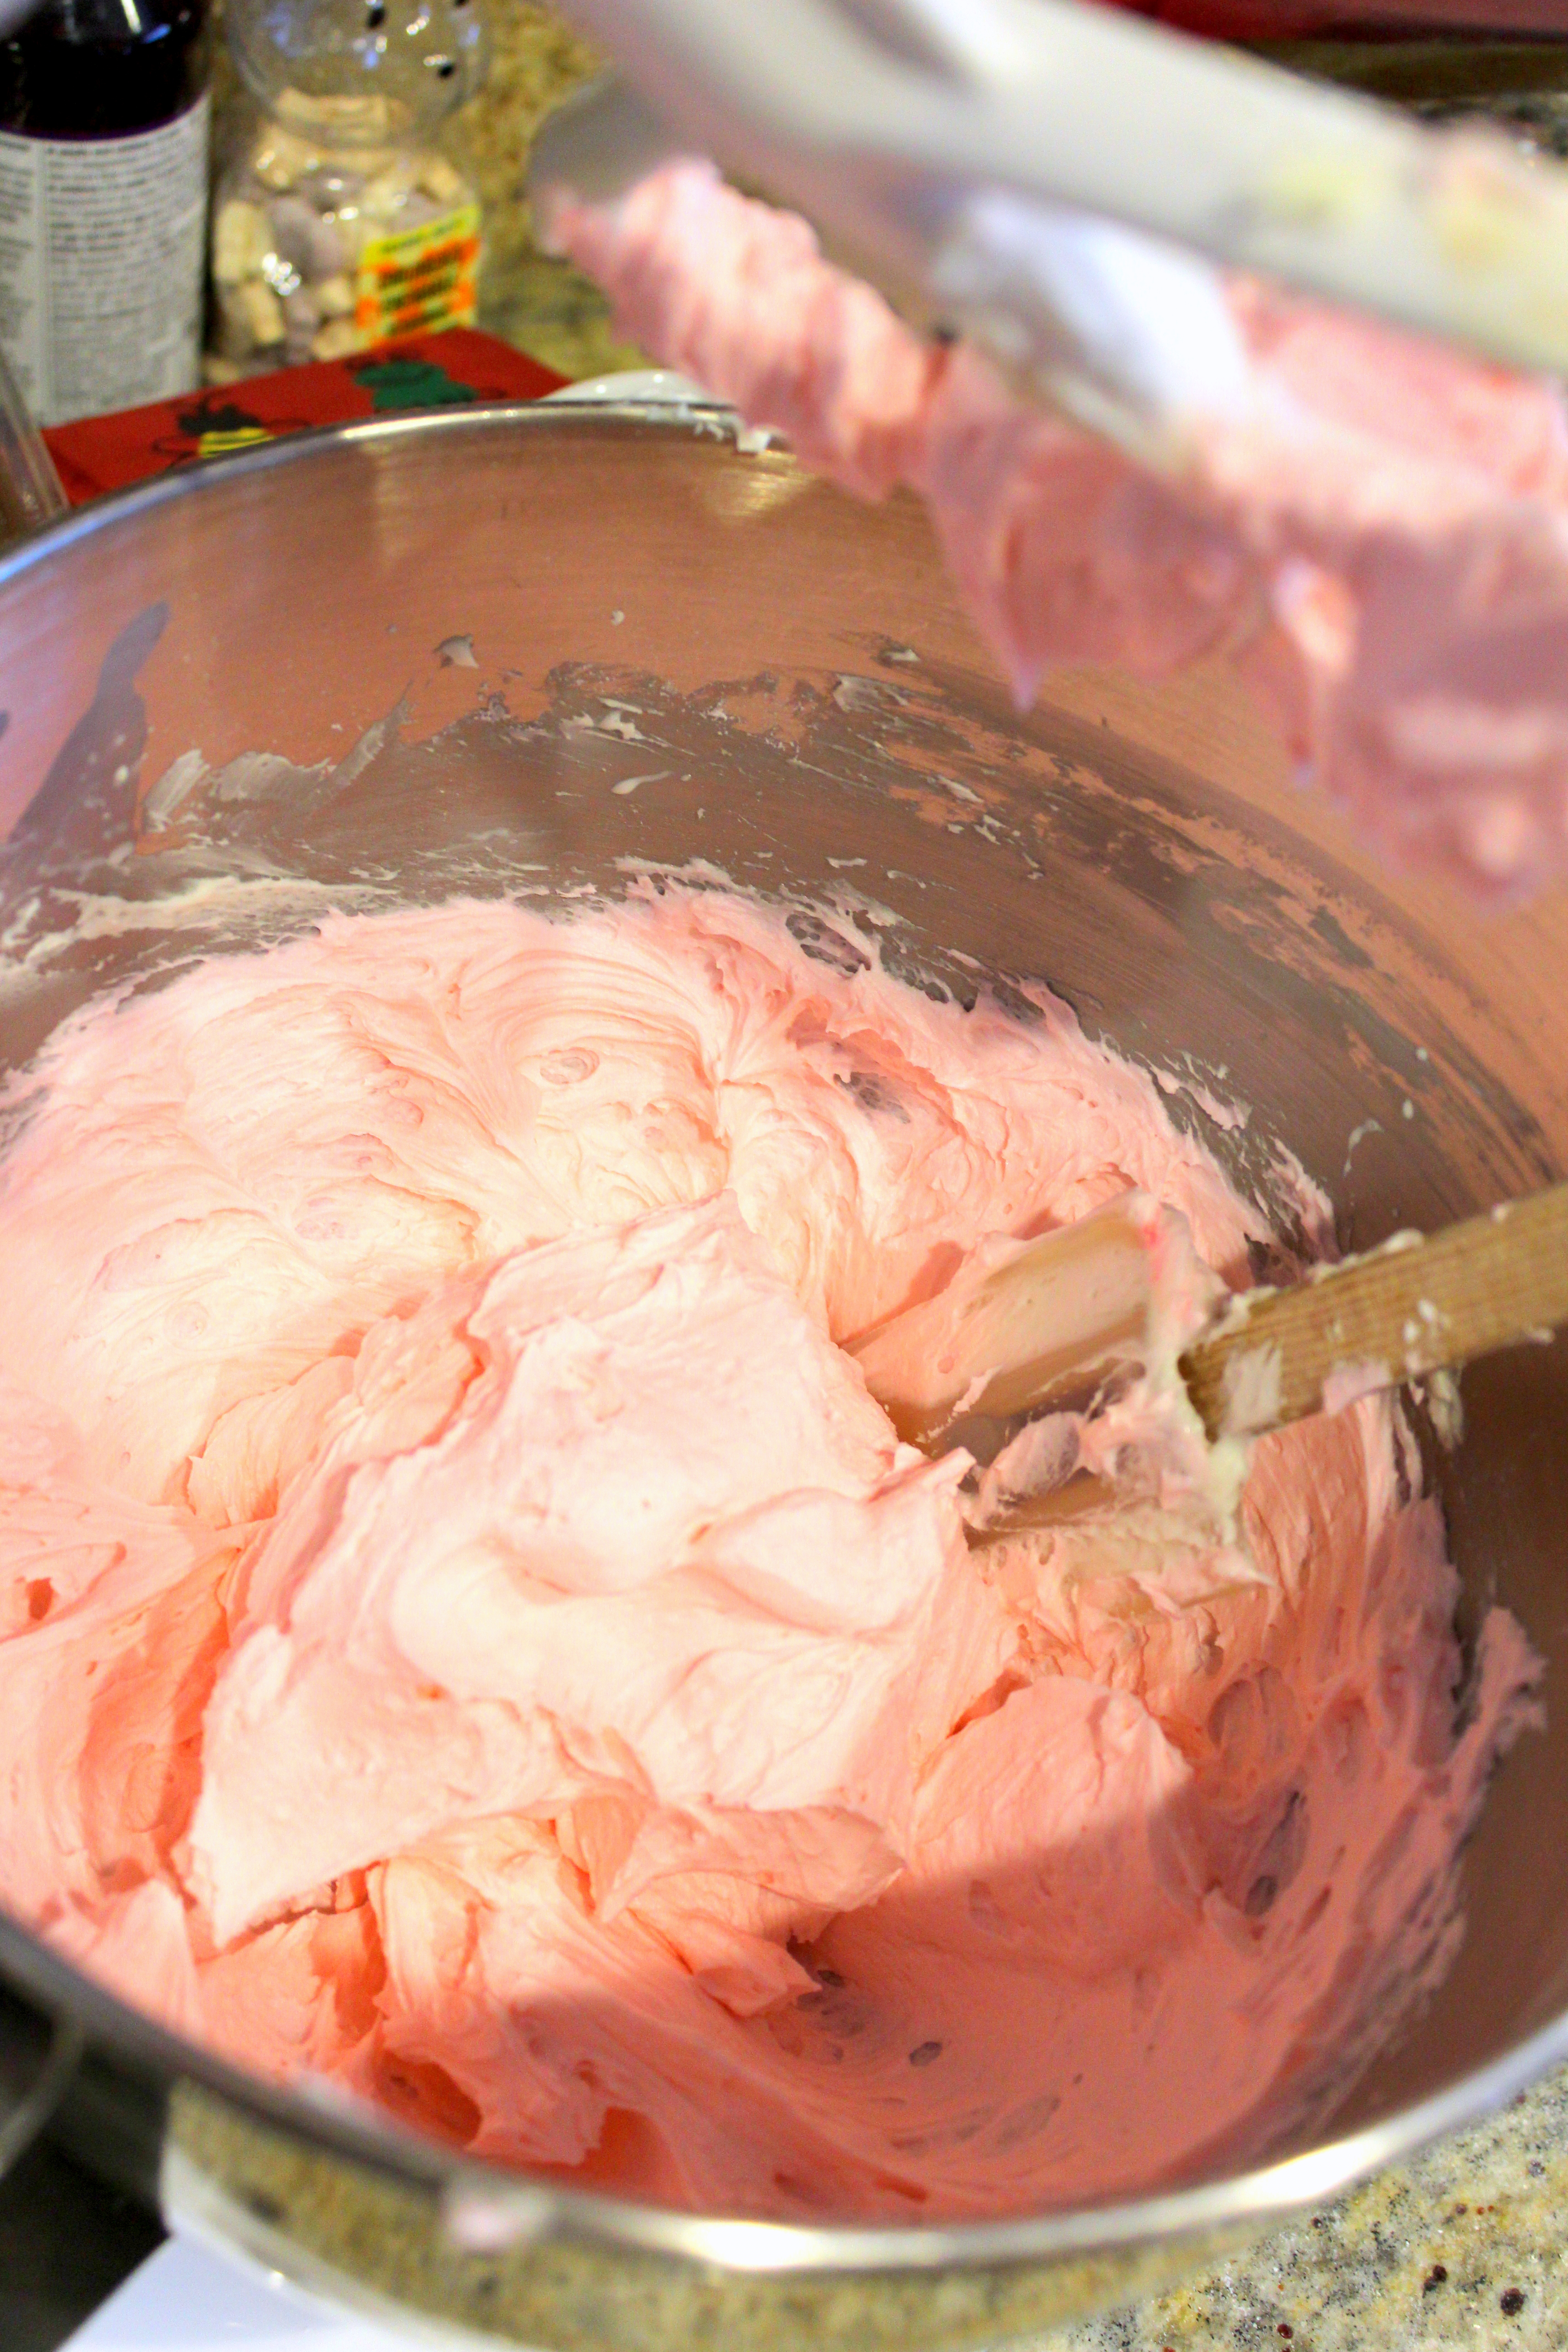
Since the party was at the park, I didn’t want to cut a cake there and in order to “simplify”, I did cupcakes with these Star Wars cupcake rings to top them off.  Silver cupcake liners and silver sprinkles for the R2D2 rings, gold liners and gold sprinkles for the C3PO rings, and silver liners with Chocolate sprinkles for the Darth Vader rings.  I didn’t get a chance to get close-up pictures of the actual cupcakes from the party on the Star wars Cupcake stand, but I had leftovers with one C3PO ring on it, so I was able to take those pictures at home.  See below for the recipes I used for the cupcakes.  The yellow cake recipe is by far my favorite vanilla cake recipe and it’s the moistest homemade butter cake you will every try!  I have “The Well Decorated Cake” book by Toba Garrett and her recipes are fantastic.  I usually use her French Vanilla Frosting recipe which tastes like Vanilla ice cream, but I tried this other buttercream this time.

Yellow Cake Recipe (I made cupcakes instead and reduced baking time to 20 mins)

Special Buttercream Frosting (I replaced half of the shortening w/ unsalted butter)

IMG_1398

So imagine all of those cupcakes had a cupcake ring on it 🙂

IMG_1401

My favorite purchase from putting together this party were these $1 cupcake carriers!!!  Yes, you heard me, $1 from the Dollar Tree!  They fit 9 cupcakes, and the lid is high enough not to squash the frosting if I had decided to go crazy on the frosting or decoration.  We were able to stack them to carry, and they even have handles (although I wouldn’t recommend carrying them by the handles since they are just a dollar and I wouldn’t want the bottom to fall off and the cupcakes…)

IMG_1376

We ended the party with the Darth Vader Pinata which was actually a pull-string pinata but my son wanted to whack it so I just cut the strings off and called it good.  Note to self: forego a pinata with 7 yr old boys… they stampede and trample…  Good thing my little 3 yr old (pictured above taking a whack at the pinata) was used to having a rambunctious 7 yr old brother and was fine when they all swarmed around for candy.

yodaBrayden

If you’re contemplating putting together an all boys birthday party of 6-7 yr olds… may the force be with you.  🙂  My son loved it and I think they had fun; that’s what counts for me, but would I do it again?  Ask me next year.

Thanks for reading~

-Flora

Pink Pillows of Nostalgia

IMG_0581

Boy, was this last week a blur of running around from morning til evening every day carting my older two kids to their respective schools, carting them back, errands, work, carting them to their activities, making multiple trips to almost every store within a 15 mile radius, planning a picnic, and feeling guilty for dragging my 2 (almost 3) yr old everywhere, so taking her to our local library for storytime.  This week should slow down a bit and I’m really looking forward to that. My daughter’s preschool had a Spring Social this past Saturday where current and new, incoming families join together for a little picnic and fun.  We had a great time with snow-cones, face painting, food, friends, and chicks hatching!  Yes, you read that right! Baby Chicks!  The preschoolers got to watch one of the chicks actually hatch out of it’s shell!  I must say, what impeccable timing, chicks!  The chicks’ due date had come and gone last Wednesday, so we were afraid they wouldn’t hatch and the kids would be disappointed.  At least they would get a heavy lesson on the ways life out of the experience, but the chicks decided to come so we were able to save that heavy life lesson for another day.  Not all chicks are fluffy and yellow as I had believed them to be, for these were black and cute and amazing to watch.

IMG_20150502_134015

peep peep!

When I was at BYU for college (not so long ago… okay… it was many years back), I would oftentimes indulge in those soft, fluffy, melt-in-your-mouth sugar cookies heaped with a generous slathering of pink (artificial) icing, topped with cute little sprinkles, and I must admit those indulges happened a little too often.  I still see copycat versions of these pink pillows of nostalgia at my local grocery store, and perhaps my taste buds have grown up, but now these cookies taste… *blah* to me.  That could also be the effect of actually looking at the list of ingredients and wondering ‘What in the world did I put in my body all those years? No wonder I’m…’

I’m not sure what they put into their cookies to make them so soft because I don’t think it’s possible to achieve that kind of softness without adding “other” ingredients into your dough.  But I’m ready with my go-to sugar cookies recipe whenever I catch myself eyeing those pink, frosted cookies made from “others” at the grocery store and this is one of the recipes I made for my daughter’s preschool’s Spring Picnic last Saturday.  This recipe uses regular all-purpose flour with no dough refrigeration time and the other one I like to use calls for cake flour and refrigeration time, which I don’t always have the patience for when I’m baking in a hurry; which is quite almost, always. So this recipe is my all-time go-to for pink, frosted, cut-out sugar cookies, and can’t forget the sprinkles to complete the look.  😉

The dough comes together beautifully for this recipe and, as I already mentioned, you don’t need to refrigerate the dough to roll-out and cut shapes.  Also, the dough doesn’t stick when you roll it out and the cookies actually hold their shape after being baked!  And did I mention that they taste delicious!  Let them sit overnight in an airtight container and you’ll get an entirely soft cookie.  They are great right out of the oven too.  What is there not to love about this recipe?!

Soft Cut-out Sugar COokies
  • 1 cup butter, room temp
  • 1 ¾ cups granulated sugar
  • 2 eggs
  • 3 tsp vanilla extract
  • 1 cup sour cream
  • 1 tsp salt
  • 2 tsp baking soda
  • 5½ cups all-purpose flour
  1. Preheat oven to 375ºF
  2. In a large bowl, combine flour with salt and baking soda and mix, set aside.
  3. Cream the butter and sugar together in a stand mixer with beater attachment until light and fluffy.
  4. Add eggs one at a time and beat to incorporate.
  5. Add vanilla and sour cream and beat to mix.
  6. Add the flour mixture and carefully mix on lowest speed.  Add more flour (a tablespoon) at a time if sticky, but don’t add too much!
  7. Roll out dough to 1/4″-1/3″ thickness and cut out in desired shapes
  8. GREASE parchment paper on cookie sheets and bake 6-7 mins.
  9. Let cool for 5 mins before transferring to cooling rack.
Fluffy Buttercream
  • 1 cup butter, room temp
  • 1 tsp vanilla extract
  • 4 cups powdered sugar
  • generous pinch of fine grain salt
  • 1/4 cup heavy cream
  1. Beat butter until light and fluffy
  2. Add powdered sugar and vanilla and beat
  3. Add salt and heavy cream and beat.
  4. Tint to desired color and frost cooled cookies.
IMG_0533

After you make your dough, lightly dust a piece of parchment paper with flour and get a hunk of dough ready to roll.

IMG_0534

Press it down and slightly flatten with your hands to make it easier to roll out.

IMG_0535

I like to place another sheet of parchment paper over the dough to roll it out. That way, it definitely doesn’t stick to my rolling pin.

IMG_0537

Peel off the top parchment (if you used one), then cut out into desired shapes. I stuck with circles this time.

IMG_0538

My little pretties ready to go into the oven.

IMG_0539

See how nicely they retained their shape (it’s easier to tell with other shapes, I suppose).

IMG_0540

Close-up of my pretty cookie 😉

IMG_0541

I baked these for 6 mins at 375 F

IMG_0545

While your cookies cool, whip up your buttercream and tint to desired color.

IMG_0579

Frost your cookies and top with colorful sprinkles

IMG_0582

Then eat, enjoy, and leave the grocery store pink “others” alone!

Thank you for reading and have another wonderful week, hopefully with some homemade sweetness along the way~

-Flora