
As I sit and reflect on my past year this Thanksgiving season, I have many, many things to be thankful for, and this Thanksgiving, I am especially grateful for my good health and for the good health of my family. I’m grateful to be able to wake up in the morning and be able to get up on my own, to be able to take care of myself and my children, be able to drive and go places, be able to cook, bake, sew, read, do the things I enjoy and also the things I may not enjoy too much (aka: clean the toilets), to be able to live life and not be in constant physical pain is a tremendous blessing that I am reminded of this season.
My next door neighbor has cancer and only has maybe a week left before she will be leaving this world behind. I believe she will be happy and no longer be in physical pain after she leaves this world, but it is still difficult to see her go. During my last visit with her when she was still awake and aware of her surroundings, she said to “enjoy life while you can” and that is something that I really need to work on. I am always immersed in the “to-do’s” and always looking for the “better”: “I’ll be able to breathe after I get through this, this, and this”, “I’ll be happy after I get a bigger place”, “I’ll be happy after the kids grow older and can take care of themselves”, etc, etc. I have been trying to find joy in the “here and now”, and it really seems to be about your attitude and perspective, as I found in this pretty neat post circulating Facebook: (read from top to bottom then from bottom to top)

I am grateful to be able to use my hands to create things for my children.


I have always been afraid of hand-sewing and have made a boy’s necktie before that required hand-sewn seams to close the back of the tie, but that may have been the first and last tie I made due to the hand-sewing which deterred me from making more. That was a few years ago, and I was really doubtful about trying to make a doll that was ALL hand-sewn when I stumbled across this book by Shelly Down while Christmas shopping (in lieu of Santa) and thought they were beyond adorable! I looked up her Gingermelon blog and saw there were free tutorials and patterns for some other insanely cute felt animals/projects and decided to try my hand at her little Sparkle Kitty. I figured I would throw up my hands (like the necktie) after trying to hand-sew the kitty and save myself from spending money on a book/pattern I wouldn’t end up using, but I really surprised myself at how the hand-sewing didn’t seem too bad and at how quickly and easily it came together (plus they are Super cute!). Coming into the project, I had NO idea what a whip stitch, blanket stitch, or a ladder stitch were but after a few searches on Google and youtube, I was good to go; though you could tell which stitches were first and which came later. I made 3 of these little creatures (one for each of my children) and was ready for more!

They’re tiny little creatures 🙂

After the kitties, which were a huge hit with my 3, I decided to purchase a PocketPoppy pattern from Gingermelon’s Etsy shop to try my hand at a doll and am pretty impressed with the pattern and how the dolls actually turned out!
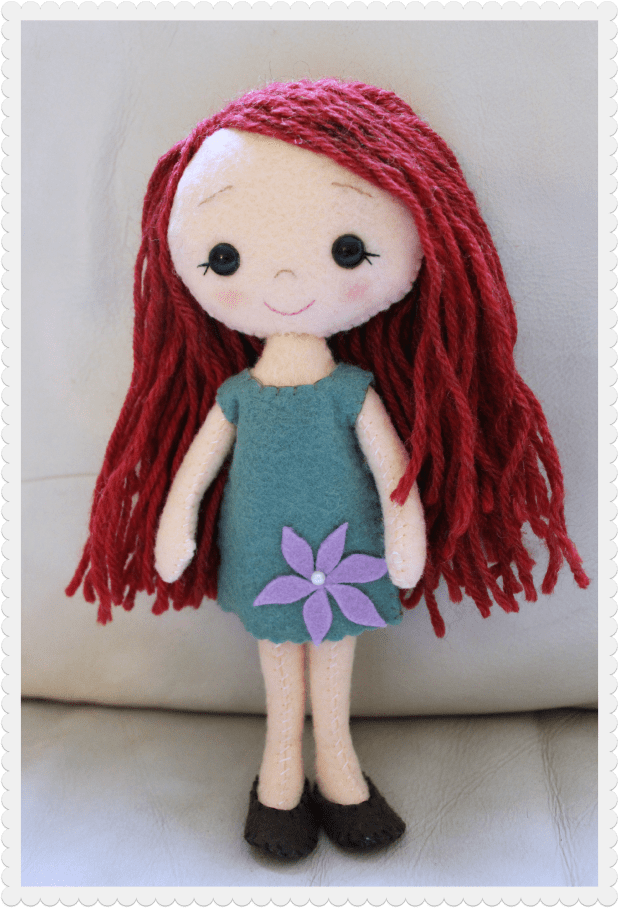
I used a wool blend felt from Felt the Wool (Etsy). The wool blend felt really does make a difference in the quality of your doll and I would advise against using acrylic felts (usually sold at Joann and Michael’s) because they pill and don’t look nice after a little bit of handling. I made the Kitties with the acrylic felt I had at home and they look worn and old already.

I used 8mm safety eyes from Amazon instead of the 7.5mm that the pattern calls for, and I think my dolls look perfectly cute. My only real challenge with the dolls was the hair! I was able to “poke” the hair into the seams at the top of the head, but I couldn’t “poke” the hair into the felt down the back of the head like the instructions suggested and opted for the gluing option instead. Only the first layer of “hair” is glued to the back of the head and the other layer of hair over that portion covers it and makes it look just fine. I also ended up gluing the bangs portion in the front to keep it looking nice.
Add a little color to their face with a red or pink crayon! Rub on gently and add more as desired~

The other more minuscule problem I found was that a couple strands of hair that was “poked” into the seam and hadn’t been glued to the back of the head had fallen out after my girls had played with them. So I tried to remedy that by adding a tiny bit of glue to the “scalp” to keep the upper layer of hair in place and hopefully, withstand the playtime that it was meant to provide for my girls.
Summary of supplies:
- PocketPoppy pattern
- wool blend felt Felt the Wool
- pair of 8mm safety eyes
- batting, fiberfill, cotton batting (I used polyester batting)
- yarn for hair (thicker is easier to work with)
- Aleene’s Jewel-It glue (this is the one I used)
- matching embroidery thread
- needles (a few different sizes help)
- fabric scissors and embroidery scissors help too
- pink/red crayon for blush
Here they are so happy with their little dolls!


My older girl wanted black or brown hair for her dolly and my younger girl wanted red hair. Sisters yet they are SO different! I love them so much and am so grateful to have a family I can dote on.
Wishing you a wonderful Thanksgiving season with loved ones.
Thank you for reading.
-Flora
