DIY: Leather Cord Charm Bracelet

DIY Leather bracelet Main pic.jpg

Another year has flown by with 2018 looming just over the last page of our dogeared  calendar; and I was just getting used to writing 2017 on all the kids’ school forms/permission slips.  The fam-bam and I packed so much in this year yet that feeling of regret over having lost another year, time we won’t ever get back, and all the to-do’s that never got “do-ed”, leaves me in disbelief at how time really does, literally, fly.  But just like I get a fresh, new slate daily, it’s time for my annual fresh, new slate.  Yeah, you shouldn’t wait for the new year to set and evaluate your goals and progress, but the new year is always a perfect time to do just that.  So, yes.  I’m saying a triumphant ‘goodbye’ to 2017 and I am ready to receive 2018 with open arms.  But first, let me get through this Christmas rush while I try to reverence the true meaning of the season with my little ones amidst all this commercialism.  And since Christmas and gift-giving go hand-in-hand, here’s a little DIY tutorial for a shiny, little something to put under your Christmas tree.

I work with a church youth group of girls ages 12-17 yrs and every year the leaders put together a little birthday gift for the girls and drop it off for them on their birthday.  So while brainstorming gifts, I stumbled across an image of a leather cord bracelet with gold tubing that would be perfect but way out of our budget to purchase.  Plus, we wanted to incorporate the new year’s youth theme into the gift as well.  After doing some research, (hrs upon hrs, ok not really) I figured out a way we could make the bracelets ourselves for about $3 each including a charm etched with our new theme!  I was pretty ecstatic because they are so cute and I know the girls will love it!  (One can hope)

I added links to places where I purchased the material, but I was buying in bulk so you may want to purchase smaller batches.

DIY Leather Cord Charm Bracelet w/ Gold Tube

Materials:

Tools:

  • scissors
  • jump-ring tool (I just used my fingers)
  • E6000 & Super glue (or Gel Superglue, Gel Gorilla glue)
IMG_5090-1

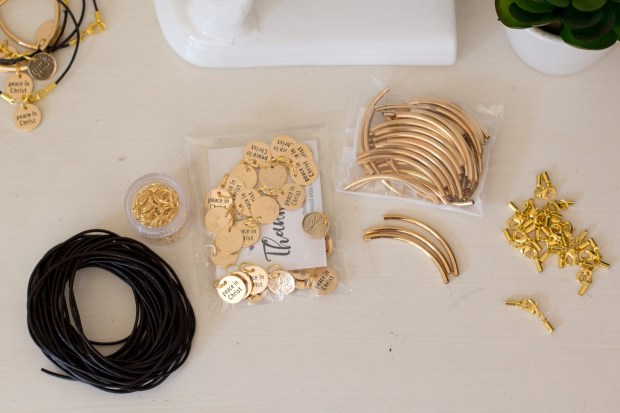
I guess gold comes in different hues… Luckily the charms and the gold tube matched while the end caps were a little more yellow, but I made it work.

IMG_5116-1

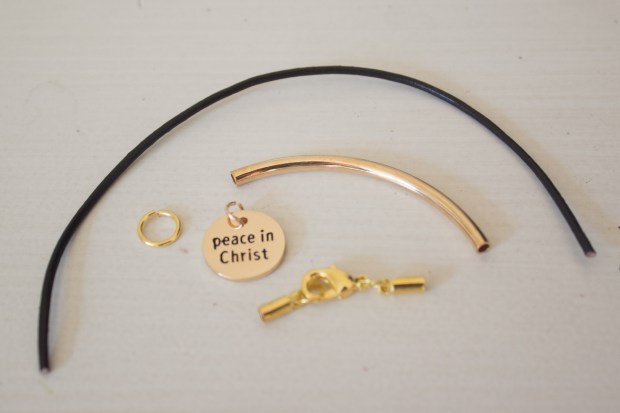
What you’ll need to make one complete bracelet. (plus the glue)

Instructions:

IMG_5119-1

  1. Cut desired length of leather cord. (My finished bracelet size is 7 inches.  Measure wrist for accuracy but that seemed to be a good size for most of the girls.  You want the length of your leather cord and the clasp to total your desired bracelet length)IMG_5121-1
  2. Thread the cut cord through the gold tube bead.IMG_5120-1
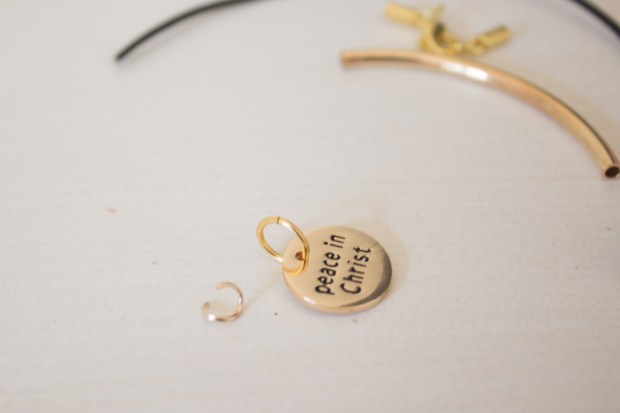
  3. Add the charm. (I had to switch the jump ring on my charm to an 8mm jump ring in order for it to fit over the gold tube)IMG_5122-1
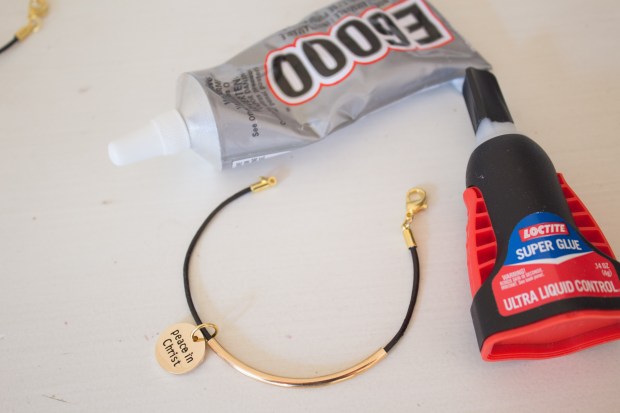
  4. Add a dab of glue to each end of the leather cord and gently insert into the end cap clasp. (if using E6000, let dry few mins, then pull back out and add a dab of super glue.  E6000 by itself came out with a tug test) (If using gel super glue or gel gorilla glue, then just glue once and done)* Let it dry overnight.

*I had E6000 glue already from a past project and thought that would suffice when gluing on the end caps, but when I tested it with a tug the next day, it slipped out fairly easily.  So I added a dab of super glue (runny kind) and it held tight.  I decided to get gel gorilla glue and that by itself held well.  Use what glue works for you.

IMG_5108-1

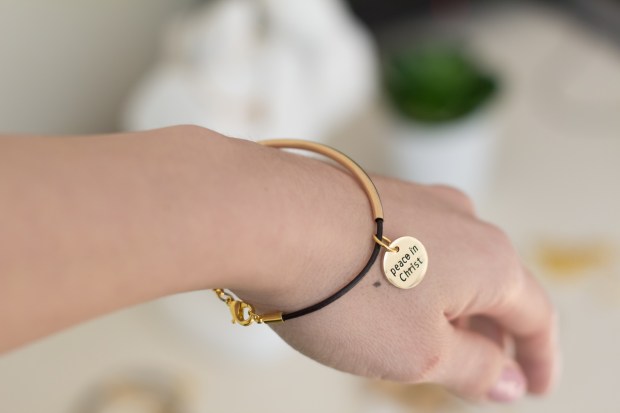
SUPER EASY and SUPER CUTE!!!

IMG_5080-1.jpg

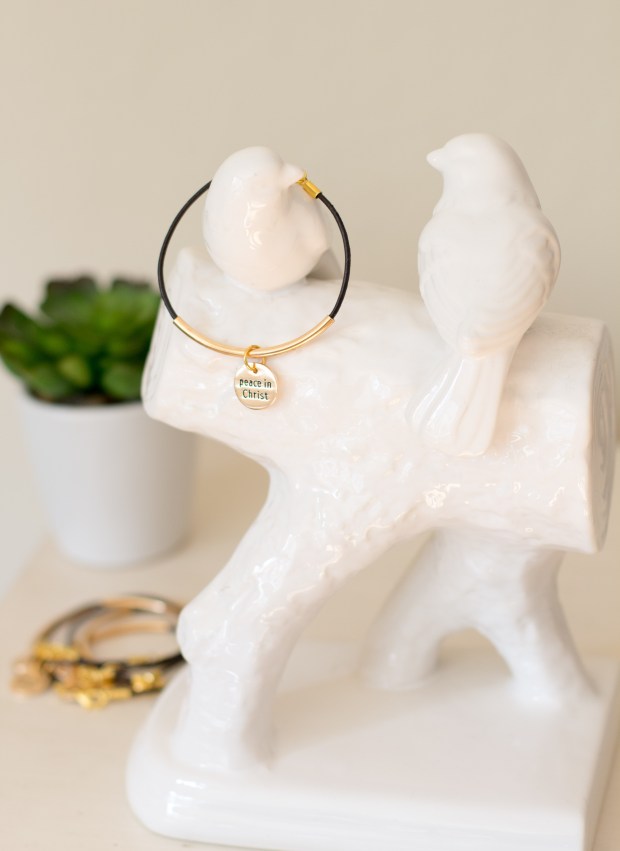
I hope you made one for yourself, too~

Thanks for reading-  Wishing you a Merry Christmas and Happy Holidays (however you may celebrate)!

-Flora

For Birthdays September Is…

September is the most exciting, busy, and tiring month of the year.  It beats even the holiday frenzy of Thanksgiving and Christmas in our family with the number of birthdays we have along with all the back-to-school shenanigans.  My birthday is also guilty of being in September along with my now, 7 yrs old son, who we just finished throwing a themed party for last weekend.  My son has always had something he was obsessed with since he was a baby, starting with airplanes, dinosaurs, etc, and now we’re at Star Wars, so you can probably guess the theme of his party.  I always start off saying I’m going to make the party as simple as possible, then I start adding things here and there until I find myself staring at the ceiling with about a gazillion things running through my head at 3am and wondering what I got myself into.  We ended up having his party at our local park with about 2 dozen 1st grade boys after inviting school friends, church friends, and his soccer team.  Let’s just say I’m glad that this park is usually empty so we had the place mostly to ourselves and so relieved that there were no injuries aside from a rope burn.

Brayden Star Wars shirt

So I am kicking myself in the butt for not taking more pictures at the party, but I was more concerned at that time in making sure I didn’t lose anybody’s kid and that they were safe than try to document the setup/party.  Just imagine I posted pretty pictures of the “Yoda Soda” made from green Gatorade powder in a large, glass, drink dispenser and a beautiful spread (who am I kidding? ha ha) of a huge bowl of our own hodgepodge trail mix ranging from a “seasonal” Star Wars Lucky Charms type cereal, Star Wars Honey Maid grahams, M&M’s, pretzel sticks, Chex cereal, to Rocket Ship Crackers (Trader Joe’s).

In preparation for the party, I wanted to make those lightsabers from pool noodles, but after some research, I was disappointed that the pool noodles were actually quite expensive.  But I found a pinterest image of one made from pipe insulation and duct tape to make the lightsabers which I thought was perfect; especially the price.  I got the 6 ft. insulation at OSH for $1.29 (Home Depot was cheaper but further from me) and I was able to cut them into 3 pieces.  I got red, blue, green, and gray duct tape to cover the pipe insulation and later added thin black duct tape to add a finishing touch to the handles.

lightsaber_steps_instructions

0930151218

This is also an after-the-party picture (if you can’t tell by the slight warp to the lightsaber).  It was pretty crazy when I handed out the lightsabers to the boys to play with… had to take them back after 2 kids started crying because someone hit them on the head and they didn’t like it… so hand them out at the END of the party.  -__-

IMG_1392

I used my go-to Soft Sugar Cookie recipe to make the cookies and got the Star Wars stencils from this Etsy shop.  I used store-bought black cookie icing (the kind that hardens, aka. royal icing) to “scrape” the Star Wars stencil designs onto the cookies.  See the step-by-step pictures below.  You could do that really with any stencils.  I did have to wipe down the stencils carefully after each cookie so the edges and lines would stay neat and not get smeared from leftover icing.  Sort of a tedious task, so I used buttercream to frost some of the cookies 🙂

stencil icing steps

cookies closeup

Obviously, I made a huge black mess on my first try with the icing and stencils , but the key is to make sure the stencil doesn’t move and scrape carefully so that the icing doesn’t seep through the cracks and “muddy” the lines and edges.

IMG_1370

Since the party was at the park, I didn’t want to cut a cake there and in order to “simplify”, I did cupcakes with these Star Wars cupcake rings to top them off.  Silver cupcake liners and silver sprinkles for the R2D2 rings, gold liners and gold sprinkles for the C3PO rings, and silver liners with Chocolate sprinkles for the Darth Vader rings.  I didn’t get a chance to get close-up pictures of the actual cupcakes from the party on the Star wars Cupcake stand, but I had leftovers with one C3PO ring on it, so I was able to take those pictures at home.  See below for the recipes I used for the cupcakes.  The yellow cake recipe is by far my favorite vanilla cake recipe and it’s the moistest homemade butter cake you will every try!  I have “The Well Decorated Cake” book by Toba Garrett and her recipes are fantastic.  I usually use her French Vanilla Frosting recipe which tastes like Vanilla ice cream, but I tried this other buttercream this time.

Yellow Cake Recipe (I made cupcakes instead and reduced baking time to 20 mins)

Special Buttercream Frosting (I replaced half of the shortening w/ unsalted butter)

IMG_1398

So imagine all of those cupcakes had a cupcake ring on it 🙂

IMG_1401

My favorite purchase from putting together this party were these $1 cupcake carriers!!!  Yes, you heard me, $1 from the Dollar Tree!  They fit 9 cupcakes, and the lid is high enough not to squash the frosting if I had decided to go crazy on the frosting or decoration.  We were able to stack them to carry, and they even have handles (although I wouldn’t recommend carrying them by the handles since they are just a dollar and I wouldn’t want the bottom to fall off and the cupcakes…)

IMG_1376

We ended the party with the Darth Vader Pinata which was actually a pull-string pinata but my son wanted to whack it so I just cut the strings off and called it good.  Note to self: forego a pinata with 7 yr old boys… they stampede and trample…  Good thing my little 3 yr old (pictured above taking a whack at the pinata) was used to having a rambunctious 7 yr old brother and was fine when they all swarmed around for candy.

yodaBrayden

If you’re contemplating putting together an all boys birthday party of 6-7 yr olds… may the force be with you.  🙂  My son loved it and I think they had fun; that’s what counts for me, but would I do it again?  Ask me next year.

Thanks for reading~

-Flora

Bottle Cap Necklaces and Keychains DIY

bottlecap collage

This summer has gone by way too fast!  I can’t believe it’s already mid-August and school is just around the corner!  I’ve been swamped the last couple months with a work, trips, family, and wedding planning (not mine; been there, done that).  We welcomed summer with a trip to Yosemite with my father-in-law during his annual trip to the US from Hong Kong.  After a week of Bible Camp we made the 14 hrs drive to WA to visit my family for 2 weeks and got to experience their unusual heat spell in a A/C-less apt.  As soon as we got back, I got to help plan a wedding!  How many of you can say you helped plan your mother-in-law’s wedding? I sure can!  Now there’s only 2 weeks left before school starts and I’m prepping for one last trip to Southern California before we get back into the grind of pickups, dropoffs, ballet, soccer, etc…

While getting a few things ready for school, I made some keychains for the kiddos’ backpacks with some of their favorite characters.  I had all the materials leftover from a birthday party many moons ago. My daughter had a birthday back in March and asked for a gymnastics party after she had a blast attending a friend’s birthday party at the same venue.  She also wanted the birthday theme to be Strawberry Shortcake so I decided to make bottlecap necklaces and keychains for party favors.  I looked around online and found the following method to be the most simple and cute for making these bottlecap necklaces/chains.

Materials:

IMG_20150304_124655

Gather your materials

IMG_20150304_135853

Carefully stick your 1″ circular image onto the 1″ epoxy sticker. Flatten back to make sure there are no bubbles

IMG_20150304_140006

Squeeze some E6000 adhesive to inside of bottlecaps and center your epoxy image onto the center.  Make sure to work in a well ventilated area and away from children.

IMG_20150304_140319

Lay out to dry overnight. Then punch a hole on the top of the bottlecap edge and insert split ring.  Then place on a necklace or keychain of your choice.

IMG_20150304_123724

For the party favor, I wrapped a Strawberry Shortcake coloring book in brown wrapping paper, then placed the necklace, crayons and a Strawberry Shortcake tattoo in a pink polka dot baggy (Target). 

IMG_20150304_124458

Finished off with green laundry rope from the Dollartree for a cute Strawberry Shortcake-esque look.

IMG_20150307_130234

IMG_20150307_130325 IMG_20150307_134815

My daughter had a blast at her party with her dear friends and everyone got cute little cupcakes to take home too!  You can never have too much cake!