Easy Seafood Soon Tofu (해물 순두부)

tofusoup

Friday nights = I don’t cook nights.  With the exception of this past Friday night, that equation proves true.  We made a trip out to the Korean Market in Oakland a couple Saturdays ago and bought all the ingredients to make this Tofu Soup but for whatever reason, never got around to making Ken’s favorite soup.  Friday nights are always pizza and a movie night with the family and last Friday was going to be no exception, but I got a text message from Ken asking if we could have the Seafood Tofu Soup for dinner that night… I immediately thought to reply “of course not!  I don’t cook dinner on Fridays!” but then thought… well… I guess I could.  And that, my friends, is because this soup so easy and quick!

I already mentioned this soup is Ken’s favorite soup, and it’s also high up on the list for my kids as well.  They love Korean soups and like to dump their bowl of rice into their soup and eat it together, which is exactly what I did growing up, and is exactly what Korean moms feed their little toddlers after they start solids.  This tofu soup is a bit spicy but the kids didn’t have a problem finishing their food with a cup of water on hand.

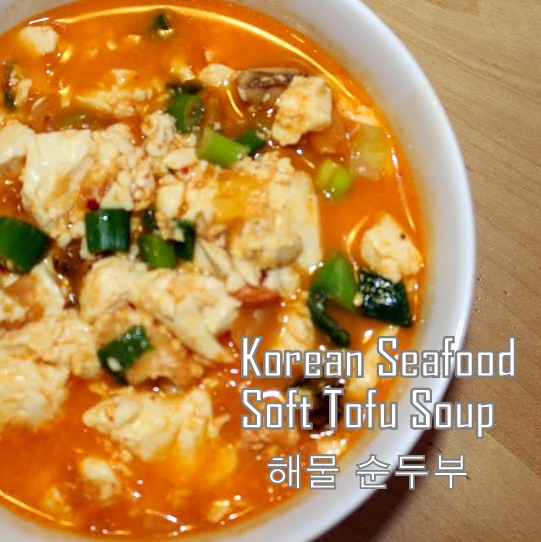
Easy Seafood Soon Tofu (Korean Soft Tofu Soup)

  • 2 cups kimchi, finely chopped
  • 1 pack frozen seafood mix, 12 oz (or canned chopped clams, about 3 cans)
  • 3-4 cups chicken stock or chicken broth
  • 5 packs silken tofu, 11oz each
  • 2-3 eggs, lightly beaten
  • 3 green onions, chopped
  • vegetable or canola oil
  • finely ground red pepper flakes
  • 1 tsp sesame oil
  • salt & pepper

Optional step: Add a teaspoon of vegetable oil to hot, large pot and add 1/2 teaspoon of red pepper flakes to make the spicy oil, then add the kimchi.

  1. Heat a large pot and add a teaspoon of oil.  Add the kimchi and cook the kimchi on med-high heat until it starts to become translucent, about 3-4 mins.
  2. Increase heat to high, add the frozen seafood and stir-fry until it is almost cooked. Or add the canned clams with the clam juice.
  3. Add the chicken broth and bring it to a boil.
  4. When the soup is boiling, add the silken tofu and break it up into big chunks with a spatula and bring to a boil.  Add the eggs and again bring to boil.
  5. Add a teaspoon of sesame oil and the green onions then season with salt and pepper.

Done!

Recently Updated

Super quick and easy. The only prep you need to do is to chop the kimchi and the green onions.  Tip: I like to wear food service gloves when handling kimchi so I don’t end up with orangey-red fingertips and a lovely kimchi smelling hand.

The soup tastes great with canned clams as well!  The clam juice in the canned clams make the broth really flavorful and gives it a stronger seafood taste.  Just add less chicken stock if you are using canned clams since the juice in the cans will count towards the liquid you are adding to make the soup.

Korean Soon Tofu is closer to a stew in the sense that your tofu chunks should not be swimming around in a lot of liquid, but if you like it with more soup then add more of the chicken stock, just don’t drown your tofu.

tofusoup9

The only “exotic” ingredient I used for this dish is the kimchi, and even that can be found at your local grocery store around the Bay Area.  I must confess, I buy my kimchi from the Korean market and don’t make my own.  But I have tried once!  Fun Fact: Did you know many Koreans have a separate Kimchi refrigerator that keeps their kimchi at their perfectly fermented state for months?  They actually sell these little (and sometimes, not so little) kimchi fridges.

Next time you’re at the grocery store, see if you can’t spot a little jar of kimchi! I bet you’ll see it, if you haven’t already.

As always, thank you for reading and hope you have a great week!

-Flora

Weekend Mashup: Cherry Blossoms, Cupcakes & Egg Hunt

IMG_0238

Spring and Easter season have the best colors!  The pretty pastels in pink, yellow, blue, the cute little bunnies, eggs, and chicks; flowers blooming, and the world waking from a winter slumber.  It’s definitely one of my favorite time of year.  I had heard there were pretty cherry blossoms at the Japanese Tea Garden in Golden Gate Park during March and April and I had been wanting to see them.  So our family took a trip out to see some pretty cherry blossoms Saturday morning, but I was disappointed.  I saw one fully bloomed, beautiful cherry blossom tree at the entrance of the garden and didn’t see any more inside.  The garden is really beautifully landscaped and we still had a good time taking photos, walking around the garden and watching the Koi in the pond, but I had envisioned paths strewn with cherry blossom petals that fluttered down from the branches throughout the garden.  Perhaps I need to go later in April or take a trip out to Japan!  (or a reality check)

IMG_0201

I had the privilege of taking dessert to a friend’s Easter egg hunt at her beautiful home over the weekend.  Her home had the perfect layout for hiding eggs and a nice size grass lot for the kids to run off all their sugar and play games like egg toss, egg-on-a-spoon-race, and more.  I know my kids had a blast and my youngest, C, who is not yet 3, participated in all the games.  It was fun watching her balance an egg on her spoon.

As you probably know, I enjoy baking and constructing layered cakes (eating them too!) but there’s something about pretty cupcakes, frosted and decorated in soft pastels that really make me happy.  I can’t look at one without eating them, which is why I get into trouble whenever I bake these little morsels of heaven.  I had been wanting to eat coconut cake, given it’s Easter season, so of course I thought I would make coconut cupcakes!  I love coconut, but I know not everyone is a fan, like my daughter A, who can’t stand anything coconut and banana.  Still can’t figure out why… they’re so tasty.  To make her happy, I added sprinkles on some cupcakes and only added shredded coconut on half of the batch.  I tried to make bunny ears with marshmallows like I’d seen on Pinterest, but they looked a bit awkward on the mini cupcakes.  I had recruited help from B and A to make the marshmallow bunny ears, but I didn’t use most of them.  Now they’re sitting in a container on my counter and getting snacked on every time I enter the kitchen.  I should probably move them to the back of my highest cabinet.

IMG_0221 Awkward on the mini cupcakes…

I used my go-to yellow cupcake recipe which uses cake flour and sour cream and replaces half of the vanilla extract called for in the original recipe with almond extract.  I did the same to the cream cheese frosting recipe and added almond extract so it would compliment the coconut nicely.  Perhaps it’s the cake flour or perhaps it’s the sour cream, but this recipe produces soft, moist, almost melt in your mouth cupcakes.

Yield: a dozen regular cupcakes or 40+ mini cupcakes

IMG_0236

Vanilla Almond Cupcakes
  • 2 cups cake flour
  • 2 tsp baking powder
  • 1/2 tsp salt
  • 1/2 cup (1 stick) unsalted butter, room temp
  • 1 cup sugar (I usually add 2/3 cup)
  • 2 eggs
  • 1/2 tsp vanilla extract
  • 1/2 tsp almond extract
  • 2/3 cup sour cream
  1. Preheat the oven to 350°F.  Prepare a mini muffin pan by greasing the cavities or inserting cupcake liners. (You may also use regular size muffin pans, see below for longer baking time)
  2. In a small bowl, whisk together the flour, baking powder, and salt.  In a separate bowl, beat together butter and sugar until light.  Add one egg at a time and then add vanilla and almond extract.
  3. Add half of the dry ingredients into the butter mixture, then half of the sour cream and repeat with the remaining dry ingredients and sour cream.
  4. Spoon the batter into the prepared muffin cups and bake mini cupcakes for 12-14 mins.  Bake regular size cupcakes for 20-25 mins.
  5. Let cool completely before frosting.
Cream Cheese Almond Frosting
  • 1/2 cup (1 stick) unsalted butter, room temp
  • 8 oz cream cheese, room temp
  • 3 cups powdered sugar
  • 1/2 tsp vanilla extract
  • 1/2 tsp almond extract
  1. Beat the butter and cream cheese together in a stand mixer  or a handheld mixer until smooth.
  2. Add the sugar, vanilla, and almond extracts and beat until smooth.
  • Sweetened shredded coconut
  • pastel colored sprinkles

After the cupcakes have cooled, use a butter knife or a small spatula to frost the cupcakes (or you can pipe) then top with shredded coconut or sprinkles.  I like using the shredded coconut for this rather than the flaked ones.  (They look better)

IMG_0229

Happy Baking and thank you for reading!

-Flora