Handmade Hanbok for My Girls

img_2952-18pmEvery year at the new cycle of the lunar calendar, there ensues in our household, a discussion between my Korean self and my Chinese husband about the ‘political correctness’ of calling the New Year holiday “Chinese New Year” vs. “Lunar New Year” (instigated by me, of course).  My husband is all for calling it “Chinese New Year” which is not THAT big of a deal, since the Chinese do celebrate it so extensively, (but then it sort of is) so I’m left wondering why my children are bringing home art and “Times” pamphlets from school solely about “Chinese” New Year  and how it’s celebrated by the Chinese, when there are over 20 other countries that celebrate it as well. But I’m not here to start a debate on one or the other, we’ll save that for another time.  I AM here to share how my latest sewing project has turned out and I think they turned out nicely, if I say so myself.

0130171508a

My “A” has long since grown out of her Hanbok (Korean dress) and my “C” probably wore her  First Birthday Hankbok for the last time last year.  Last Lunar New Year 2016, my A wore her Chinese dress and my C wore her Hanbok, which nicely represented their Korean and Chinese heritage.  This year, the girls wore their Chinese dress on Saturday and wore their Korean Hanboks on Sunday.  I’d been wanting to make a hanbok for my girls for years now, but never got around to tracking down a good hanbok pattern until this past Christmas season when I pulled the trigger and bought a Korean Dress pattern book on Etsy.  It was mailed to me in California from South Korea and it took about 2 weeks to get the book.  I bought it here on Etsy

img_2894-1

I offered to make a Korean boy’s outfit for my son but he wouldn’t have it.  He said he would never, ever wear it… makes my life easier.  He also refused to wear a Chinese jacket sent from his grandpa in Hong Kong… But what can you do? You move on and make cute things for the girls while they’ll still wear it.

img_2938-10

I love the bright and vibrant color combination of C’s hanbok (right) with the little floral design top.  Hanboks are traditionally more vibrant in color and I wonder if I should have picked a bright, mustardish- yellow for A’s hanbok skirt (left) instead of pink to go with her mint top.

Did you notice that the girls’ hanbok bows are on opposite sides?   I made C’s hanbok first (left, below) and accidentally reversed the front bodice pattern pieces and ended up having to put the tie on the incorrect side.  I didn’t have enough fabric to fix the mistake so I figured I would just finish it and no one would really notice… unless you put side-by-side photos of them together like so…

hanbokcollageSo the mint/pink Hanbok has the correct tie placement on the right side of the Jogori (top) with the 1-bow pointing to the left.   (Yes, it does matter, but let’s just assume for C’s hanbok it doesn’t)

img_2905-1

This is the skirt portion of the hanbok that you wear under the Jogori (top).  It’s basically a wrap skirt/dress and you bring the ties to the front and tie to secure.

img_2967-26

The pattern book is all in Korean but it has good step-by-step photos that illustrate each step that made it fairly easy to follow along.  They do use specific vocabulary associated with the pieces of Hanbok that I had to look up, and the book does have a handy picture chart with labels and their corresponding names.

img_2966-25

I think I got the hair right… I recall from watching Korean dramas (yes, Korean dramas, an excellent source) set in the old Joseon time periods usually having a small braid on the side, woven into one long braid in the back for girls and I think it was buns for married women.  Regardless, the girls looks adorable with their braids and hanbok.

img_2964-23

A and C tried to convince me to wear my hanbok to church with them, but I didn’t really want to wear my hanbok from my wedding (which comes with a huge petticoat) to 3 hours of church.  Maybe next year girls… and that’s a BIG MAYBE.

Thanks for reading and Happy Chinese, Korean, Lunar New Year !!!

-Flora

Steamed Korean Buns

img_1882pm

It’s a cold, rainy day here and I’m enjoying just shuffling around the home and being grateful for the warmth, shelter, and food in our tummies.  I’ve got a little slot of time before the Thursday afternoon madness resumes  so I thought I would post an old-time favorite snack of mine that we made a while back but I never got around to posting.  If you noticed my last post was some time ago … there’s been some crazy real estate swapping that went on which kept me just a bit preoccupied.  I’m the type that likes to concentrate on one thing at a time and feel frazzled if I have too much going on and of course I ended up starting a part-time job at the same time we decided to sell and buy…  so there’s my excuse 🙂

Back in SoCal, I loved walking through our big neighborhood Korean grocery store and walking to the back of the store where they made “Wang Mandoo” and sneaking a pack into the grocery cart.  “Wang” means king and “mandoo” means dumpling.  So you can imagine they were giant, softball-sized dumplings filled with my favorite “Japchae” or glass noodles.  The slightly sweet steamed bun exterior mingled with the savory beef and veggie japchae interior was perfection that would leave you feeling like the “after” of a Snickers Bar commercial.

I found this recipe for steamed Korean buns many years ago on a Korean baking site, and it’s just perfect when you live 30 mins from the nearest Korean store (compared to 5 mins growing up) and you do not want to do the Caldecott Tunnel but you want some “Wang Mandoo”.  Plus, homemade is always better, right?   The recipe was all in grams so I measured all the ingredients into volume measurements for my own sake and I’m sharing them with you.  I didn’t notice any difference in the result when I used my converted volume measurements to make them again and again.

I made two different fillings for my buns: “Wang Mandoo” with Japchae filling and “Hobbang” with sweet red bean paste filling.

You can use my Japchae recipe here for the “Wang Mandoo” and the red bean paste filling was purchased at my past Korean store excursion.  You can really put anything you want inside the bun, Spam and kimchi is super yummy, too!  Or you can just make buns without any filling!  I made both japchae filling and the red bean paste filling and they were both so delicious!  Would be perfect for this cold, rainy day… wish I had some right now.

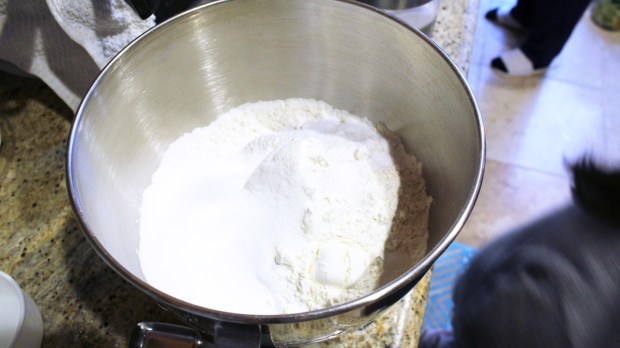
img_1843In a large mixing bowl, mix together the flour, baking powder, yeast, sugar, salt, and dry milk powder.
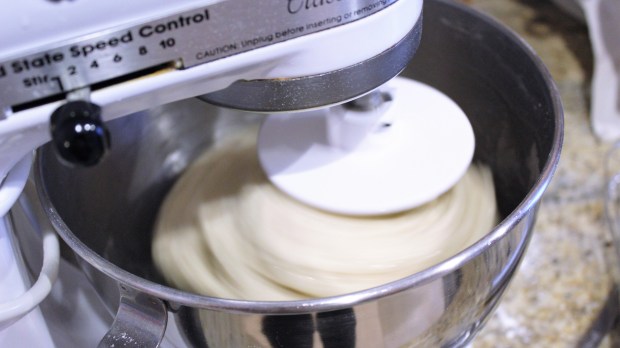
img_1847Add the warm water and mix/knead until dough forms.  You can use a stand mixer with a dough hook attachment.  Once you have a ball of dough, add in the oil and knead until you have a nice, shiny dough that isn’t sticky.

img_1848Divide the dough into little balls (60 gram balls, about the size of a golf ball).  Place on a baking sheet lined with wax paper, cover with clean cloth and let rest for 15 mins.
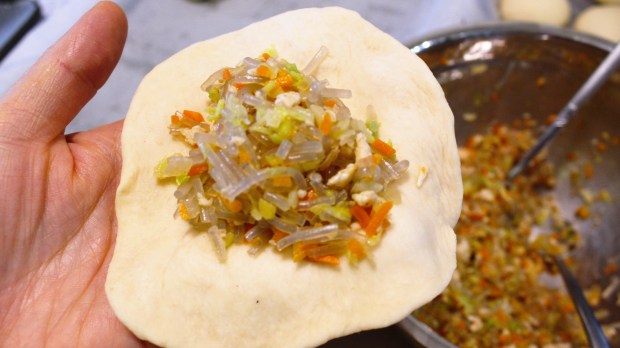
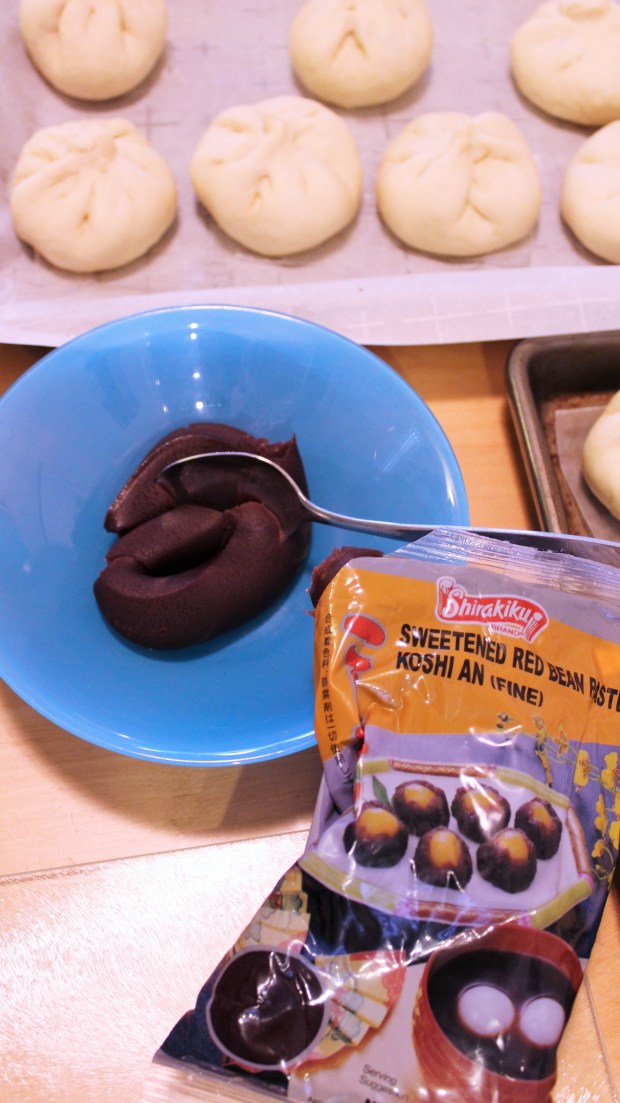
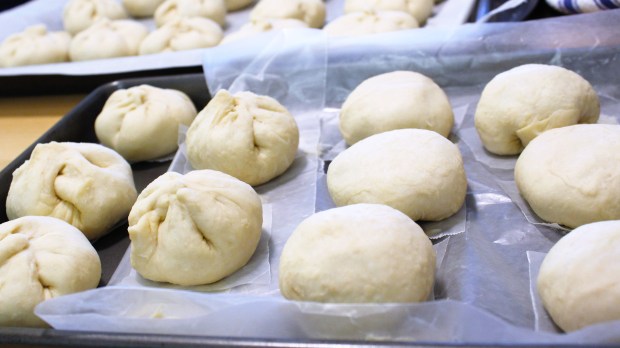
img_1861Flatten a ball of dough and fill with desired filling of choice.  Pinch ends closed then place onto a square of wax paper.  (If not using filling, just place ball of dough onto wax square)
Watch my mom pinch and close the dough for the bun.  Apologize for the static background noise.  watch with sound off 🙂

img_1866

This is my store-bought Red bean paste

img_1870

Traditionally for the “Wang Mandoo” you place the seam side facing up and for the “Hobbang” you place it seam side down.

img_1871Let dough rise in a warm place for 30 mins

img_1872While the dough is rising, start heating your pot of water for the steamer over med high heat

img_1874Place the dough into the steamer (don’t over-crowd, they will grow) once the water is boiling and you see steam rising.  Steam for about 10 mins. Don’t open the lid while steaming.

img_1882

And Voila~ beautiful, fluffy, warm, delicious buns!!!

Steamed Korean Buns Recipe (왕만두/호빵)

Makes: about 2 dozen buns

Ingredients (Bun)

  • scant 3 cups all purpose flour
  • 3/4 TBS baking powder
  • 1 1/2 TBS dry yeast
  • 1/3 cup granulated sugar
  • 1 tsp salt
  • 2 TBS non-fat dry milk powder
  • 1 cup warm water (more or less)
  • 1/6 cup vegetable or canola or grapeseed oil

Filling

Japchae Recipe or store-bought Red Bean Paste or be creative! 🙂

Directions

  1. Prep: cut out 24 little 3″x 3″ squares of wax paper.
  2. In a large mixing bowl, mix together the flour, baking powder, yeast, sugar, salt, and dry milk powder.
  3. Add the warm water and mix/knead until dough forms.  You can use a stand mixer with a dough hook attachment.  Once you have a ball of dough, add in the oil and knead until you have a nice, shiny dough that isn’t sticky.
  4. Divide the dough into little balls (60 gram balls, about the size of a golf ball).  Place on a baking sheet lined with wax paper, cover with clean cloth and let rest for 15 mins.
  5. Flatten a ball of dough and fill with desired filling of choice.  Pinch ends closed then place onto a square of wax paper.  (If not using filling, just place ball of dough onto wax square)  Traditionally for the “Wang Mandoo” you place the seam side facing up and for the “Hobbang” you place it seam side down.
  6. Let dough rise in a warm place for 30 mins
  7. While the dough is rising, start heating your pot of water for the steamer over med high heat
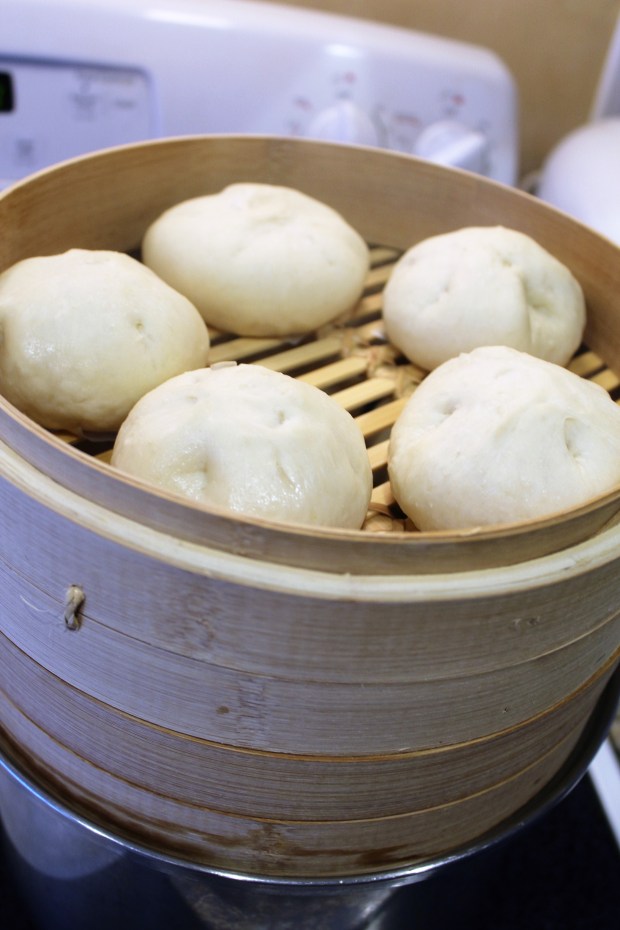
  8. Place the dough into the steamer (don’t over-crowd, they will grow) once the water is boiling and you see steam rising.  Steam for about 10 mins. Don’t open the lid while steaming.
  9. Carefully remove and enjoy your steams buns!!!
img_1880

Before my mom devoured hers 🙂

I’m going to get my butt out to the Korean store soon.  My stock of Korean ingredients is dwindling… probably when it stops raining.  Yes, I’m spoiled with good weather here and don’t go out when it rains… and my parents live in WA… ha.

Thanks for reading and stay dry and warm out there!

-Flora

Umma’s Kimchi (Napa Cabbage Kimchi)

IMG_1839_ummakimchi

I have a confession to make.  I am Korean.  Okay, that wasn’t my confession.  Here it is:

I am Korean.  And I buy my kimchi.  -_-  I know, I know.  I don’t deserve to lay claim to my Korean roots if I don’t make my own kimchi or own a kimchi refrigerator.  (Yes, there is such a fridge and it keeps kimchi and regular produce fresh forEVER!)  But wait, do you know what kimchi is?  It’s only the best, tastiest, and healthiest Korean mealtime staple with natural probiotics and lots of Vitamin A and C.  Basically it’s fermented Chinese cabbage (can also be made from a variety of other vegetables and seasonings) that is eaten as a side dish and ranges from mild to spicy, to watery, to fishy.

My mom’s visiting and I’m taking full advantage of her Korean cooking skills and documenting her kimchi-making process so I can try to replicate it next time I run out of her kimchi.  I’ve made kimchi by myself once before in my lifetime and I must confess it was a fail.  My mom sort of walked through the steps and ingredients with me over the phone and I tried to mimic it… and well… it just wasn’t the same.  Hopefully, standing over her shoulder and breathing down her neck while watching her make this kimchi will help me the next time I attempt it.  We sort of measured the ingredients as she went along because, like many Korean moms out there, her measurements and recipe is in her head and her hand.  She just sort of eyeballs it and adds more or less by taste.  I was probably frustrating her whenever I stopped her to measure the ingredients 🙂  but she was super patient with me.  So here is how my mom makes her kimchi:


IMG_1752

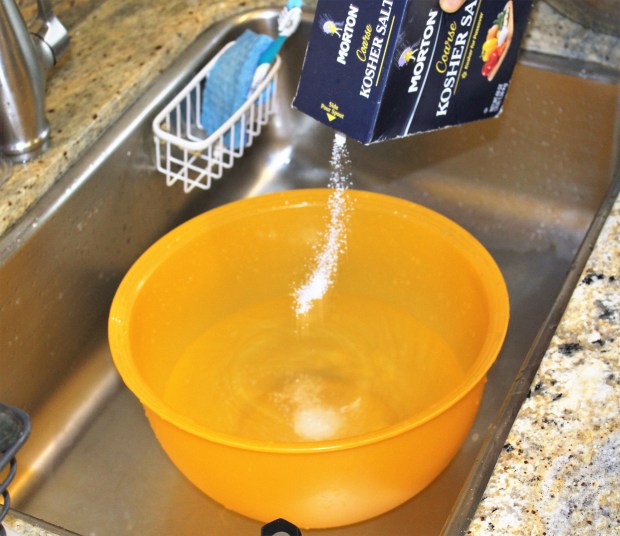
Add lots of salt to a bucket of water (should taste like the sea). We used Kosher Salt because I don’t have Kimchi salt, but my mom prefers to use Kimchi salt (which might be the same as rock salt).


IMG_1755

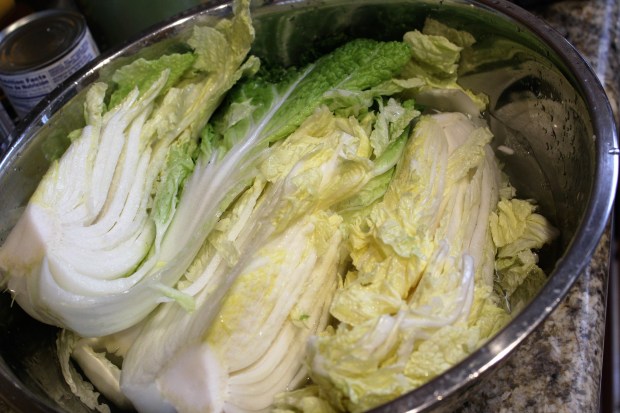
Slice your cabbage in half, vertically.

IMG_1754

Slice again, so you have quartered your cabbage. Cut off the hard core/stem, but we want enough of the stem to keep the leaves together.

IMG_1758

Dunk your cabbage quarters in the brine water, let it drain, then salt between each leaf, concentrating on the thicker, white (non-leafy) portion of the cabbage.  Repeat for all.

Here’s a quick video to help you (and me) see how to prep/brine the cabbage.


IMG_1765

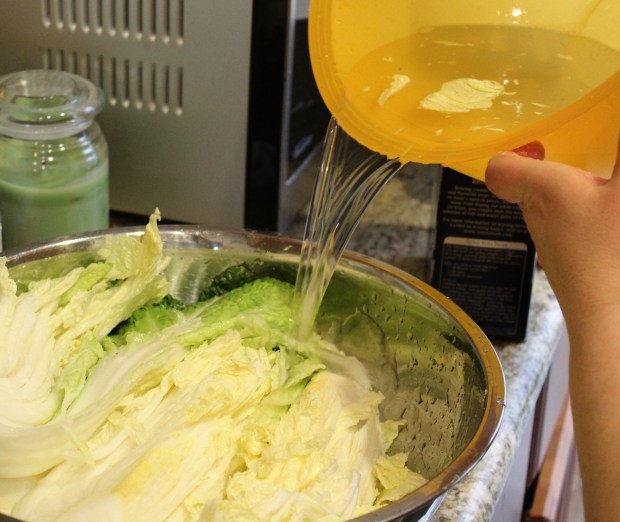
After salting all the cabbage, pour the rest of the salt water over the cabbage and let it brine for about 2-3 hours. (depends on how much salt and water.  taste it after 2 hours to determine)

IMG_1766

Turn and rotate the cabbage halfway through brining


Meanwhile, make the kimchi paste/marinade by chopping your onion, Korean pear, ginger, garlic, and radish, place in a blender, add your fish sauce, then puree.

IMG_1811

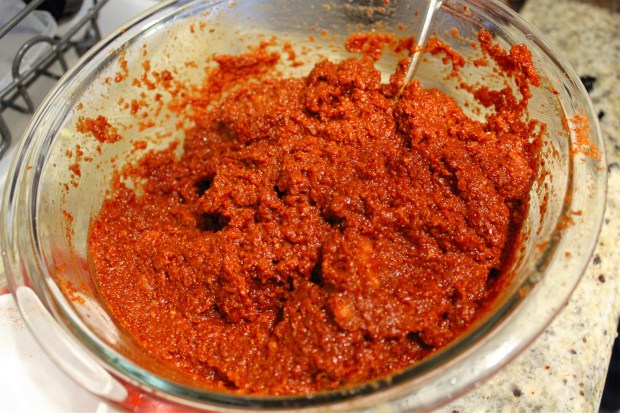
Add your red pepper flakes and brown sugar to your puree and you have your kimchi paste

After the cabbage is salty enough, dump out the salt water, then rinse your cabbage in running water 2-3 times and let drain for about 30 mins.  Now get on some food service gloves (the red pepper on your skin will sting) and smear on that kimchi paste all over and between the cabbage leaves.  “Wrap” the outer most leaf around the quarter of cabbage then carefully tuck into a glass jar.  Fill the jar (cover w/ lid) then place in the refrigerator (or to eat it sooner, leave it out at room temperature for a day).  And you lucky ducks with a kimchi refrigerator, you know what to do.

Ingredients

  • 2 Napa (Chinese) Cabbage, washed
  • Lots of Coarse salt (Preferably Kimchi salt)
  • 1 cup fish sauce (I used Tiparos brand Thai Fish Sauce. Korean ones are saltier and less sweet, so add more or less according to taste)
  • 1/2 onion, chopped
  • 1/2 Korean pear, chopped
  • 1 cup Daikon radish, chopped
  • 1 inch ginger root, chopped
  • ~13 cloves garlic, sliced
  • 1 ½ cups coarse red pepper flakes
  • 1 TB brown sugar

*You will need a big, wide bowl to brine, a bucket, food service gloves, and wide-mouth glass (preferably) jar to store kimchi)

Directions

  1. Add lots of salt to a bucket of water (should taste like the sea)
  2. Slice your cabbage in half, vertically. Then slice again, vertically, so you have quartered your cabbage.
  3. Cut off the hard core/stem, but we want enough of the stem to keep the leaves together.
  4. Dunk your cabbage quarters in the brine water, let it drain, then salt between each leaf, concentrating on the thicker, white (non-leafy) portion of the cabbage.  Repeat for all.
  5. After salting all the cabbage, pour the rest of the salt water over the cabbage and let it brine for about 2-3 hours turning and rotating the cabbage halfway through brine period . (depends on how much salt and water.  taste it after 2 hours to determine)
  6. Meanwhile, make the kimchi paste/marinade by chopping your onion, Korean pear, ginger, garlic, and radish, place in a blender, add your fish sauce, then puree.
  7. Add your red pepper flakes and brown sugar to your puree and you have your kimchi paste
  8. After the cabbage is salty enough, dump out the salt water, then rinse your cabbage in running water 2-3 times and let drain for about 30 mins.
  9. With food service gloves (the red pepper on your skin will sting), smear on the kimchi paste over and between the cabbage leaves.
  10. “Wrap” the outer most leaf around the quarter of cabbage then carefully tuck into a glass jar.  Fill the jar (cover w/ lid) then place in the refrigerator (or to eat it sooner, leave it out at room temperature for a day).  And you lucky ducks with a kimchi refrigerator, you know what to do.

*I bought only one Napa cabbage but the recipe makes enough kimchi paste for two Napa cabbages so the recipe calls for two of the cabbages.

IMG_1837_jjangkimchi

Good luck to you (and to me)!

Thanks for reading!

-Flora (and my mom)

Korean Food: Bulgogi Bibimbap Recipe!

IMG_0970black border

Happy Father’s Day (yesterday) to all the wonderful dads, granddads, uncles, and all the male figures out there who are a role model/father figure to our little ones (and sometimes not so little ones…).  I am lucky to have an awesome partner to help me raise our three little ones in this parenting experiment we have undertaken that we, hopefully, don’t mess up.

We had a wonderful weekend filled with fun activities ranging from adult softball to swimming to a birthday party before our relaxing Father’s Day Sunday at home.  I had grand plans for Father’s Day… but well… it didn’t pan out.  I found myself standing in line at Safeway on Saturday night with some nectarines and whipped cream to make crepes for Sunday morning breakfast when I saw a college student in line before me with the Sports Illustrated Warriors Champs edition.  I asked him how much the magazine was, then I thought I should grab one as a last minute gift for my Warriors fan hubby.  He loved it!  And the crepes got raving reviews from the hubby and all three of the kids, so that was a score!  It was such a simple crepe, too!  Just used the basic crepes recipe that I always use, spread raspberry jam onto half of the crepe, then added sliced nectarines (peaches would be great too) and whipped cream.  So good!  You can never go wrong with peaches and cream.

IMG_0972

Ken hubby married a Korean woman, me, so we eat a lot of Korean food, and luckily, he loves Korean food! (most of it anyway… I can’t get him to eat rice cakes though)  So dinner tonight was bibimbap.  It’s basically lots of different seasoned vegetables (some pickled, others boiled or stir-fried) with some teriyaki-style marinated beef all mixed with rice; I like to add red pepper paste to mine. It’s gotta be one of the healthiest dishes out there, and it’s Soooooo good!  My mother-in-law joined us for dinner and this is her favorite dish.  She always orders the stone bowl bibimbap whenever we go to Korean restaurants, which is the same thing, they just put the rice in a hot stone bowl so the rice touching the bowl becomes nice and crunchy.

CYMERA_20150621_193923

I put together a recipe and measured the ingredients while making this today so I would be able to share it.  I eyeballed some of the ingredients but you can always adjust the seasonings to your own taste.  I tend to make my ingredients slightly more salty then I would normally season them because you’ll be mixing it with the rice, which is not seasoned.

Recently Updated10

Bulbogi Bibimbap

serves about 5-6

Ingredients
  • 2 large cucumbers, thinly sliced
  • 1 daikon radish, julienned (about 4 cups)
  • 2-3 bunches spinach (not baby)
  • 1 bag soybean sprouts (different from mung bean sprouts)
  • 3 carrots, peeled and julienned
  • 4-5 Mexican squash, cut in half vertically, then sliced
  • 1 lb bulgogi beef (thinly sliced beef)
  • salt, pepper, oil, vinegar, sugar, brown sugar
  • sesame oil, sesame seeds,
  • soy sauce, brown sugar, crushed garlic
  • cooked calrose rice (sushi rice, not long grain) (4 cups uncooked)
Directions
  1. Cook your rice in your rice cooker and cut/prep your ingredients.
  2. At least 1 hour ahead of time, pickle the sliced cucumbers by submerging them into a large bowl with salty water (should taste like the ocean) 🙂
  3. At the same time, but in a separate bowl, pickle the julienned radish by adding 3/4 cup vinegar, 1/3 cup white sugar, 1TB salt and 1/4 cup water.  Set them both aside.
  4. Marinate the beef by massaging about a tablespoon of sesame oil into the meat with gloved hands then add 1/4 cup soy sauce, 4 TB brown sugar, and 3 crushed garlic cloves and mix.  Set aside to marinate.
  5. Bring a medium pot of water to a boil, then boil the soybean sprouts for 5 mins (becomes somewhat translucent) and drain.  Place drained sprouts into a bowl then season with salt, 1/2 tsp of sesame oil, and 1/2 tsp sesame seeds.  You can also add some crushed garlic if desired; about 1 clove. Mix with gloved hands. Sprouts are done, so set aside.
  6. Bring another pot of water to a boil and blanch the spinach.  Don’t overcook the spinach!  Just about a minute should be enough.  Drain, gently squeeze out the water and place the spinach into a bowl.  Add salt, 1/2 tsp sesame oil, and 1/2 tsp sesame seeds, (again, garlic optional) and mix.  It works best if you use food service gloves to mix by hand.
  7. Add about a tablespoon of oil onto a frying pan, heat over med high heat.  Add a clove of crushed garlic then stir fry the Mexican squash until cooked. Season with salt and pepper.
  8. Add about a tablespoon of oil onto a frying pan, heat over med. high heat.  Add a clove of crushed garlic then stir fry the julienned carrots.  Season with salt and pepper.
  9. Drain the cucumbers, gently squeeze excess water from the cucumbers, then place them into a bowl.  Add a little sesame oil (about 1/2 tsp) then mix and the cucumbers are ready. Sesame seeds optional
  10. Scoop out the radish from the vinegar and place into a bowl.  You don’t need to drain it completely of the liquid.  You can add red pepper flakes if you want a kick to it, but I didn’t add it for the kids’ sake.
  11. Heat the pan and cook the meat until ready.
  12. Serve cooked rice in large bowls then place each of the vegetables and meat on top and mix.  Add a little more sesame oil if desired and also red pepper paste if you can handle the heat. 🙂

CYMERA_20150621_194433

CYMERA_20150621_194511

My kids ate really well tonight!  The girls actually asked for seconds and my boy asked for a huge bowl of food to start off with and finished it!  We love bibimbap!!!  Try making your own~

Thanks for reading and have a wonderful, fantastic, awesome week!

-Flora

Easy Seafood Soon Tofu (해물 순두부)

tofusoup

Friday nights = I don’t cook nights.  With the exception of this past Friday night, that equation proves true.  We made a trip out to the Korean Market in Oakland a couple Saturdays ago and bought all the ingredients to make this Tofu Soup but for whatever reason, never got around to making Ken’s favorite soup.  Friday nights are always pizza and a movie night with the family and last Friday was going to be no exception, but I got a text message from Ken asking if we could have the Seafood Tofu Soup for dinner that night… I immediately thought to reply “of course not!  I don’t cook dinner on Fridays!” but then thought… well… I guess I could.  And that, my friends, is because this soup so easy and quick!

I already mentioned this soup is Ken’s favorite soup, and it’s also high up on the list for my kids as well.  They love Korean soups and like to dump their bowl of rice into their soup and eat it together, which is exactly what I did growing up, and is exactly what Korean moms feed their little toddlers after they start solids.  This tofu soup is a bit spicy but the kids didn’t have a problem finishing their food with a cup of water on hand.

Easy Seafood Soon Tofu (Korean Soft Tofu Soup)

  • 2 cups kimchi, finely chopped
  • 1 pack frozen seafood mix, 12 oz (or canned chopped clams, about 3 cans)
  • 3-4 cups chicken stock or chicken broth
  • 5 packs silken tofu, 11oz each
  • 2-3 eggs, lightly beaten
  • 3 green onions, chopped
  • vegetable or canola oil
  • finely ground red pepper flakes
  • 1 tsp sesame oil
  • salt & pepper

Optional step: Add a teaspoon of vegetable oil to hot, large pot and add 1/2 teaspoon of red pepper flakes to make the spicy oil, then add the kimchi.

  1. Heat a large pot and add a teaspoon of oil.  Add the kimchi and cook the kimchi on med-high heat until it starts to become translucent, about 3-4 mins.
  2. Increase heat to high, add the frozen seafood and stir-fry until it is almost cooked. Or add the canned clams with the clam juice.
  3. Add the chicken broth and bring it to a boil.
  4. When the soup is boiling, add the silken tofu and break it up into big chunks with a spatula and bring to a boil.  Add the eggs and again bring to boil.
  5. Add a teaspoon of sesame oil and the green onions then season with salt and pepper.

Done!

Recently Updated

Super quick and easy. The only prep you need to do is to chop the kimchi and the green onions.  Tip: I like to wear food service gloves when handling kimchi so I don’t end up with orangey-red fingertips and a lovely kimchi smelling hand.

The soup tastes great with canned clams as well!  The clam juice in the canned clams make the broth really flavorful and gives it a stronger seafood taste.  Just add less chicken stock if you are using canned clams since the juice in the cans will count towards the liquid you are adding to make the soup.

Korean Soon Tofu is closer to a stew in the sense that your tofu chunks should not be swimming around in a lot of liquid, but if you like it with more soup then add more of the chicken stock, just don’t drown your tofu.

tofusoup9

The only “exotic” ingredient I used for this dish is the kimchi, and even that can be found at your local grocery store around the Bay Area.  I must confess, I buy my kimchi from the Korean market and don’t make my own.  But I have tried once!  Fun Fact: Did you know many Koreans have a separate Kimchi refrigerator that keeps their kimchi at their perfectly fermented state for months?  They actually sell these little (and sometimes, not so little) kimchi fridges.

Next time you’re at the grocery store, see if you can’t spot a little jar of kimchi! I bet you’ll see it, if you haven’t already.

As always, thank you for reading and hope you have a great week!

-Flora

Japchae 잡채- Korean Glass Noodles

We woke up excited to have a good friend and her daughter come visit and play with us all day today!  It was so nice to hang out and chat while the kids entertained themselves, yes, I really don’t have many friends here.  We got a good laugh watching “Pitch Perfect” (my 4th time) while our little girls were taking their afternoon nap and my 4 yr old boy did his ‘quiet time’, more like movie time, with us.  We went to the park after their nap and after our movie to run the kids around and use up some of their energy.  But before we left, we did the vegetable prep that way we could just throw the ingredients together after we got back  So dinner tonight was Korean Japchae and bulgogi with lettuce that you wrap up with rice and a spicy bean paste.

Oh, and on a side note, my 9 month old daughter just started waving “hi” and “bye” and can also shake her head when we shake our head.  Except she moves her whole body while she’s shaking her head with extreme gusto.  She is so cute and I could just eat her up!  Her little chipmunk cheeks are to die for.  I wish she would stay this happy and unrebellious forever!
And back to our subject: Japchae is a very well known and popular Korean noodle dish that is different from other “noodle” dishes because instead of it being a main dish in a meal, Koreans use is as a side dish to be eaten with rice and other side dishes.  I think rice is Korean people’s main dish in every meal.  It’s always there, oh, and kimchi, can’t forget our mealtime staple.  Serve up a plate of lasagna and my dad will ask for rice and kimchi to go with it.  A meal just isn’t a meal without rice and of course if there’s rice, there needs to be kimchi.  Many Korean restaurants will serve japchae as a side dish with their Barbeque meats.  It’s fairly easy to make other than the fact that it has quite a few steps for prep.
I normally make Japchae without a recipe and without using any measuring cups or spoons so when my aunt (on my husband’s side) asked me for a recipe, I obviously couldn’t give it to ber.  So this time, I used measuring cups and spoons to measure how much of each ingredient I was adding so I could share it with everyone.  As with all recipes (usually non-baking), I think it’s a good rule of thumb to use your instincts and taste as you go so you can add more or less seasoning according to your taste.

Japchae
printable recipe (no step-by-step pics)

Ingredients
1 pack Korean dried glass noodles (sweet potato noodles) about 1 lb.
4 medium carrots, peeled and julienned
1 medium onion, sliced
1 bunch spinach, blanched for a few seconds and drained
4 dried shitake mushrooms, soaked in warm water for 15 mins
.25 lbs beef*, sliced into 1-inch strips (marinated bulgogi works great)
2 cloves of garlic, minced or use garlic press (divide in half)
vegetable oil
1/3 plus 4 TB lite** soy sauce
1/4 plus 1 TB brown sugar
2 TB sesame oil
sesame seeds

salt and pepper

*you can omit the beef for a vegetarian version.  Just add a little more of the vegetables, like another carrot or two and some more spinach or add zucchini and cook it with the other vegetables.

** If you are using regular soy sauce, add just the 1/3 cup soy sauce to begin with and add more as needed.
1.  Soak the dried shitake mushrooms in warm water before hand and prepare your vegetables by washing, peeling, and cutting.  Mix the soy sauce and brown sugar in a bowl
2.  Bring a medium pot of water to a boil and blanch the spinach for a few seconds until it withers then drain and gently squeeze excess water.  Add a 1/4 tsp of salt, 1 clove of garlic, minced, (or I use a garlic press), a 1/4 tsp sesame oil and mix.
 
3.   Bring a large pot of water to a boil and cook the glass noodles for about 5-7 minutes.  Test it by tasting the noodle for doneness.  It shouldn’t be hard.  Rinse under cold water and drain.
4.  Put the noodles into a large mixing bowl and add most of the soysauce and brown sugar mixture to the noodles and mix well.  Taste and add the rest of the soysauce mixture if needed then add the 2 TB sesame oil and mix.  A food service glove, like the one pictured above, comes in very handy.
5.  Add a tablespoon of vegetable oil to a hot wok or large pan and stir fry 1 minced garlic clove (again I use garlic press) then add the carrots, saute for a minute and lastly, and add the onions and mushrooms.  Add 1 tsp salt and a little pepper and stirfry until the vegetables are cooked, but not soggy and overcooked.  Add the vegetables and the seasoned spinach to the noodles and mix.
6.  Using the same pan, cook the meat, adding some salt and pepper if the meat is not marinated.  Again, you may omit the beef if you wish for a vegetarian dish and just add some zucchinis to step 5.  Add the meat to the noodles and mix.
7.  Mix the noodles well using your gloved hand and taste.  Add more soysauce or brown sugar according to taste.  Add some sesame seeds and mix, then sprinkle some more sesame seeds to the middle when serving for a pretty presentation.

Turkey Tomato Mabo Tofu (mild)

I LOVE spicy food!  But alas, my little ones can’t handle the heat just yet.  Although my almost 3 yr old daughter can eat kimchi as long as it’s not super spicy.  In fact, she’ll ask for a glass of water just so she can continue to eat it.  
Most mabo tofus I’ve seen at Chinese restaurants seem to be just meat with tofu and sauce.  My husband loves those, but I like to add a healthy dose of vegetables to mine.  Maybe since I’m Korean and grew up with mabo tofu swimming with vegetables, like most of our other dishes.  Did you know my mother always made spaghetti marinara sauce with ground beef, celery, bell peppers and all other sorts of vegetables she could find?  And I love it like that.  I used to think that the cook forgot or was too cheap to add vegetables to marinara sauce when I ate out because I assumed everyone put a plethora of vegetables to their marinara sauce.  Come on now, everybody knows that!  So how do I make my mabo tofu?  I use creamy tomato soup!  It actually tastes really good.  The ginger makes it very fragrant and the tomato soup just makes it extra special, even without the spiciness.  
Ingredients:
1 pack of firm tofu, cut into cubes
1 pack ground turkey
1-inch piece of fresh ginger root, minced
3 cloves of garlic, minced (or I just use a garlic press)
2 TB Vegetable Oil 
1-2 zucchinis, chopped (1 if large, 2 if small)
1 red bell pepper, chopped (any color really)
2-3 stalks of celery, chopped
1 medium onion, chopped
2-2.5 cups of chicken broth or stock
1 cup creamy tomato soup
1/4 cup water
2-3 TB corn starch
salt and pepper

1. Prep all your vegetables by chopping and mincing.
2. Heat the oil in a wok or large saucepan over high heat.  When it is hot, add the ginger and garlic and saute for a minute then add the ground turkey.  Add some salt, about 1 tsp.  
3.  When the turkey is almost cooked add the onions and all the vegetables (not the tofu).  Cook for a couple mins but don’t completely cook the vegetables just yet because you will need to add liquid to boil it and we don’t want the vegetables to get soggy.    

4.  After the vegetables are almost, but not completely, cooked, add the tofu, chicken broth, and tomato soup and bring it to a boil.

5.  While you are waiting for it to boil, mix the 1/4 cup water in a small bowl with the 2-3 tablespoons of corn starch and mix.

6.  Once it starts boiling, add 2/3 of the cornstarch mixture to the wok  and mix.  Add more cornstarch to the wok if the sauce seems too runny.  We don’t want it to become gelatin, but we don’t want it to be soupy.  Add enough cornstarch so it is in between a sauce and soup consistency.

7. Add salt and pepper to taste.

AND you are DONE!

Dish it up over rice and you’ve got yourself a healthy and very tasty meal.

Crab Rounds

This is a really simple but delicious side dish made with just a few ingredients.  The imitation crab meat from the local grocery tastes much better than the dry, frozen ones from the Korean market.  I usually buy the leg style since I like to use it to make California rolls, but the flake ones work just fine for this.

 I used one package of the crab meat, 4 eggs, 4 green onions, some mushrooms with some salt and pepper.  Mix the 4 eggs and add the crab meat (chopped or flaked), chopped green onions and sliced mushrooms (or the tiny mushrooms that don’t need to be sliced).  Then add some salt and pepper to it.

Heat a pan with some oil (I use cooking spray) and place about a tablespoon of the mix to make little rounds.  Cook over medium heat until it browns slightly then flip it and cook until the egg is done and enjoy.
We ate it as a side dish to our Seaweed Miso Soup and rice.  YUM!